Easy Cherry Pie Recipe – A Simple, Classic Dessert Anyone Can Make
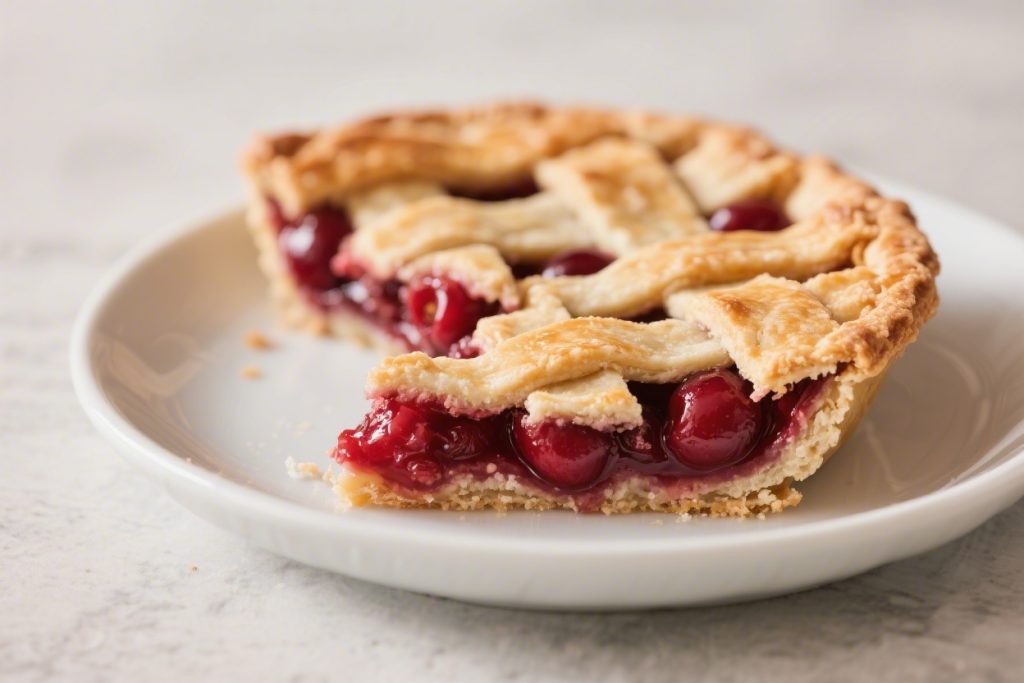
Cherry pie feels like a warm weekend afternoon: familiar, cozy, and always welcome.
This version keeps things simple without skipping on flavor. You’ll get a flaky crust, a glossy cherry filling, and that perfect sweet-tart balance in every bite.
No fancy tools. No complicated steps. Just a reliable cherry pie that turns out beautifully, even if you’re new to baking.

Easy Cherry Pie Recipe – A Simple, Classic Dessert
Ingredients
- 2 refrigerated pie crusts (store-bought or homemade, for a top and bottom crust)
- 5 cups pitted cherries (fresh or frozen; sweet cherries work best)
- 3/4 to 1 cup granulated sugar (adjust to taste and sweetness of cherries)
- 1/4 cup cornstarch
- 1 tablespoon lemon juice
- 1 teaspoon vanilla extract
- 1/4 teaspoon almond extract (optional but delicious)
- 1/4 teaspoon salt
- 1 tablespoon unsalted butter (cut into small pieces, for dotting the filling)
- 1 egg (for egg wash)
- 1 tablespoon milk or water (for egg wash)
- Coarse sugar (optional, for sprinkling on top)
Instructions
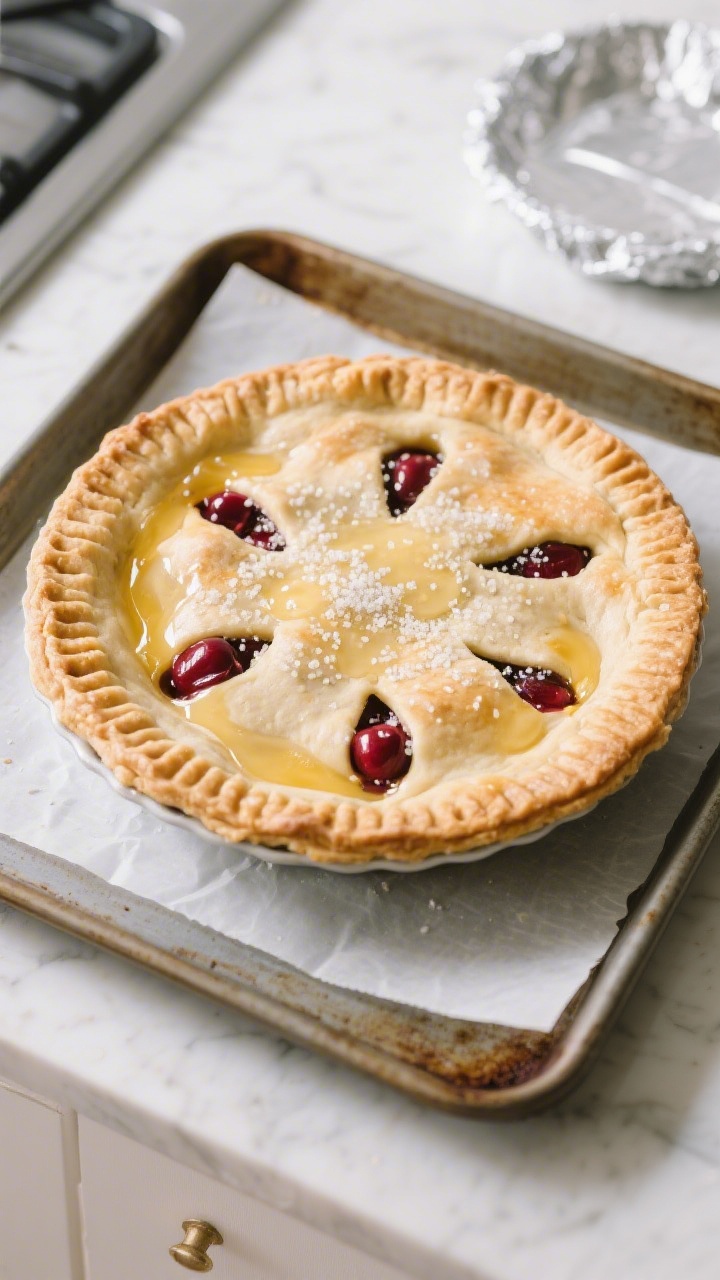
- Prep the oven and pan. Heat your oven to 425°F (220°C). Place a baking sheet on the lower rack to catch any drips. Set out a 9-inch pie dish.
- Make the filling. In a large bowl, combine the cherries, sugar, cornstarch, lemon juice, vanilla, almond extract (if using), and salt.Stir until the cherries look glossy and the cornstarch is fully mixed in. If using frozen cherries, keep them cold and don’t thaw completely—just break up any clumps.
- Fit the bottom crust. Unroll one pie crust and ease it into the pie dish. Press it gently into the corners without stretching.Let the edges hang over the rim.
- Fill the pie. Pour in the cherry mixture and spread it evenly. Dot the top with small pieces of butter. This adds richness and helps the filling set smoothly.
- Add the top crust. Place the second crust over the filling.Trim excess dough, leaving about 1 inch overhang. Fold the top crust under the bottom crust and crimp the edges with your fingers or a fork to seal.
- Vent and glaze. Cut 4–6 small slits in the top crust to vent steam. Whisk the egg with milk or water and brush it over the top crust.Sprinkle with coarse sugar if you like a little crunch.
- Bake hot, then reduce. Bake at 425°F (220°C) for 15 minutes. Without opening the oven, reduce the temperature to 375°F (190°C) and bake for another 35–45 minutes. The pie is done when the crust is deep golden and the filling is bubbling through the vents.
- Protect the edges if needed. If the crust browns too fast, tent the pie with foil or use a pie shield during the last 20 minutes.
- Cool before slicing. Let the pie cool on a rack for at least 3 hours.This is key. The filling needs time to thicken so your slices are clean and not runny.
Why This Recipe Works

This recipe leans on a few smart tricks to make your pie both easy and delicious.
First, we use a mix of sweet cherries and a touch of lemon to keep the flavor bright, not flat.
Second, a straightforward thickener—cornstarch—gives the filling a clean, glossy set without making it gummy.
Third, store-bought pie dough keeps things stress-free, but you can swap in homemade if you prefer.
Finally, a short rest after baking helps the filling firm up, so every slice holds together.
Ingredients
- 2 refrigerated pie crusts (store-bought or homemade, for a top and bottom crust)
- 5 cups pitted cherries (fresh or frozen; sweet cherries work best)
- 3/4 to 1 cup granulated sugar (adjust to taste and sweetness of cherries)
- 1/4 cup cornstarch
- 1 tablespoon lemon juice
- 1 teaspoon vanilla extract
- 1/4 teaspoon almond extract (optional but delicious)
- 1/4 teaspoon salt
- 1 tablespoon unsalted butter (cut into small pieces, for dotting the filling)
- 1 egg (for egg wash)
- 1 tablespoon milk or water (for egg wash)
- Coarse sugar (optional, for sprinkling on top)
How to Make It
- Prep the oven and pan. Heat your oven to 425°F (220°C). Place a baking sheet on the lower rack to catch any drips. Set out a 9-inch pie dish.
- Make the filling. In a large bowl, combine the cherries, sugar, cornstarch, lemon juice, vanilla, almond extract (if using), and salt. Stir until the cherries look glossy and the cornstarch is fully mixed in. If using frozen cherries, keep them cold and don’t thaw completely—just break up any clumps.
-
Fit the bottom crust. Unroll one pie crust and ease it into the pie dish. Press it gently into the corners without stretching.
Let the edges hang over the rim.
Subscribe to Cookwarely
Get updates on the latest posts and more from Cookwarely straight to your inbox.
- Fill the pie. Pour in the cherry mixture and spread it evenly. Dot the top with small pieces of butter. This adds richness and helps the filling set smoothly.
-
Add the top crust. Place the second crust over the filling.
Trim excess dough, leaving about 1 inch overhang. Fold the top crust under the bottom crust and crimp the edges with your fingers or a fork to seal.
- Vent and glaze. Cut 4–6 small slits in the top crust to vent steam. Whisk the egg with milk or water and brush it over the top crust. Sprinkle with coarse sugar if you like a little crunch.
- Bake hot, then reduce. Bake at 425°F (220°C) for 15 minutes. Without opening the oven, reduce the temperature to 375°F (190°C) and bake for another 35–45 minutes. The pie is done when the crust is deep golden and the filling is bubbling through the vents.
- Protect the edges if needed. If the crust browns too fast, tent the pie with foil or use a pie shield during the last 20 minutes.
- Cool before slicing. Let the pie cool on a rack for at least 3 hours. This is key. The filling needs time to thicken so your slices are clean and not runny.
Keeping It Fresh
Once cooled, cover the pie loosely with foil and keep it at room temperature for up to 2 days. For longer storage, refrigerate it for up to 4 days.
If you prefer warm slices, reheat individual pieces in a 300°F (150°C) oven for 10–12 minutes.
To freeze, wrap the fully cooled pie well in plastic, then foil, and freeze for up to 2 months.
Thaw in the fridge overnight and warm in the oven to refresh the crust.

Why This is Good for You
Cherry pie may be a treat, but cherries bring a few perks.
They’re rich in antioxidants and vitamin C, and they offer natural anti-inflammatory compounds. Compared to heavy cream desserts, a fruit pie gives you fiber from real fruit.
You can also control the sweetness: use the lower end of the sugar range if your cherries are very ripe.
For a lighter option, serve smaller slices and pair with plain yogurt instead of ice cream.
Subscribe to Cookwarely
Get updates on the latest posts and more from Cookwarely straight to your inbox.
What Not to Do
- Don’t skip the cooling time. Cutting too soon makes a soupy mess. Give it time to set.
- Don’t overstuff the pie. Too much filling will bubble over and prevent the center from cooking evenly.
- Don’t forget the vents. Steam needs an escape route to prevent soggy crust and blowouts.
- Don’t thaw cherries completely if using frozen. Excess liquid can water down the filling. Keep them cold and measure the cornstarch as written.
- Don’t underbake. A golden crust and active bubbling mean the starch has cooked and the filling will set.
Variations You Can Try
- Brown sugar twist: Swap 1/3 cup of the granulated sugar for brown sugar for a hint of caramel warmth.
- Spiced cherry: Add 1/2 teaspoon ground cinnamon and a pinch of nutmeg for a cozy, bakery-style flavor.
-
Lattice top: Cut the top crust into strips and weave a lattice.
It looks pretty and helps moisture escape.
- Crumb topping: Replace the top crust with a simple streusel (flour, brown sugar, cold butter, and a pinch of salt) for a crisp, buttery finish.
- Gluten-free: Use a gluten-free pie crust and substitute cornstarch with arrowroot or tapioca starch in the same amount.
- Tart cherry mix: Combine sweet cherries with up to 1 cup tart cherries for extra tang. Increase sugar slightly to balance.
Wrapping Up
This cherry pie keeps things easy, but never boring.
With a flaky crust, a bright cherry filling, and a few smart steps, you’ll get a pie that slices clean, tastes fresh, and looks like it came from a bakery.
Keep the ingredients simple, don’t rush the cool time, and let the oven do the heavy lifting.
Serve it warm or room temp, with ice cream or plain—either way, it’s a classic for a reason.
FAQ
Can I use canned cherry pie filling?
Yes, but the flavor and texture won’t be as bright or fresh. If you use canned filling, you can still add a splash of lemon juice and a bit of vanilla to improve the taste.
The baking time remains about the same.
What if my cherries are very tart?
Increase the sugar to the higher end of the range, or add an extra tablespoon. Taste a cherry from the bowl before you assemble the pie and adjust as needed. A pinch more salt can also round out the flavor.
How do I keep the bottom crust from getting soggy?
Use a hot oven to start, and bake on a preheated baking sheet.
Subscribe to Cookwarely
Get updates on the latest posts and more from Cookwarely straight to your inbox.
You can also brush the bottom crust with a thin layer of egg white before filling to create a barrier. Venting the top well helps excess moisture escape.
Can I make the pie ahead?
Yes. Assemble the pie, then freeze it unbaked.
When ready to bake, place it straight from the freezer into a preheated oven. Add 15–20 extra minutes to the baking time and watch the crust color.
Do I have to use almond extract?
No, but it adds a classic cherry bakery note. If you don’t like almond, leave it out or replace it with more vanilla.
The pie will still taste great.
What thickener works best besides cornstarch?
Tapioca starch or arrowroot both work well. Use the same amount as cornstarch, and ensure the filling comes to a good bubble in the oven so it activates and sets properly.
Why is my filling cloudy or chalky?
That can happen if the starch didn’t fully cook. Make sure you see steady bubbling through the vents and give it enough oven time.
Also, let the pie cool completely so the filling finishes setting.
Can I reduce the sugar?
Yes, especially if your cherries are very sweet. Try 1/2 cup sugar to start and taste a cherry from the mixed filling.
Keep in mind that less sugar can mean a looser set and a slightly less glossy finish.