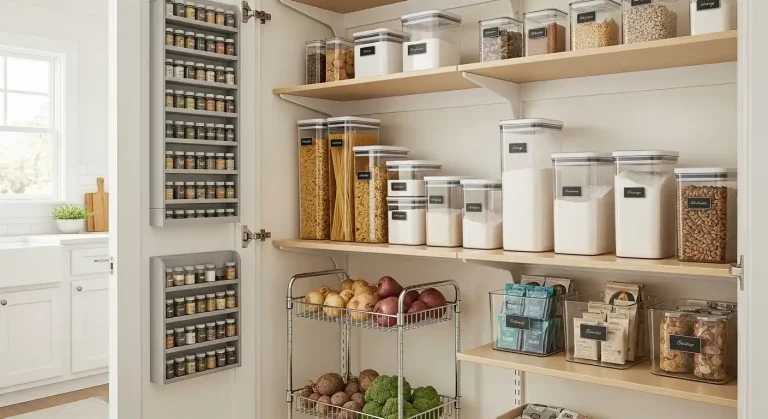
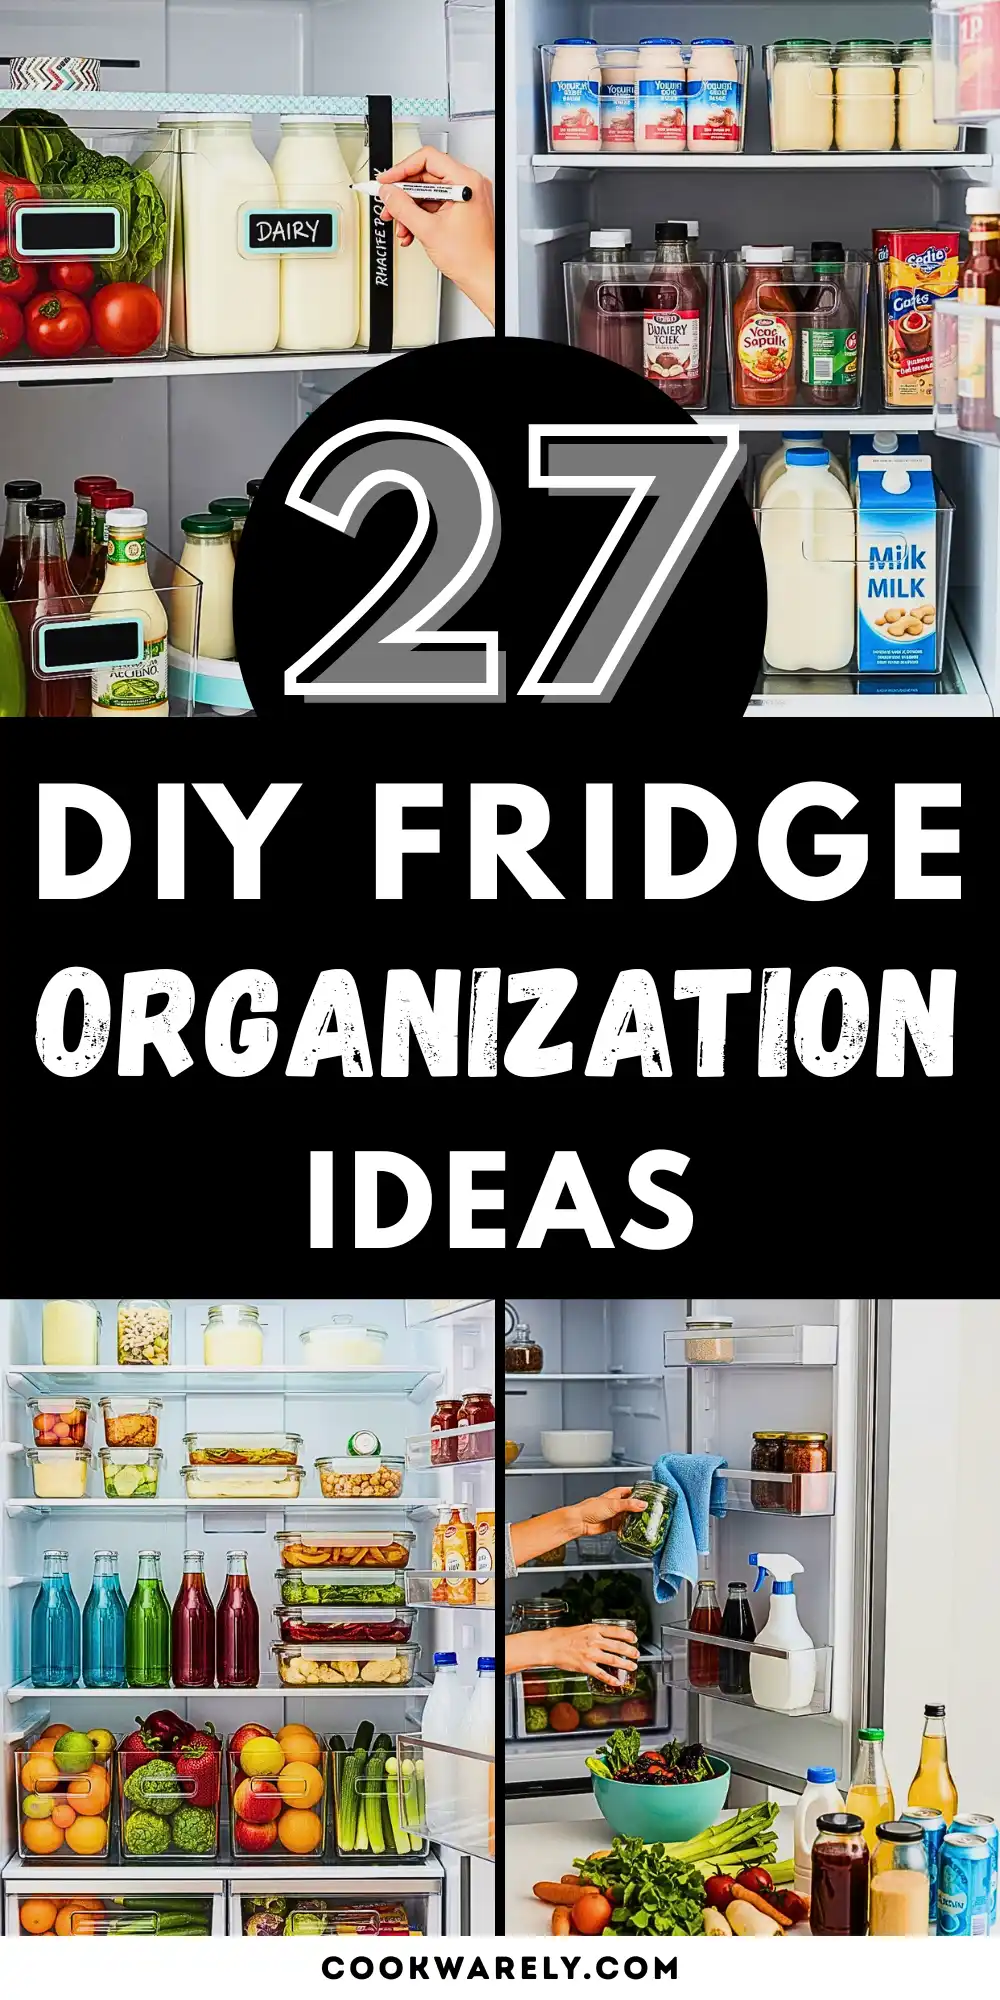
27 DIY Fridge Organization Ideas to Maximize Space
Keep your food fresh and your fridge clutter-free with these smart DIY organization ideas. They’re simple, stylish, and practical for any home.
If your fridge often feels like a black hole where leftovers disappear, you’re not alone.
A messy refrigerator can make it hard to find what you need, lead to wasted food, and even cause unnecessary stress during mealtime.
That’s why fridge organization is more than just a chore—it’s a smart way to keep your kitchen running smoothly.
And the best part? You don’t need to spend a fortune on containers or gadgets.
With some simple DIY solutions, you can create a fridge that’s tidy, functional, and easy to maintain.
To get you started, we’ve gathered 27 DIY fridge organization ideas that will help you keep things fresh and under control.
Whether you have a large family fridge or a compact one, these ideas will make a noticeable difference.
Why Organizing Your Fridge Matters
A tidy fridge isn’t just about aesthetics (though a color-coordinated lineup of produce is undeniably satisfying).
Here’s why it really matters:
- Saves money: You’ll actually eat what you buy instead of letting it rot in the back.
- Saves time: No more digging through containers to find last night’s leftovers.
- Improves health: When healthy snacks are prepped and visible, you’re more likely to grab them.
- Prevents waste: Proper organization reduces spoilage.
How to Start Before Organizing

Before diving into DIY hacks, do a quick reset:
- Declutter: Toss expired food, old sauces, and forgotten leftovers.
- Deep clean: Wipe down shelves and drawers with warm soapy water.
- Sort by category: Group foods (dairy, drinks, condiments, produce) so you know what you’re working with.
- Take inventory: Make note of what you always store, so you can plan your DIY hacks around your habits.
DIY Fridge Organization Ideas
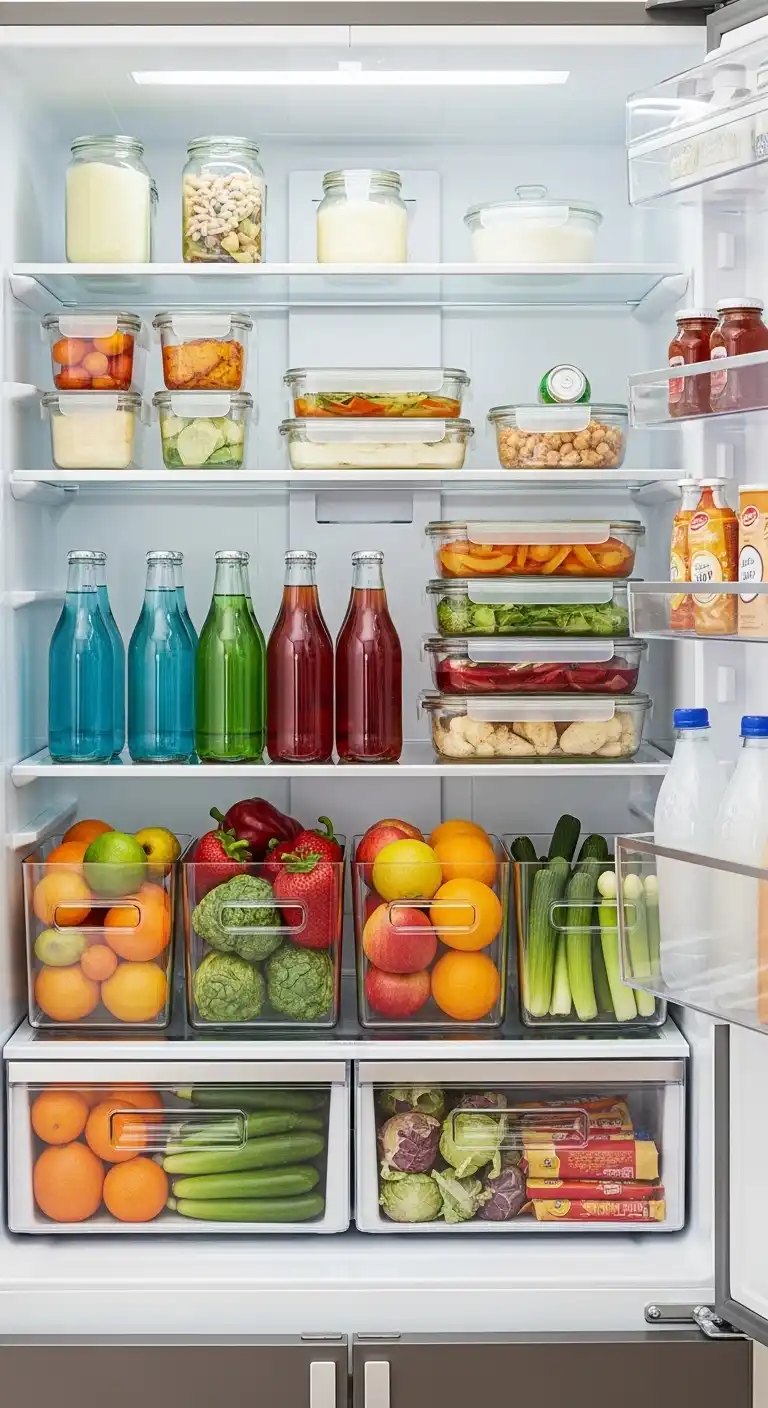
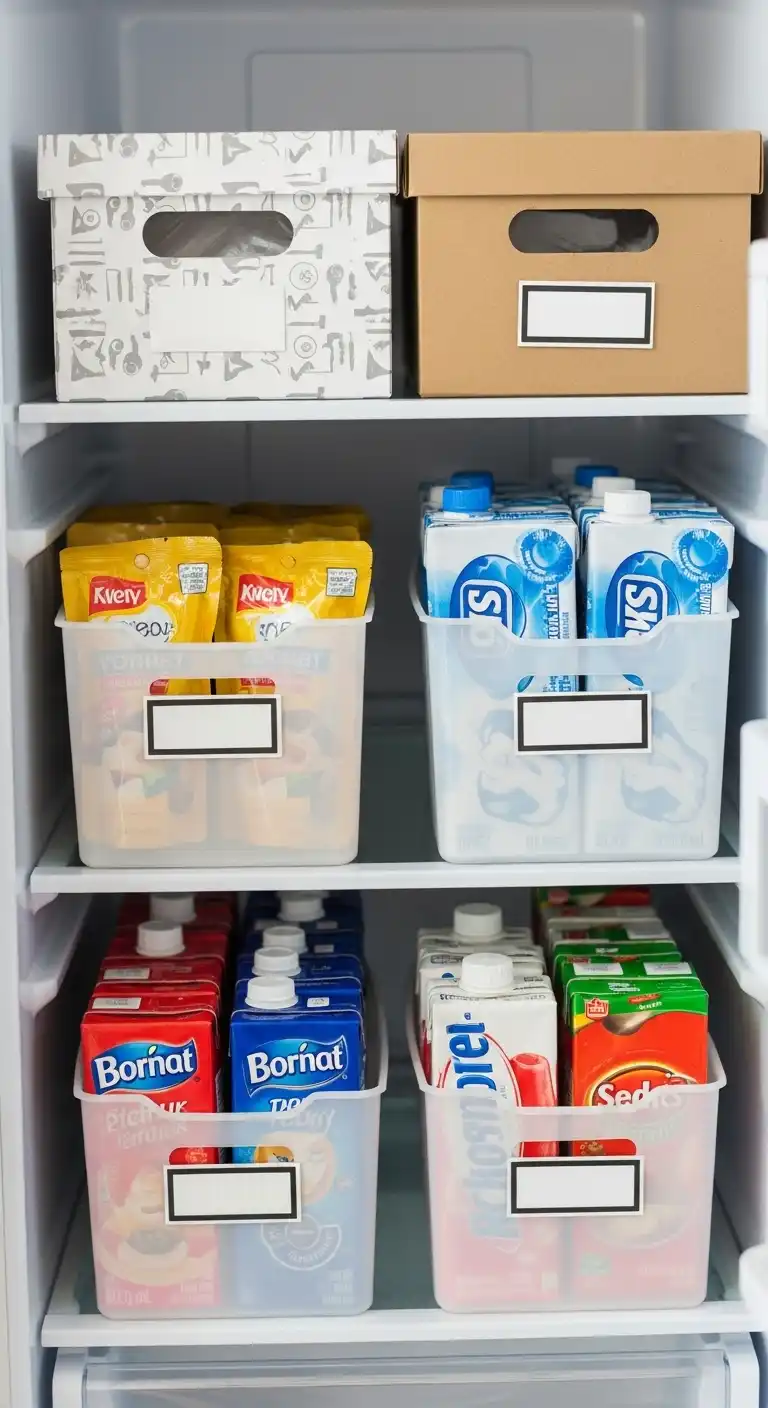
1. Use Clear Bins for Easy Visibility
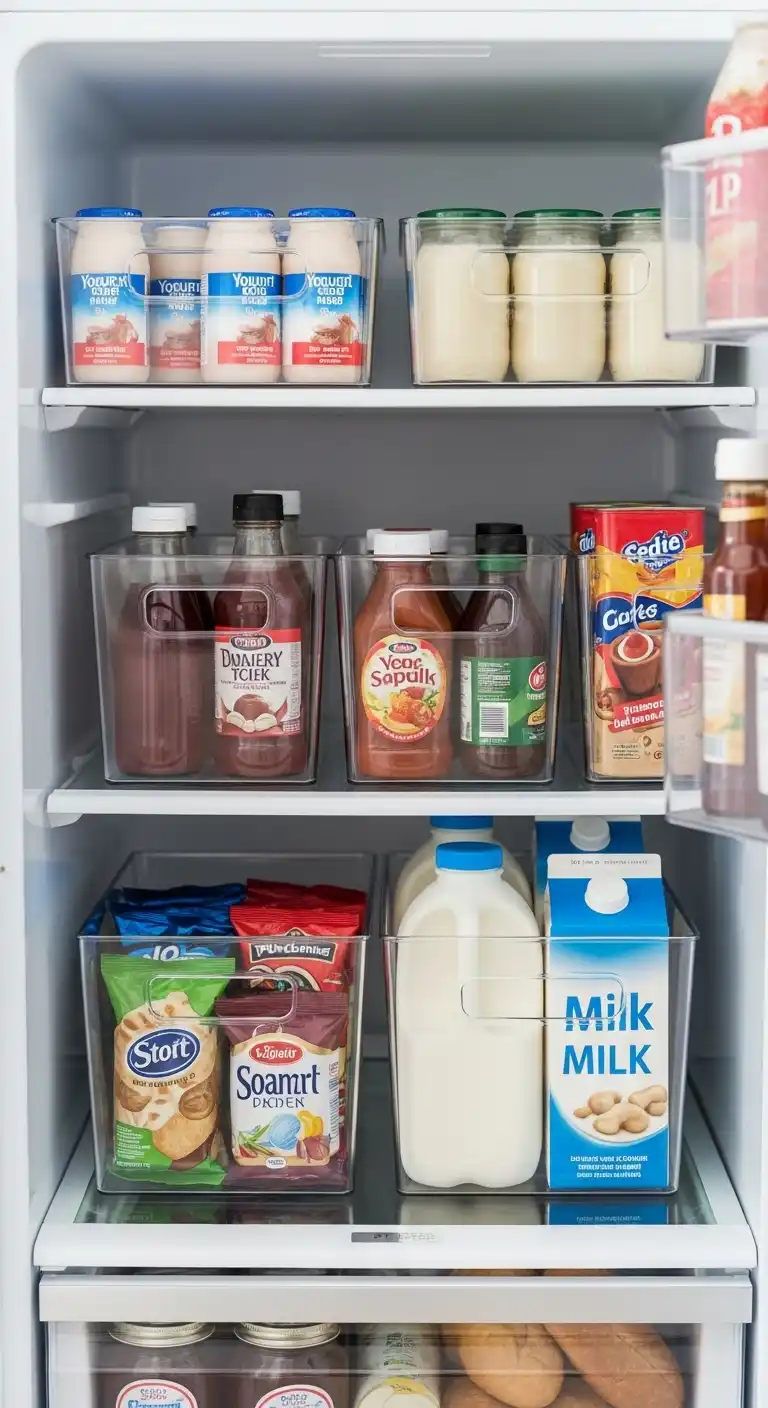
Clear bins are a DIYer’s dream.
You can grab a few from the dollar store or repurpose storage boxes you already own.
Group items by category—yogurts in one, condiments in another, snacks in their own bin.
This way, you’re not shuffling jars around just to reach the milk.
DIY Tip:
If you don’t want to buy bins, cut the bottom off sturdy cardboard boxes, wrap them in contact paper or gift wrap, and voilà—custom fridge bins.
Why it works:
Clear bins make everything visible and easy to pull out.
Plus, they stop random spills from spreading all over your fridge shelves.
2. Label Everything
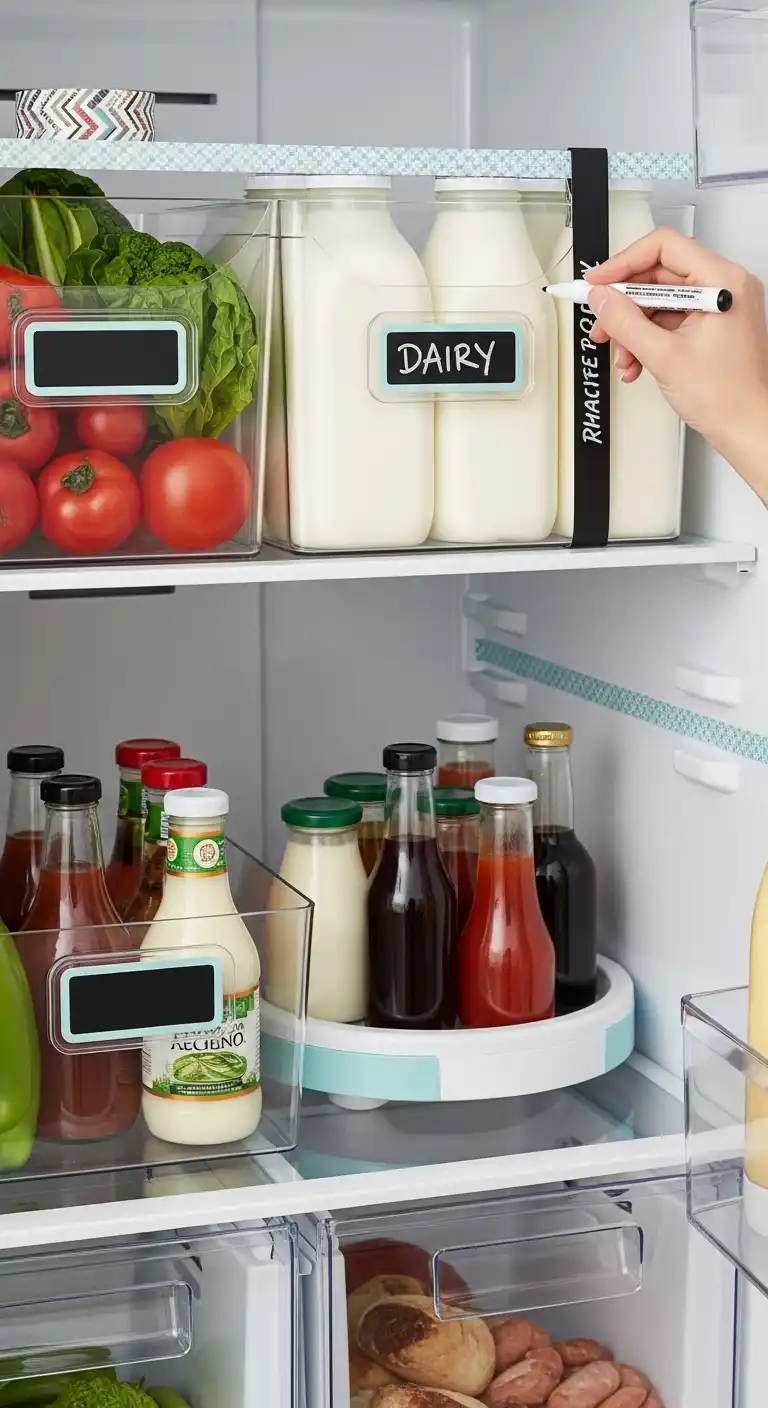
You can have the most organized fridge, but if no one knows where things belong, chaos returns.
Label bins, shelves, and even drawers so family members know where to put stuff back.
DIY Tip:
Use washi tape or chalkboard labels for a budget-friendly solution.
You can write directly on tape with a marker and peel it off when you want to change it up.
Why it works:
Labels keep your system consistent.
It’s especially useful in shared households where six people are all using the same fridge.
3. Lazy Susan for Condiments
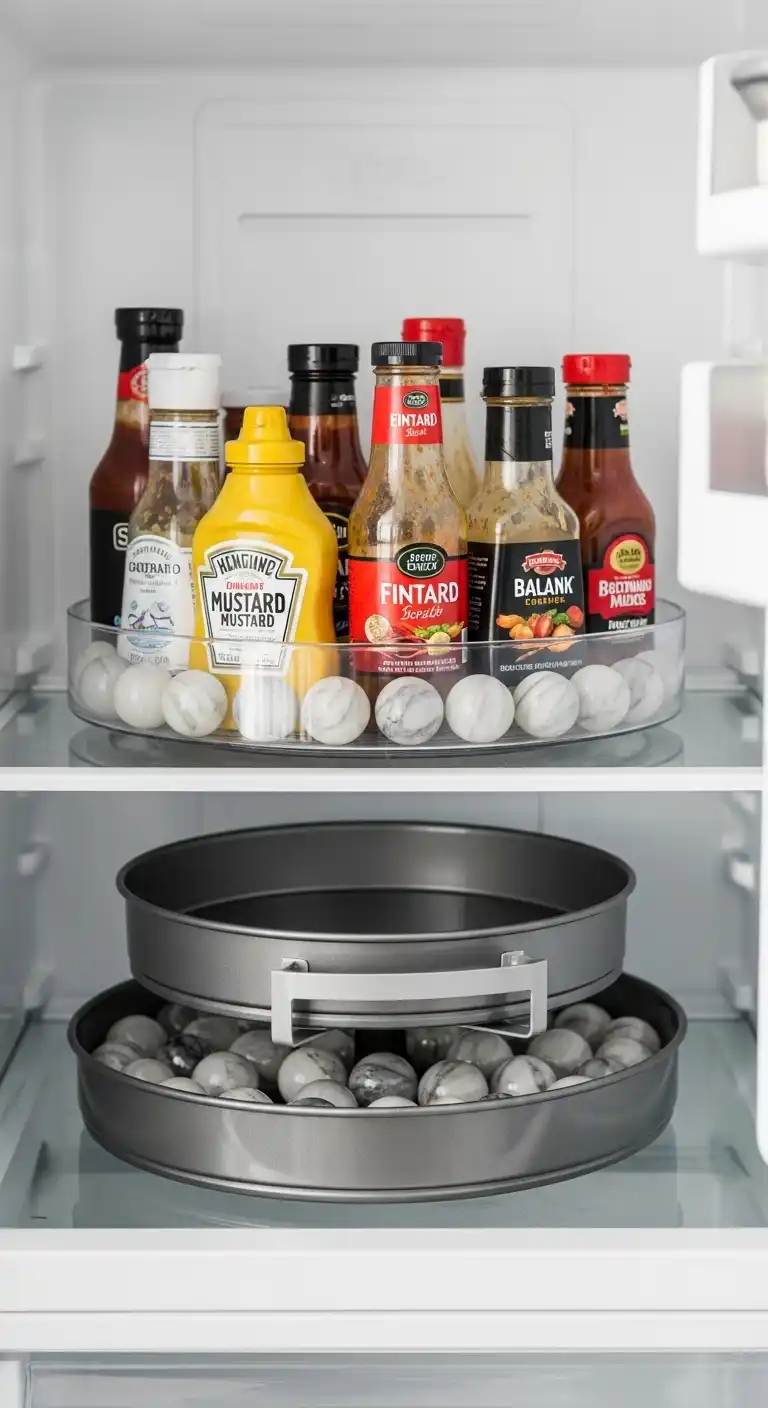
We all know the “condiment graveyard” at the back of the fridge.
Enter the Lazy Susan.
Place one on a shelf, line up your sauces and dressings, and simply spin to grab what you need.
DIY Tip:
If you don’t have one, make your own by stacking two round baking pans with marbles in between.
Instant Lazy Susan, no shopping required.
Why it works:
No more losing half-full mustard bottles to the abyss. Everything stays visible and accessible.
4. Mason Jars for Prepped Produce
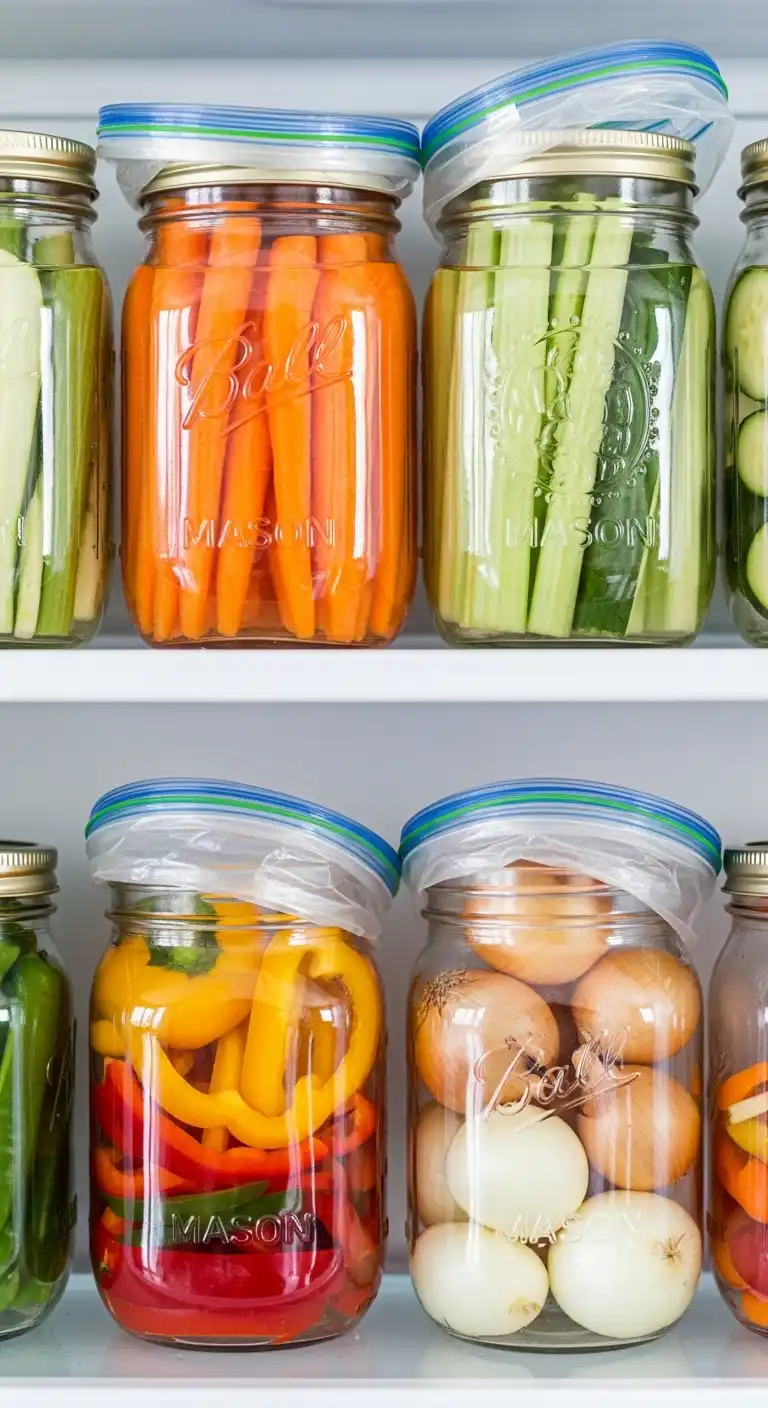
Cut veggies often get shoved in plastic bags and forgotten.
Instead, store them in mason jars filled with water (carrots, celery, cucumbers) or in airtight jars (peppers, onions).
The jars keep everything crisp and easy to see.
DIY Tip:
Repurpose old pasta sauce jars instead of buying new ones.
Just give them a good wash and maybe a cute label.
Why it works:
Clear jars = instant motivation to snack healthy. Plus, produce actually lasts longer.
5. Binder Clips to Hang Bags
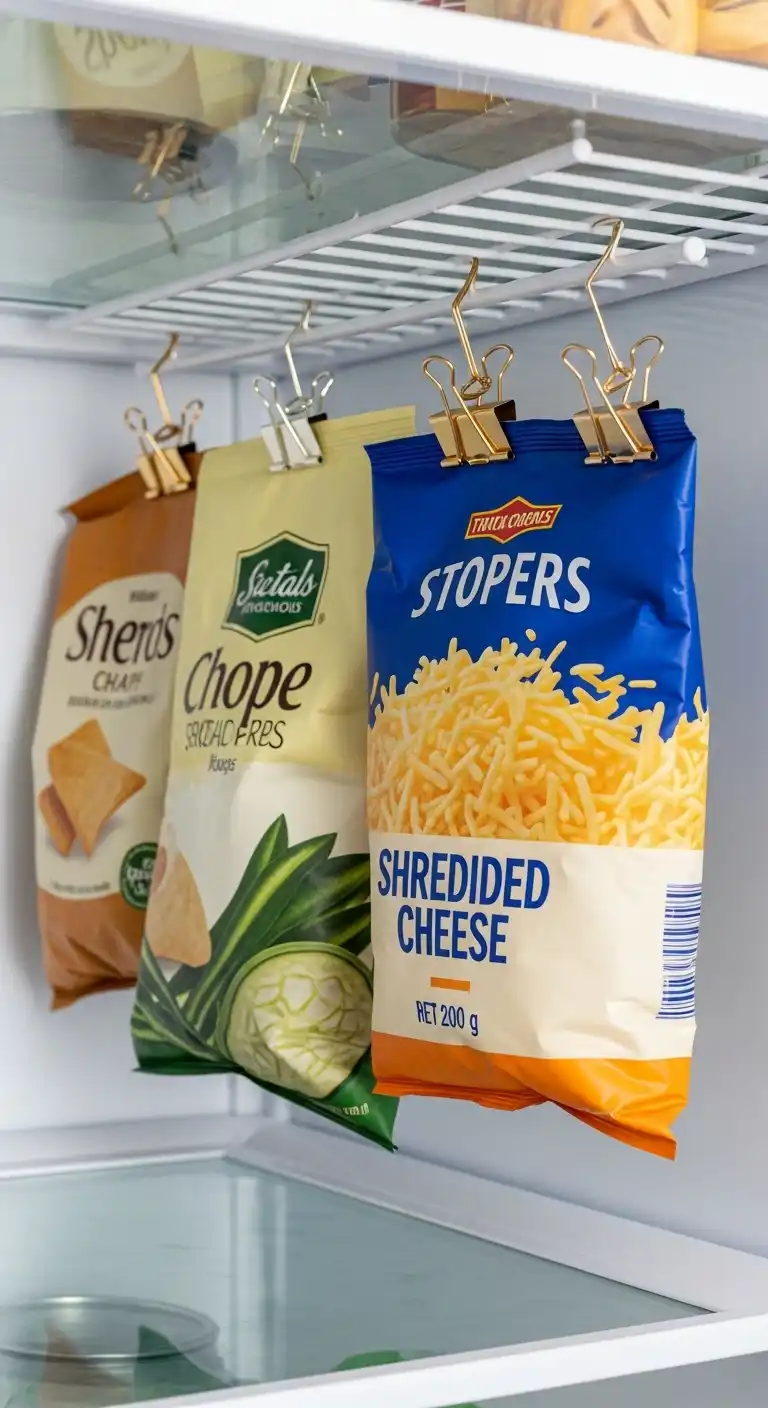
Ever notice those little wire racks under fridge shelves?
You can clip chip bags, veggie bags, or even shredded cheese bags directly onto them with binder clips.
Suddenly, you’ve got vertical hanging storage you didn’t know existed.
DIY Tip:
Spray paint binder clips in gold, white, or pastel colors to make them look chic.
Why it works:
It frees up shelf space and keeps bags from tumbling everywhere.
6. Egg Carton Sauce Holders
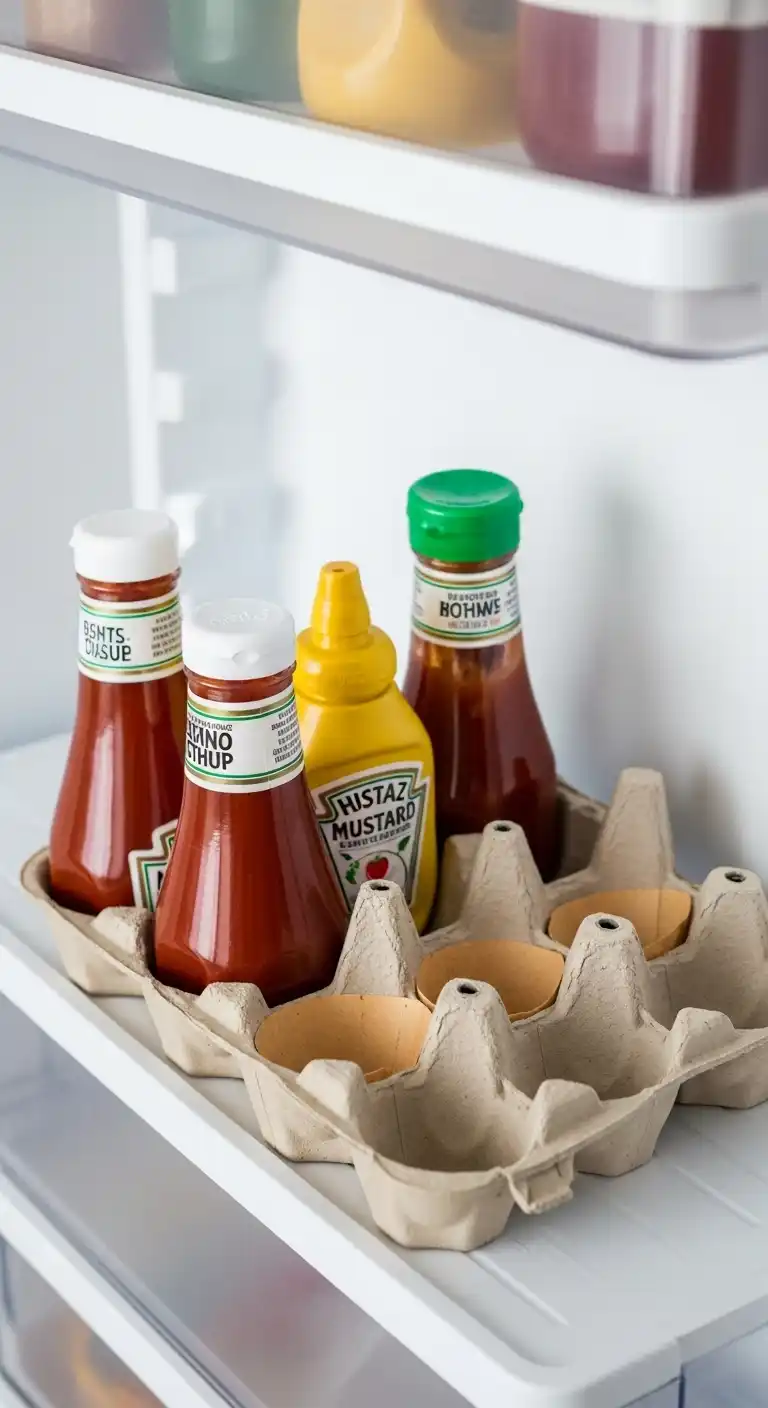
Instead of letting condiment bottles tip over, cut up an old egg carton and place it on your fridge door shelf.
Store upside-down ketchup or mustard bottles in the slots—they’ll stand upright and be ready to pour instantly.
DIY Tip:
Line the carton with contact paper to make it wipeable and spill-resistant.
Why it works:
Keeps small bottles stable, reduces clutter, and helps you use every last drop.
7. Repurpose Magazine Holders for Snacks
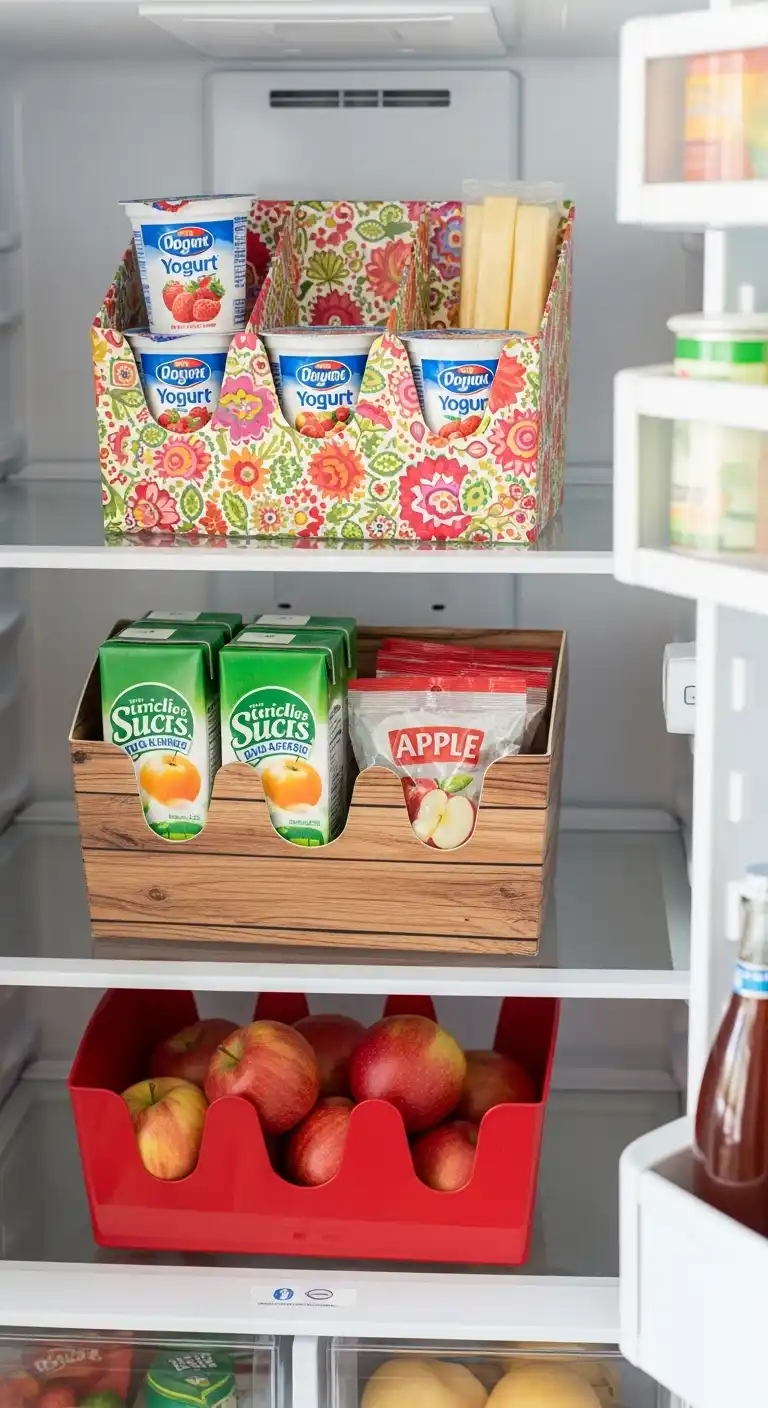
Those cheap cardboard or plastic magazine holders from the dollar store?
They’re the perfect size to stand upright in your fridge.
Use them to store yogurt cups, juice boxes, or even apples.
DIY Tip:
Wrap plain magazine holders with patterned paper or vinyl to make them match your kitchen aesthetic.
Why it works:
They keep snacks organized and prevent smaller items from rolling around your shelves.
8. Use Drawer Dividers for Deli Meats and Cheeses
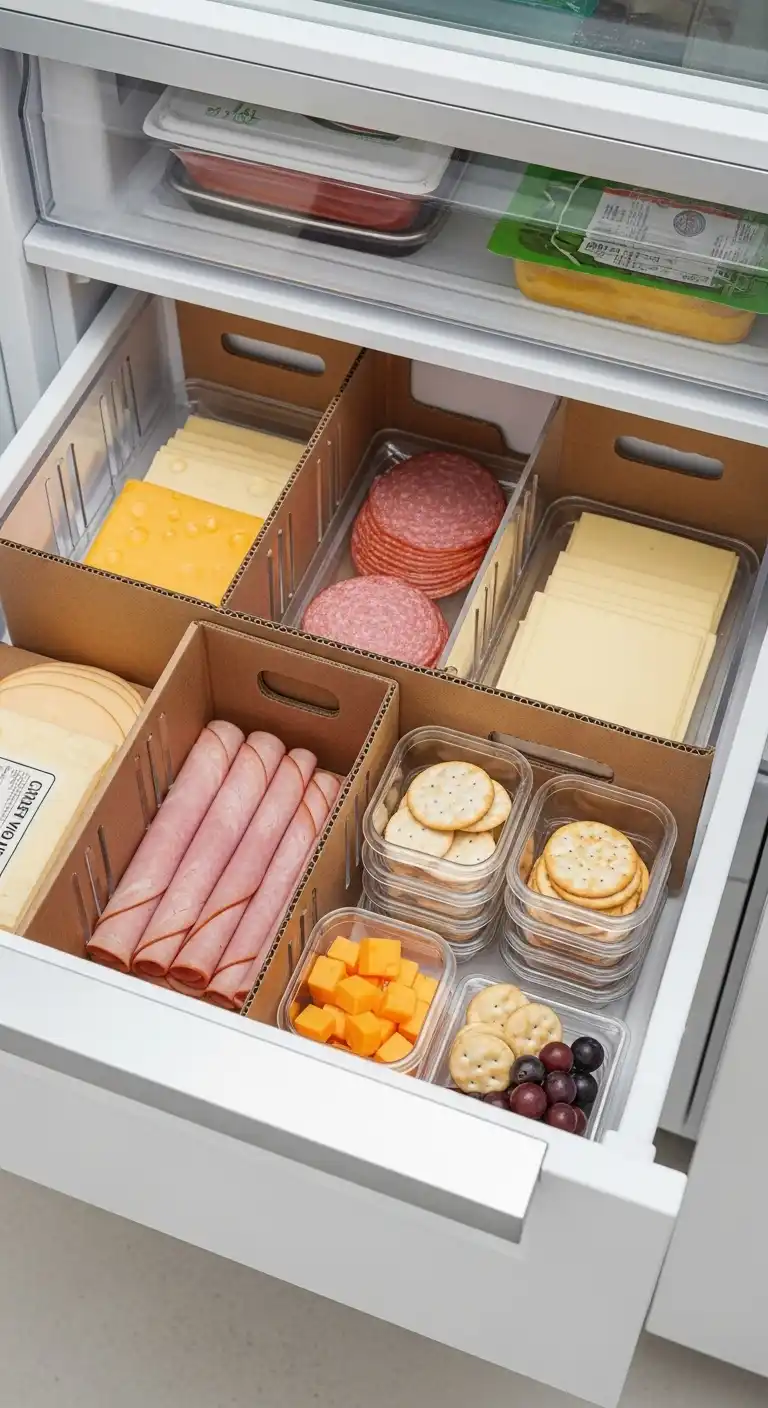
That fridge drawer meant for deli meats and cheeses?
It can quickly turn into a disaster zone where slices get squished and forgotten.
Subscribe to Cookwarely
Get updates on the latest posts and more from Cookwarely straight to your inbox.
The solution: drawer dividers.
You can easily make your own using sturdy cardboard, acrylic sheets, or even small plastic containers.
By dividing the space, each type of food gets its own home—no more digging for that last slice of cheddar under three packs of ham.
DIY Tip:
Cut cardboard to size, cover it with clear contact paper (so spills don’t ruin it), and slip them into the drawer as dividers.
This gives you a budget-friendly version of custom drawer organization without spending a dime.
Why it works:
- Keeps flavors from mixing (no one wants Swiss cheese that smells like salami).
- Helps you spot what’s running low at a glance.
- Encourages portion control since items are grouped neatly.
For extra organization, you can go a step further and pre-portion cheese slices or roll deli meats before storing.
This makes sandwiches or snack boards quicker to assemble.
You could even dedicate one section to snack packs—pair cheese cubes with crackers or grapes, so you (or your kids) have grab-and-go options ready.
Instead of having to sort through one jumbled drawer every time, you’ll open it to find a mini grocery store section—everything neatly categorized and easy to reach.
9. Repurpose Old Tupperware as Snack Zones
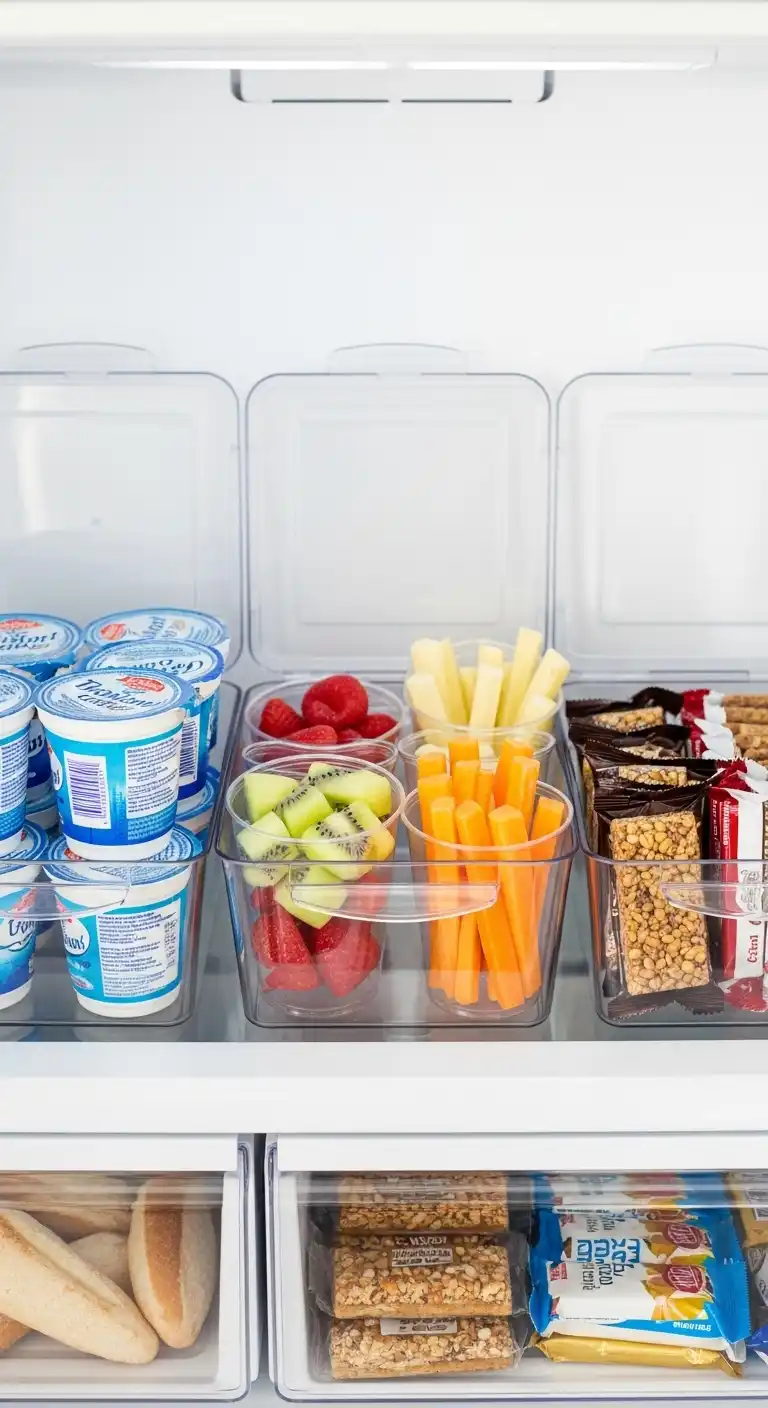
You know those mismatched plastic containers that have lost their lids?
Don’t throw them out—turn them into snack zones in your fridge.
Dedicate one for fruit cups, another for yogurt, another for cheese sticks or granola bars.
The key is visibility + accessibility, especially if you’ve got kids (or snack-loving adults) in the house.
DIY Tip:
To make it fun, label each container with chalkboard tape or colorful stickers.
For example: “After School Snacks” or “Movie Night Treats.”
Why it works:
- Keeps snacks from being scattered across shelves.
- Makes it easier for kids to grab their own food without pulling everything out.
- Helps with portion control—when the “snack box” looks low, you know it’s time to restock.
To level this up, try creating day-of-the-week snack boxes.
Each container can be packed with different small bites (apple slices, nuts, a cheese stick), and everyone just grabs the box for that day.
It’s like meal-prepping, but on a smaller, snack-friendly scale.
Instead of random snacks being shoved into every corner, you’ll end up with a fridge that looks intentional and pretty, even if you only used leftover plastic containers.
10. File Organizer for Beverage Storage

Soda cans, sparkling water, or even small juice bottles can hog precious shelf space if they’re stacked haphazardly.
Enter the file organizer hack.
Those plastic or metal magazine/file holders from your office or dollar store can be laid on their side in the fridge.
Suddenly, you’ve got a perfectly shaped beverage dispenser.
DIY Tip:
Line the inside with contact paper or non-slip shelf liner to prevent rattling.
If you’re feeling crafty, spray-paint it in a pastel or metallic finish to make it look chic.
Why it works:
- Keeps cans/bottles stacked neatly without rolling around.
- Frees up shelf space above since beverages are now contained.
- Makes it easy to see when you’re running low.
For larger families or avid drinkers, try stacking two organizers to create a mini beverage station in your fridge.
You could even separate by type—sparkling water in one, soda in another, mini juice boxes in a third.
No more avalanche of cans every time someone opens the fridge door.
Instead, it feels like you’ve got a little mini-fridge convenience store right at home.
11. DIY Shelf Risers for Double Storage
Tall bottles like juice or milk can leave a lot of wasted vertical space in your fridge.
The fix? DIY shelf risers.
You can easily make these from wire racks (the kind used in cabinets), sturdy plastic bins, or even a repurposed cooling rack.
By creating a second “level,” you instantly double your storage.
DIY Tip:
Don’t want to buy anything?
Stack sturdy Tupperware containers upside down to act as risers and place lighter items on top (like yogurts or butter).
It’s a makeshift shelf that works in a pinch.
Why it works:
- Maximizes vertical space in tall areas.
- Keeps items separated by category—drinks on bottom, snacks on top.
- Makes it easier to see smaller items that would otherwise get lost.
This hack works especially well for things like lunch prep.
Imagine your bottom level holds meal-prep containers for the week, while the top riser has your sauces, yogurts, or snack bags.
Everything has a home, nothing is buried, and your fridge feels instantly more spacious.
12. Tension Rods as Dividers
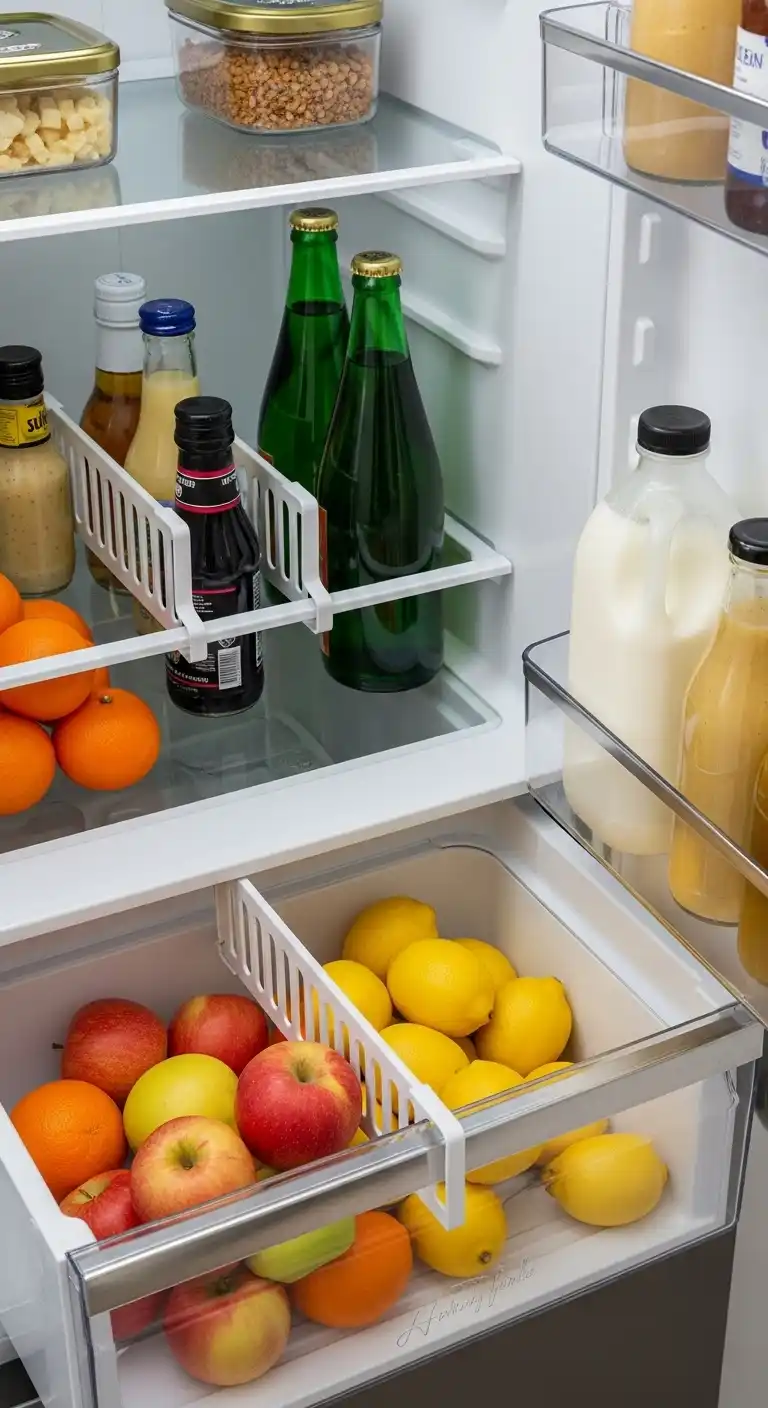
This one is genius: small tension rods (the kind used for curtains) can be placed inside your fridge to create instant dividers.
For example, use them in a bottom drawer to section off apples, oranges, and lemons, so they’re not rolling into each other.
Or use them upright on a shelf to keep bottles from tipping over.
DIY Tip:
Spray-paint rods to match your fridge interior (white, black, or even pastel) so they blend in.
Why it works:
- Turns one big drawer into multiple sections.
- Keeps bottles from sliding around every time you open the door.
- Super customizable—you can move or remove them anytime.
This is one of the most versatile hacks because tension rods come in different lengths and can be adjusted to fit any space.
You could even make a mini “juice box corral” or keep salad dressings from sliding into your milk jug.
It’s a budget-friendly trick that makes your fridge look instantly more organized without buying new containers.
13. DIY Chalkboard Inventory on the Door
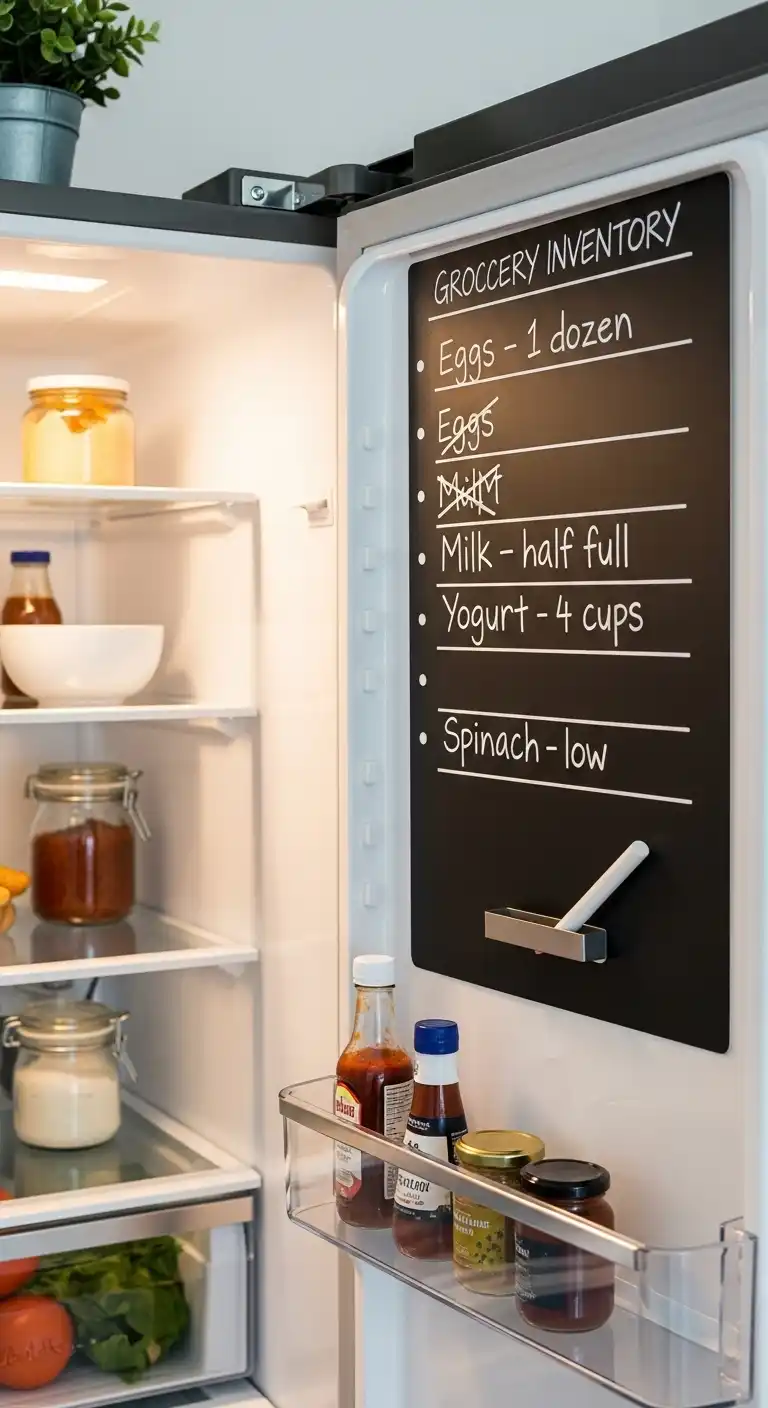
Ever buy a second jar of mayo only to find three hiding in the back of the fridge?
That’s where a chalkboard inventory system comes in handy.
You can either paint the inside of your fridge door with chalkboard paint (yes, it works!) or stick on a peel-and-stick chalkboard sheet.
Write down what you have, cross it off when you use it, and update it during grocery runs.
DIY Tip:
If you don’t want chalk dust, use a dry-erase sheet instead.
Magnetic whiteboards can also stick right onto the fridge door interior.
Why it works:
- Reduces food waste (no more forgotten duplicates).
- Makes meal planning easier since you know what’s available.
- Involves the whole family—kids can help update it.
Imagine never having to wonder if you’re out of eggs again.
A quick glance at the door tells you exactly what you’ve got, making this hack one of the smartest long-term DIY solutions.
Subscribe to Cookwarely
Get updates on the latest posts and more from Cookwarely straight to your inbox.
14. Repurpose Shoeboxes for Produce Storage
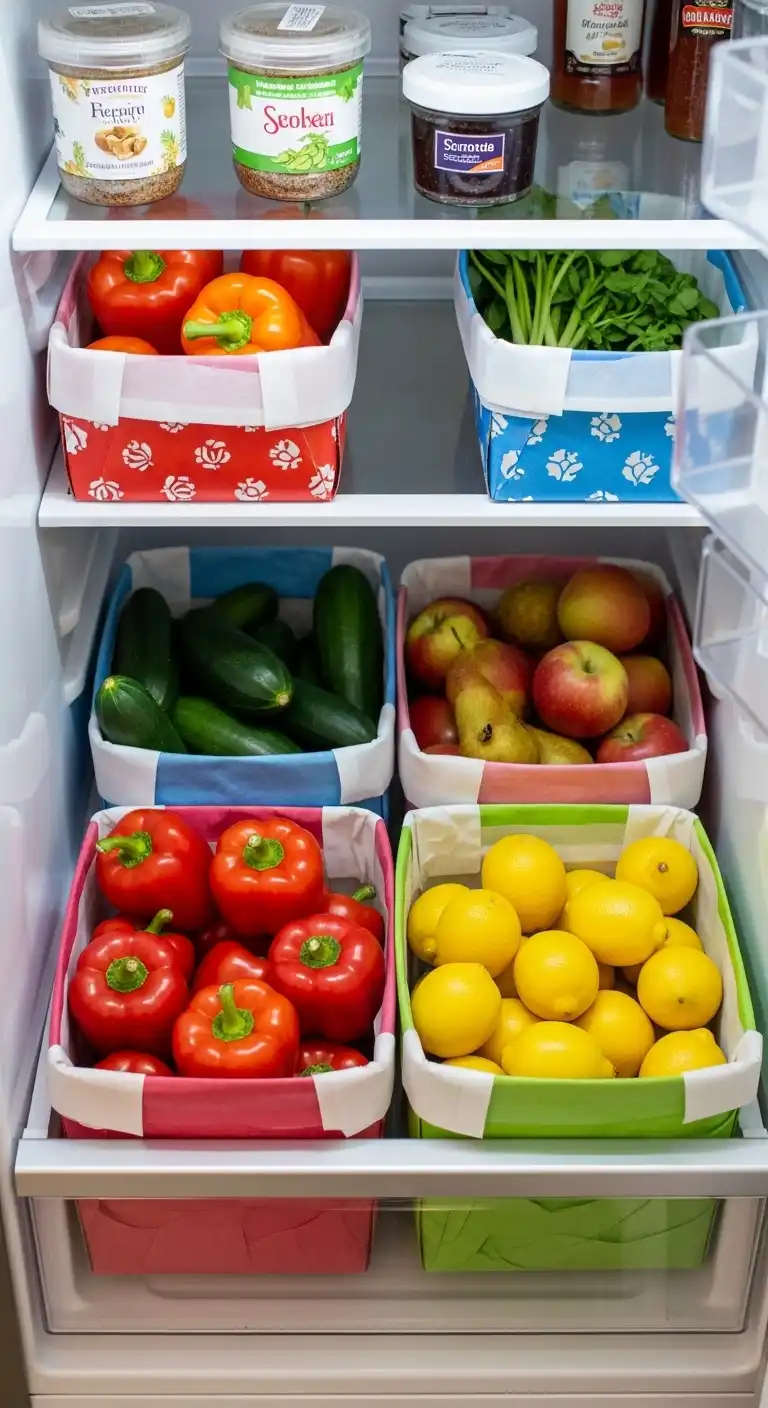
Shoeboxes may seem like an odd choice, but with a little creativity, they’re perfect for produce storage.
Line them with wax paper or contact paper, and they become durable bins that fit nicely in fridge drawers or on shelves.
Sort veggies (like peppers, cucumbers, zucchini) or fruits (apples, pears, lemons) by type.
DIY Tip:
Wrap shoeboxes in colorful vinyl or adhesive paper to make them wipeable and spill-proof. Plus, they’ll look way more stylish.
Why it works:
- Creates cheap but effective storage bins.
- Helps keep produce separate, preventing bruising.
- Lets you easily pull out a whole category at once (like a “fruit box” or “veggie box”).
This is especially handy if you buy in bulk.
Instead of piling everything into the fridge drawer and losing track, shoebox bins let you organize like a pro—without spending money on fancy acrylic containers.
15. Lazy Susans for Easy Access
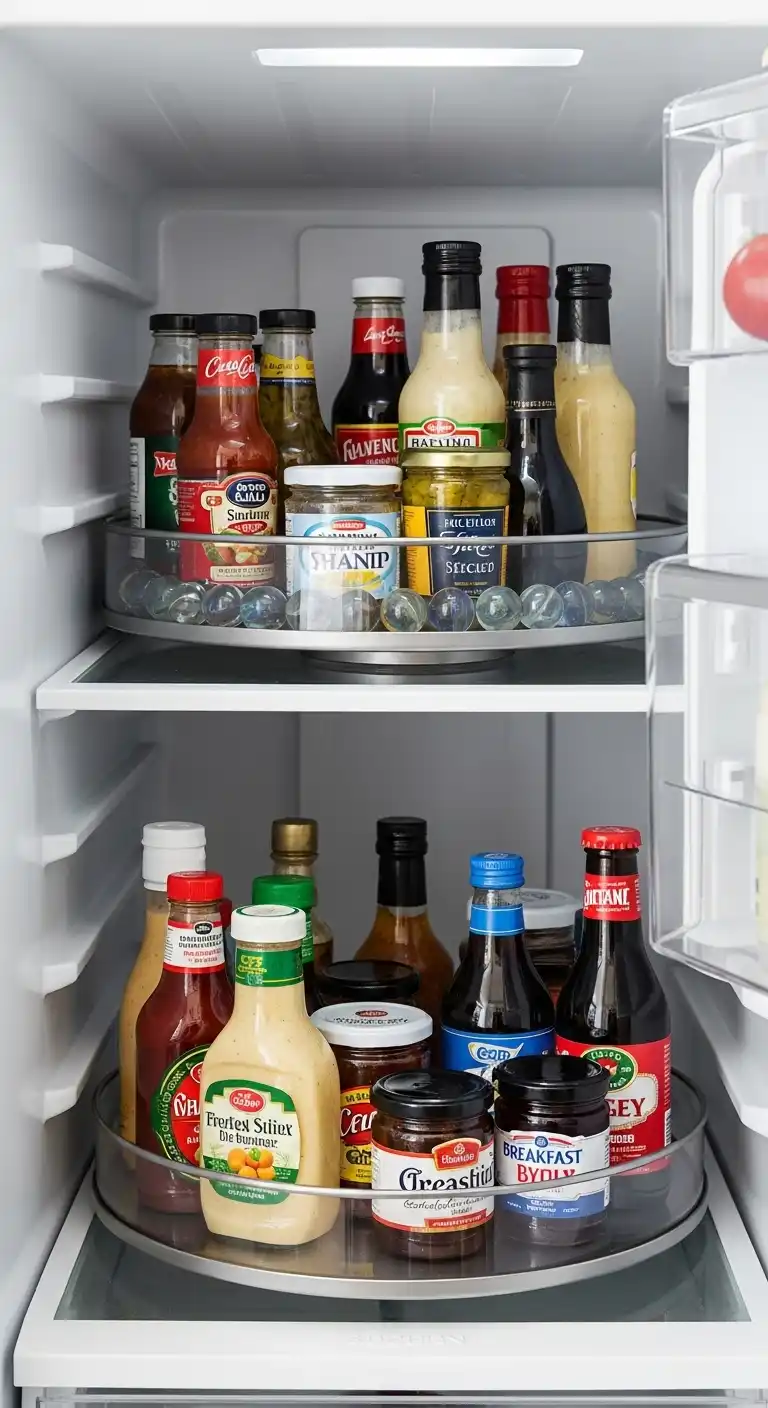
If you’ve ever forgotten about that jar of pickles hiding in the back of the fridge, you need a lazy Susan in your life.
These spinning trays are total game-changers.
Just give it a spin, and everything becomes visible and reachable.
DIY Tip:
Don’t rush to buy a fancy one.
You can make your own using two round baking pans and a handful of marbles sandwiched in between.
It’s an easy, budget-friendly hack that works like a charm.
Why it works:
- Ends the dreaded “back of the fridge” black hole.
- Perfect for condiments, dressings, and small jars.
- Reduces waste since you’ll actually see what you own.
For maximum organization, dedicate different lazy Susans to categories: sauces on one, jams and spreads on another, or even breakfast condiments like butter, syrup, and jelly grouped together.
Pro tip:
Try adding a two-tiered lazy Susan for taller bottles.
It doubles your storage and makes your fridge look like a tiny revolving pantry.
16. Color-Coded Containers

Visual organization is underrated.
Using color-coded containers can transform your fridge into a super-efficient system.
Think green bins for veggies, red for meat, blue for dairy, and clear for snacks.
DIY Tip:
If you don’t want to buy new bins, grab some clear containers and add color-coded labels or washi tape.
Same effect, less cost.
Why it works:
- Makes it easy for everyone in the house to find things.
- Speeds up meal prep—just grab the color-coded bin you need.
- Adds a pop of color and style to your fridge.
You could even take it further by assigning each family member their own snack bin in their favorite color.
That way, no one argues over who ate the last cheese stick—it’s all clearly marked.
Color-coded organization isn’t just about looks; it’s a system that trains your brain to navigate the fridge faster.
Over time, you won’t even have to think—you’ll just know where to reach.
17. Binder Clips for Bottle Storage
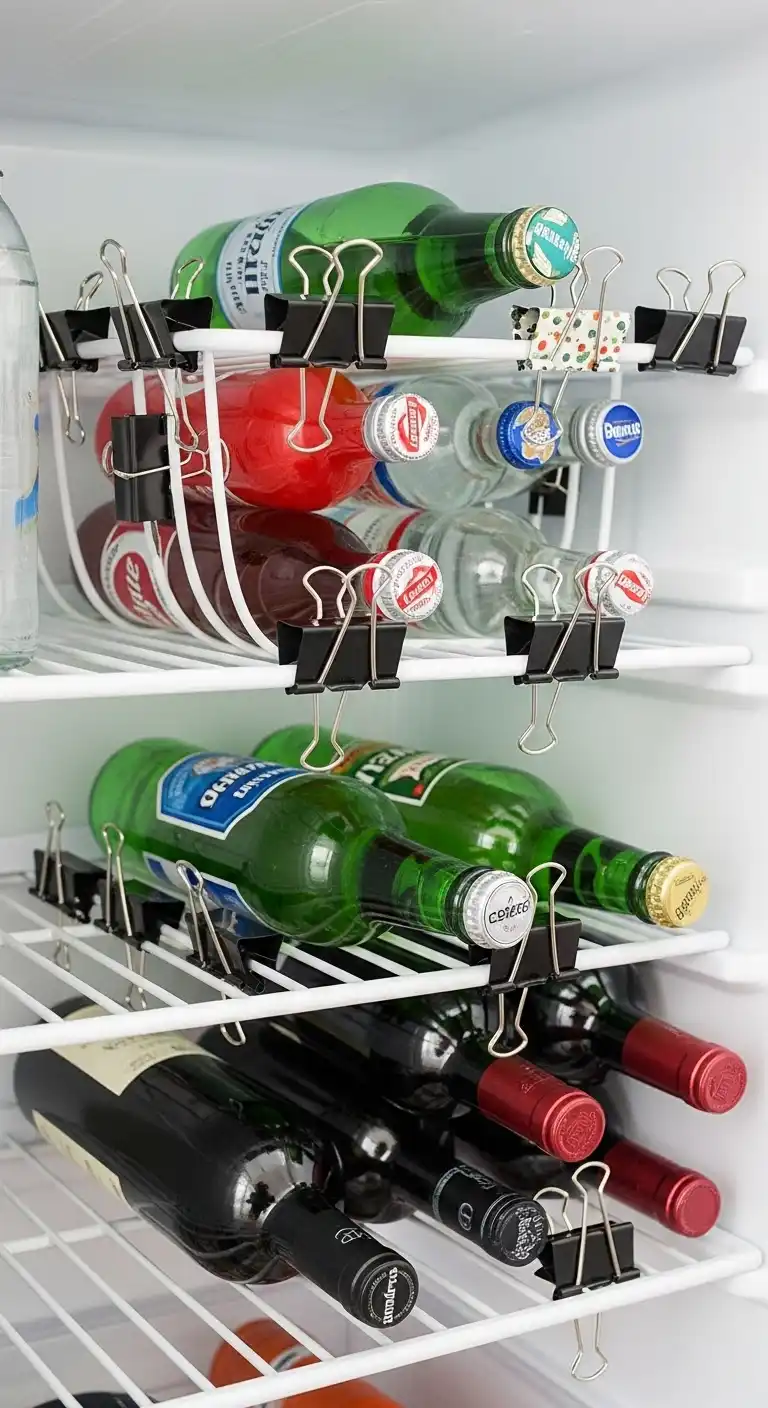
If you’ve got bottles rolling around on a fridge shelf, this hack will blow your mind.
Use binder clips (the big black ones from office supplies) clipped to the wire rack of your shelf.
They act like stoppers, keeping bottles—like soda, beer, or sparkling water—neatly stacked in a pyramid.
DIY Tip:
Decorate binder clips with washi tape or spray paint to match your fridge aesthetic.
Why it works:
- Prevents bottles from rolling every time the door shuts.
- Lets you stack bottles horizontally without chaos.
- Costs practically nothing.
It’s also great for wine bottles that don’t fit in the door racks.
Instead of taking up an entire shelf, you can safely stack them in one corner with binder clips holding them in place.
This hack is so simple but makes your fridge look instantly clever—like a pro secret no one told you before.
18. Clear Mason Jars for Prepped Produce
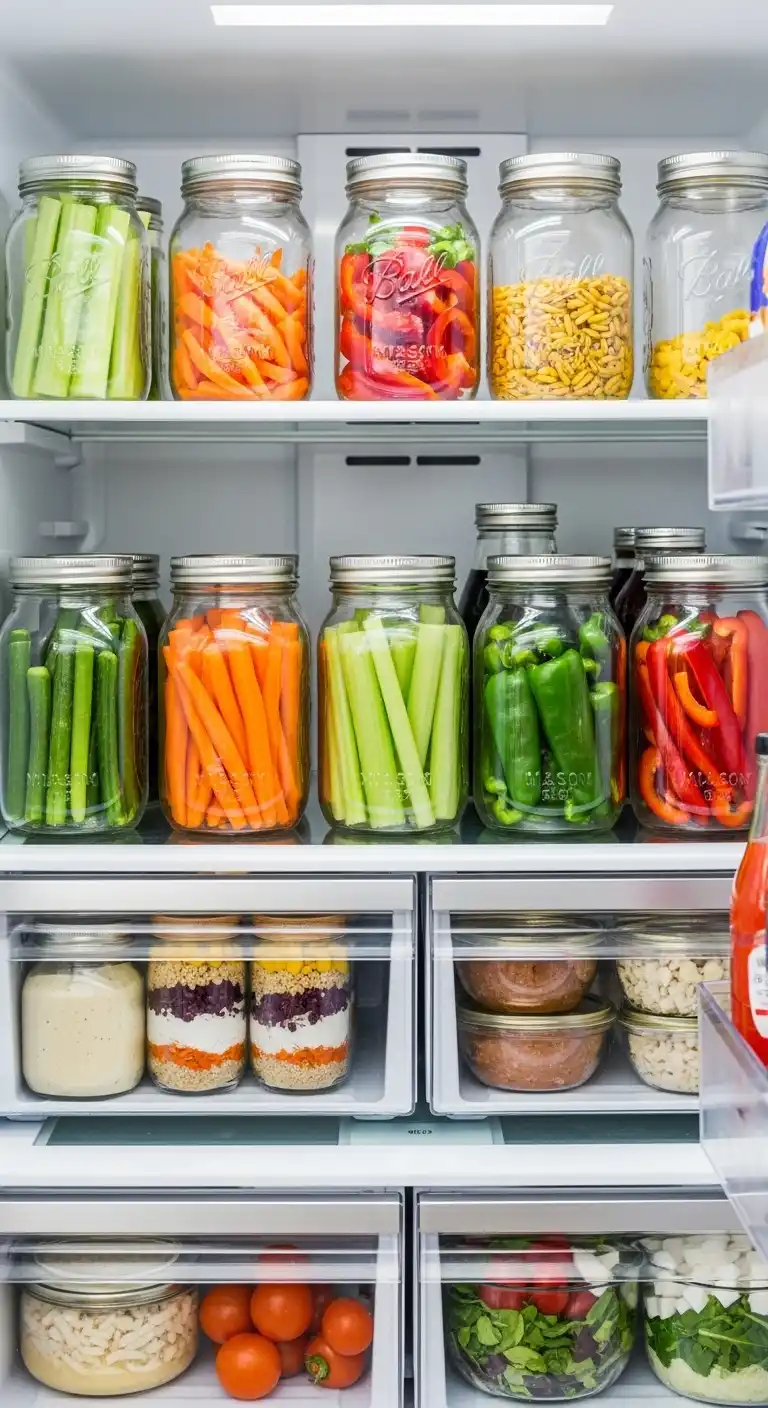
Mason jars aren’t just for farmhouse decor—they’re a DIY fridge organizer’s best friend.
Chop your veggies (carrots, celery, peppers) ahead of time, pop them into jars, and line them up on a shelf.
Not only does it look stunning, but it also keeps produce fresher longer.
DIY Tip:
Add a little water at the bottom of carrot and celery jars to keep them crisp for days.
Why it works:
- Encourages healthy snacking since everything’s prepped.
- Reduces food waste (no more slimy veggies hiding in drawers).
- Looks Instagram-worthy every single time.
You can also prep salads in jars—layering dressing at the bottom, then grains, proteins, and greens at the top.
Just grab a jar when you’re hungry, shake it up, and you’ve got lunch ready in seconds.
This method not only keeps your fridge organized but also motivates you to eat better.
It’s fridge organization and lifestyle upgrade rolled into one.
19. Upcycled Egg Cartons for Sauce Bottles
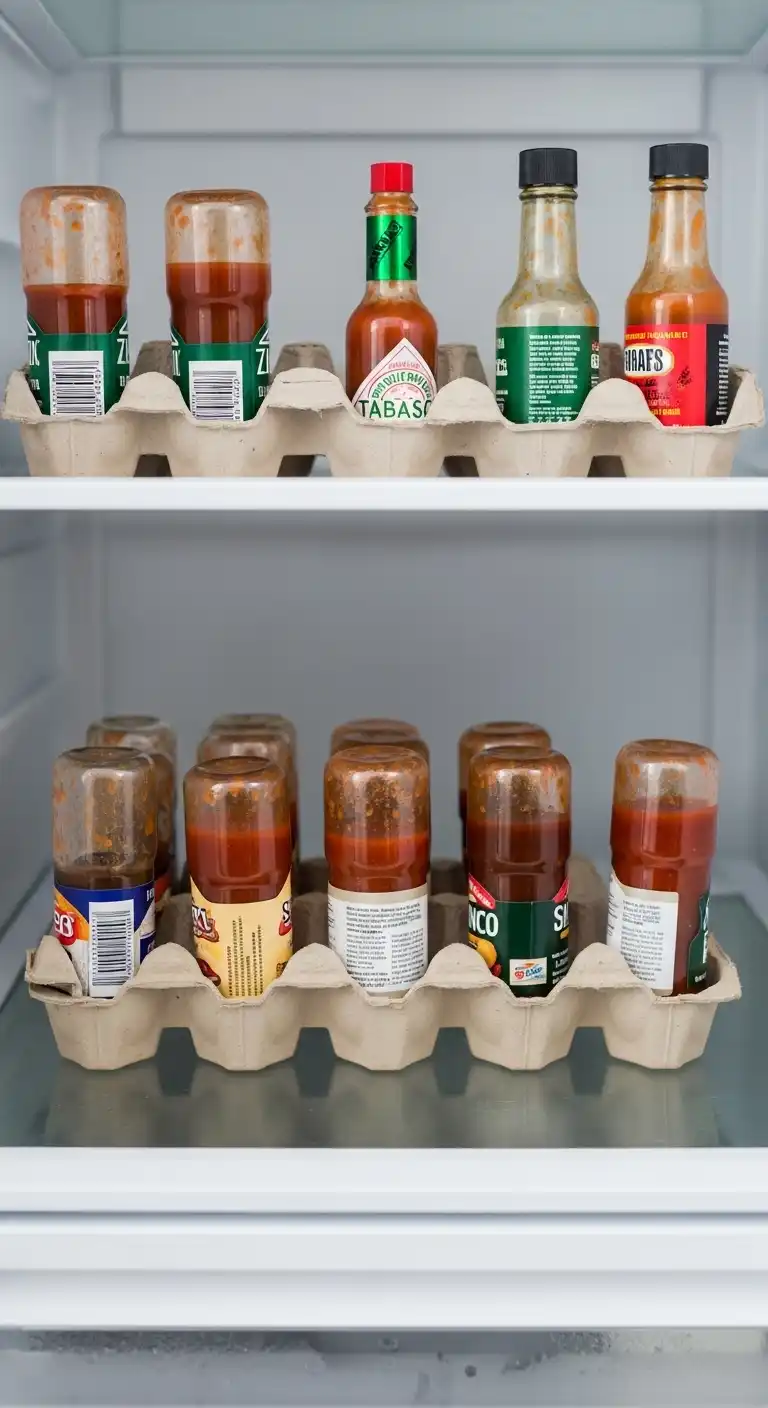
Don’t toss out your egg cartons just yet—they can be upcycled into brilliant storage for condiment bottles.
Place half an egg carton on a fridge shelf, and rest small bottles upside down inside each slot.
The cartons hold them steady, and you’ll get every last drop out without shaking.
DIY Tip:
Use cardboard cartons for sturdiness, or cut down a plastic one for a wipeable option.
Why it works:
- Saves space by corralling mini bottles together.
- Prevents half-empty bottles from getting lost.
- Reduces waste since gravity keeps contents ready to pour.
This hack is perfect for hot sauces, soy sauce, or mini salad dressings.
Instead of bottles toppling over or getting shoved to the back, they’ll all stay in one tidy, easy-to-reach row.
It’s a zero-cost, eco-friendly trick that transforms trash into treasure while keeping your fridge streamlined.
20. Plastic Wrap on Fridge Shelves
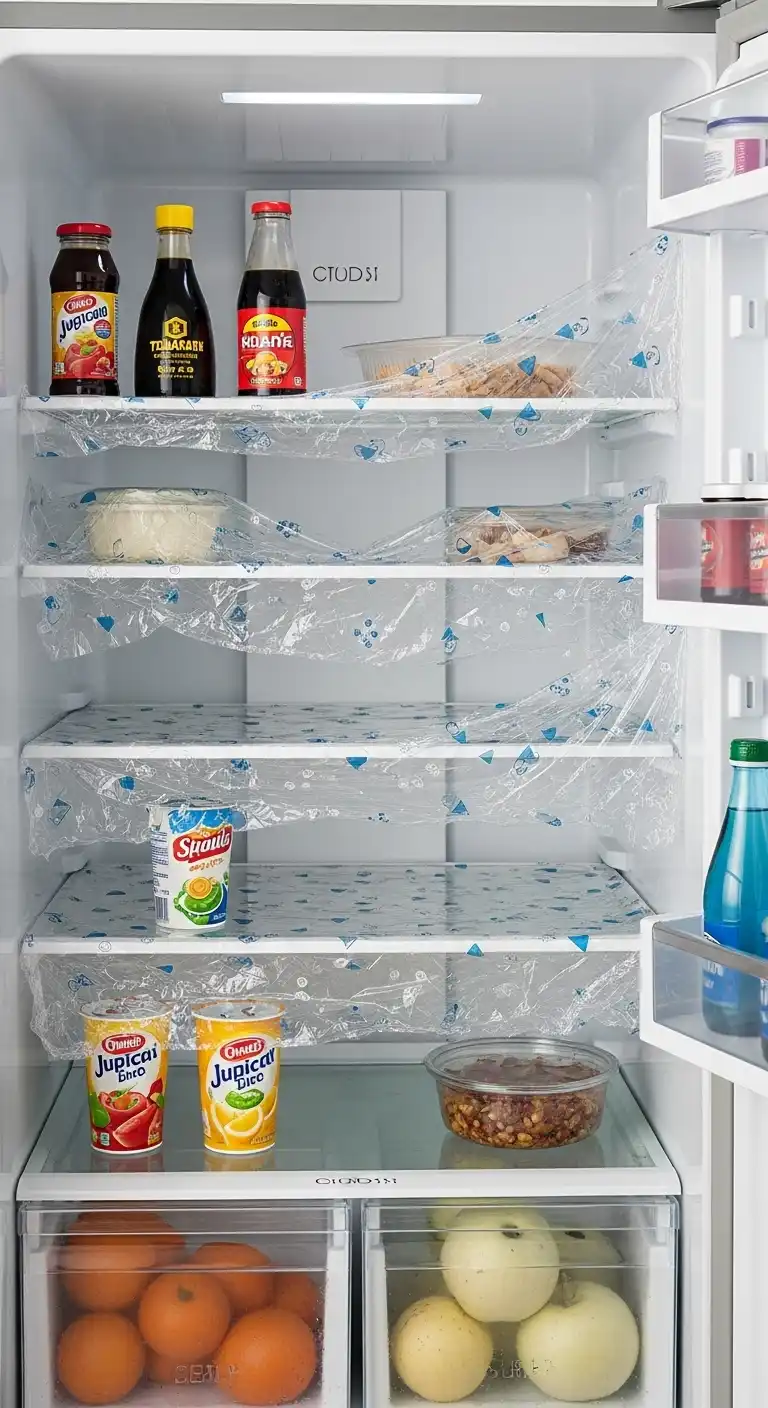
Cleaning sticky fridge spills is the worst.
But here’s a clever DIY trick: cover your shelves with plastic wrap, cling film, or clear shelf liners.
When something inevitably drips (looking at you, soy sauce bottle), just peel off the wrap, toss it, and re-cover.
DIY Tip:
For a reusable option, try clear vinyl tablecloth material or washable fridge liners you can cut to size.
Why it works:
- Saves you time scrubbing sticky messes.
- Keeps glass shelves scratch-free.
- Makes your fridge look instantly neater.
This hack works especially well for households with kids or messy eaters.
Subscribe to Cookwarely
Get updates on the latest posts and more from Cookwarely straight to your inbox.
Juice boxes, yogurt cups, and leftovers won’t ruin your day anymore.
Instead of pulling out the entire shelf to scrub, you’ll just swap the cover in seconds.
Bonus:
Use patterned or colored liners to add a decorative touch while staying functional.
It’s like giving your fridge a little outfit change.
21. Hanging Baskets for Extra Space
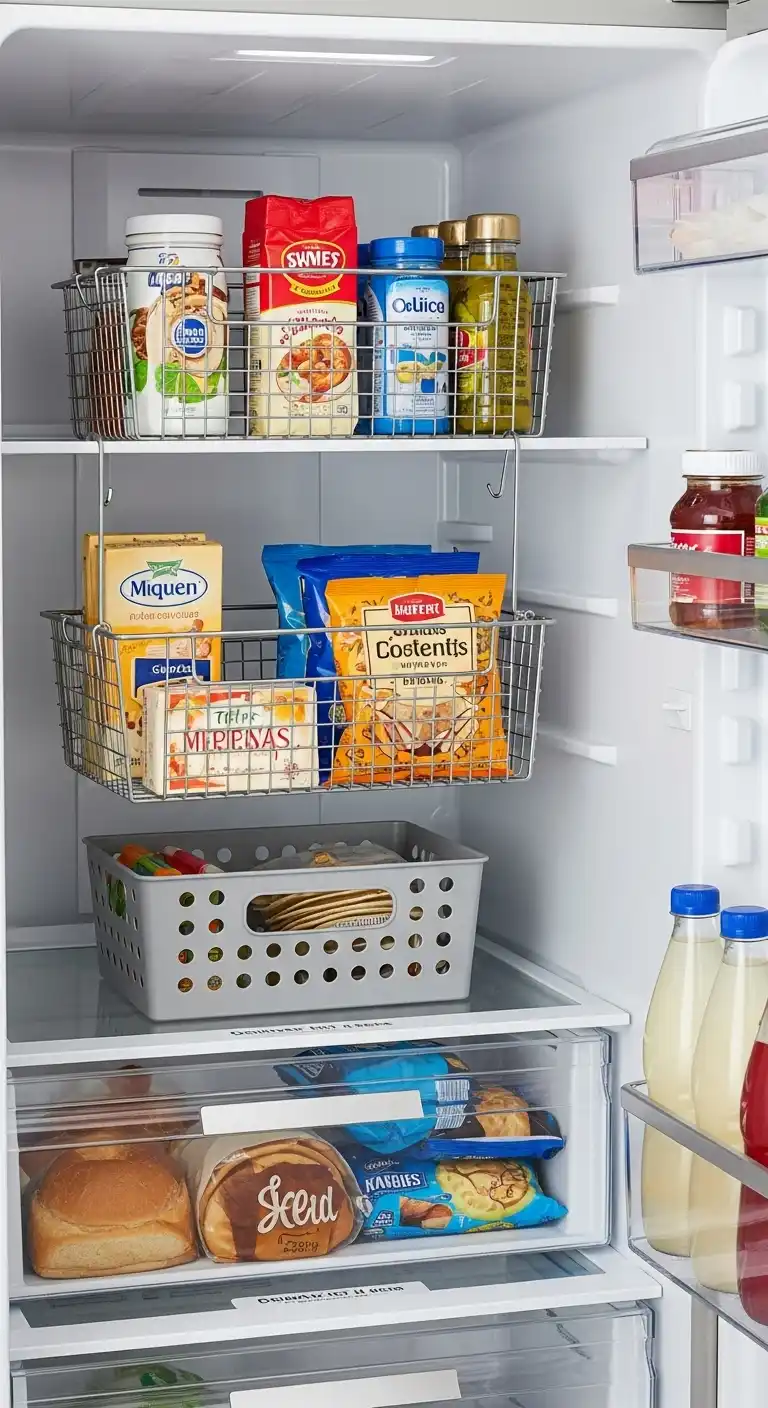
You know that empty vertical space just above your food? Fill it with hanging baskets.
You can repurpose wire baskets, attach them under shelves, or even use adhesive hooks with lightweight bins.
Suddenly, you’ve added a whole new layer of storage.
DIY Tip:
Dollar store wire baskets or Ikea under-shelf baskets fit perfectly and cost next to nothing.
Why it works:
- Maximizes vertical space that usually goes unused.
- Great for small items like cheese, tortillas, or snack bags.
- Keeps fragile items safe since they don’t get buried under heavier ones.
This hack is especially useful for small fridges where every inch counts.
It’s like adding a mezzanine floor to your fridge—a clever second level for the little things that usually get lost.
22. DIY Chalkboard Labels
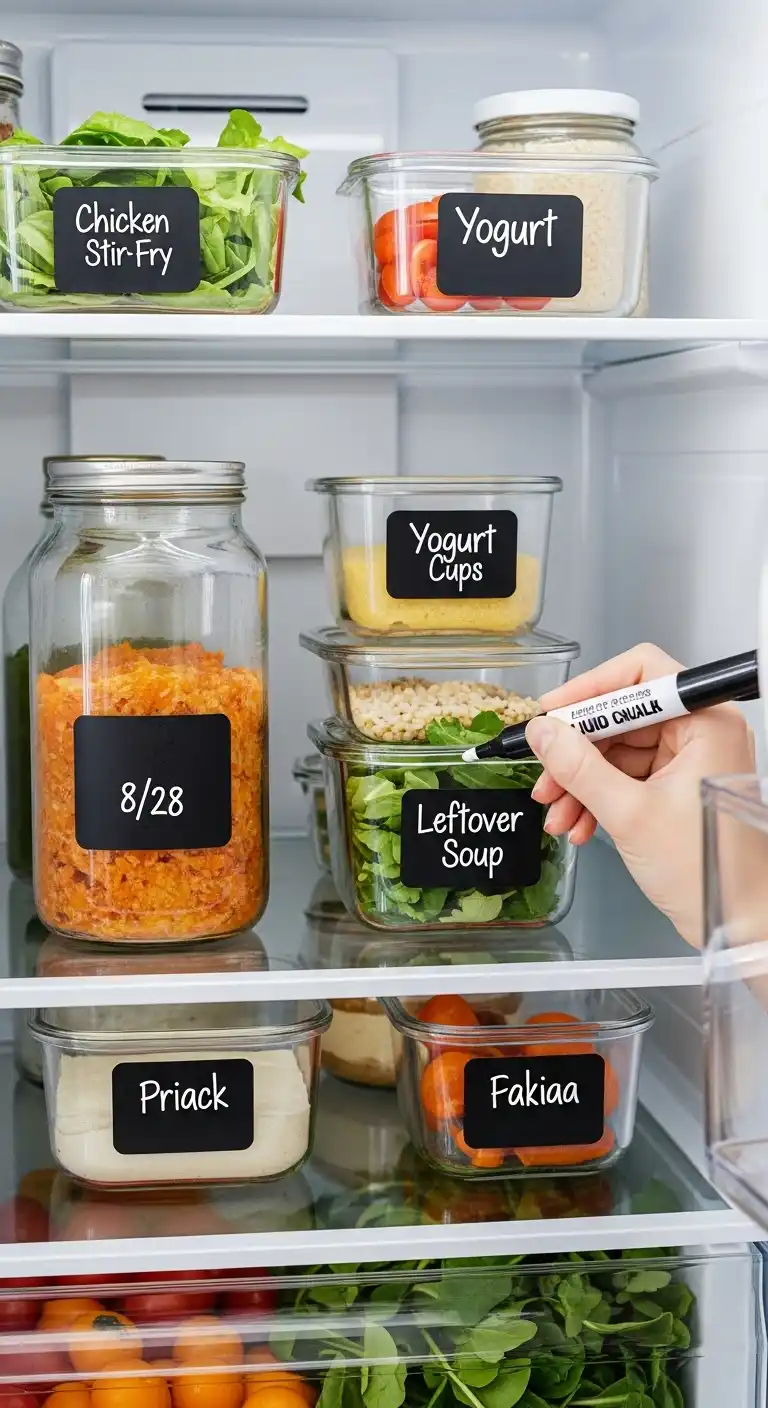
Forget the mystery Tupperware—chalkboard labels make it easy to know what’s inside every container.
You can either buy reusable chalkboard stickers or DIY your own using chalkboard paint and tape.
Write the contents and date on each container, and just wipe it off when you reuse it.
DIY Tip:
If you don’t want to deal with chalk dust, use liquid chalk markers. They’re neater, bolder, and won’t smudge as easily.
Why it works:
- Keeps track of leftovers so they don’t go to waste.
- Adds a farmhouse-chic vibe to your fridge.
- Works on jars, bins, or even glass shelves.
Imagine opening your fridge and instantly spotting a container labeled “Chicken Stir-Fry 8/28.”
No guessing. No sniff test. Just organized, stylish clarity.
Plus, chalkboard labels are super flexible—you can switch them out as often as you like, making your fridge look worthy every single time.
23. Stackable Drawer Units
Sometimes the fridge’s built-in drawers just aren’t enough.
Enter stackable drawer units—small, clear plastic drawers that can fit right on your shelves.
They create mini-sections for snacks, cheeses, deli meat, or even prepped fruit.
DIY Tip:
Repurpose desk organizers or small craft drawers for a budget-friendly solution.
Why it works:
- Adds more compartments to an otherwise flat shelf.
- Makes it easier to grab what you need without moving other items.
- Helps kids find their snacks quickly.
You can dedicate one drawer to smoothie packs, another to sandwich fixings, and another to pre-portioned snacks.
Suddenly, your fridge feels less like chaos and more like a custom-built pantry.
It’s DIY storage with a serious upgrade in functionality.
24. Tension Rods for Vertical Storage
Got tall bottles or containers sliding around? Use tension rods to create dividers in your fridge.
They’re adjustable, easy to install, and can hold items upright without tipping over.
DIY Tip:
Place them in the freezer too—perfect for keeping bags of frozen veggies standing tall.
Why it works:
- Keeps tall bottles from falling over.
- Divides shelves into neat sections.
- Adds customizable organization without tools.
This trick is especially handy in side-by-side fridges where space feels narrow.
Suddenly, instead of one big messy shelf, you’ve got tidy “lanes” where everything stays in place.
25. Shoe Boxes as DIY Bins
Who says storage bins need to be expensive?
Clean, sturdy shoe boxes (lined with contact paper or clear wrap) make excellent DIY fridge organizers.
They’re perfect for grouping similar items together like yogurt cups, snack pouches, or drink boxes.
DIY Tip:
Add adhesive handles or cut-out grips to make sliding them in and out easier.
Why it works:
- Practically free if you’re upcycling.
- Keeps items from scattering all over shelves.
- Easy to customize with paint, wrapping paper, or labels.
This is one of those hacks that looks far more impressive than it is.
Guests will think you bought trendy organizers, but really, you just gave your old shoe boxes a second life.
Eco-friendly and practical.
26. Repurposed Magazine Holders for Freezer Organization
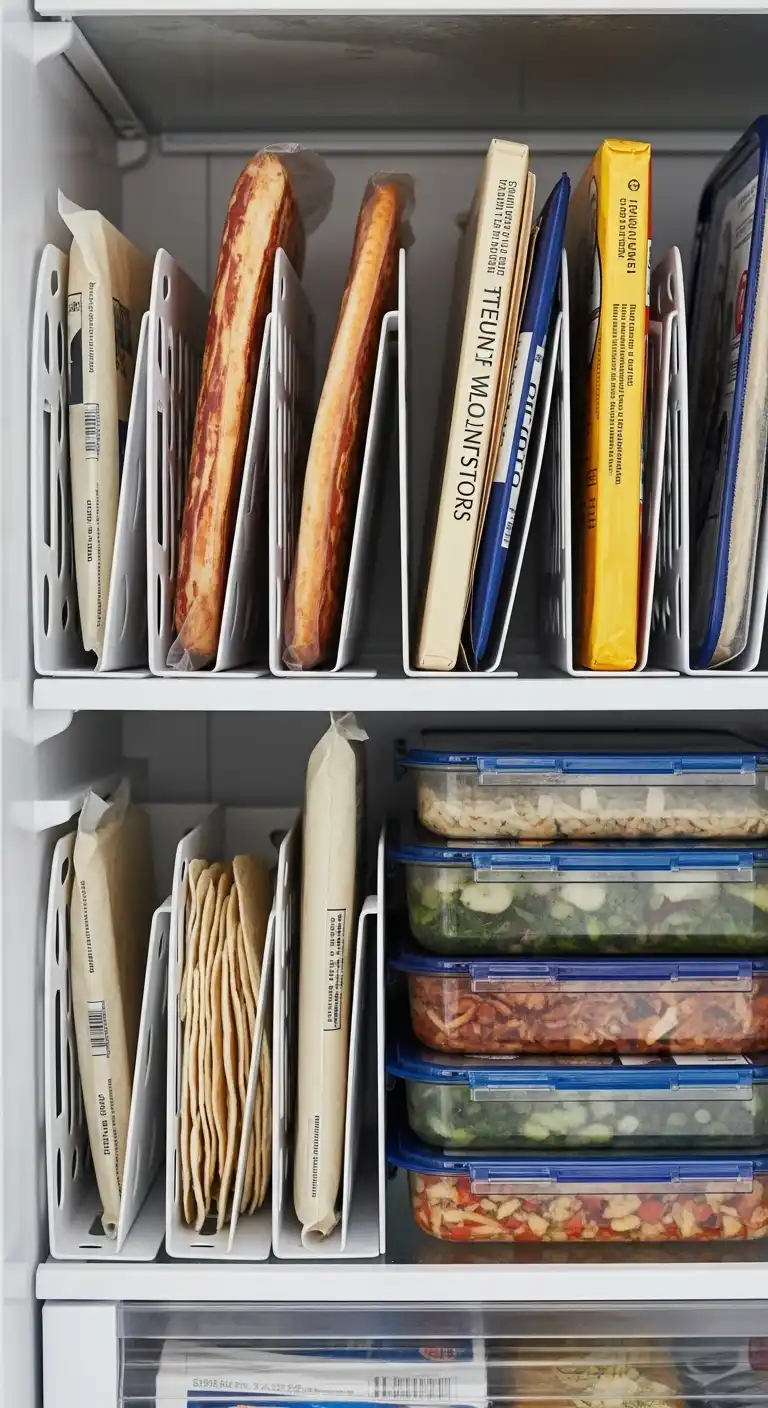
Here’s a brilliant hack: turn magazine holders on their side and use them to organize flat items in your freezer, like frozen pizzas, tortillas, or meal prep trays.
They act like dividers, keeping everything upright and easy to grab.
DIY Tip:
Spray paint them white or metallic for a sleek finish before placing them in your freezer.
Why it works:
- Prevents frozen food avalanches.
- Maximizes vertical freezer space.
- Makes meal prep smoother since you can see everything.
No more digging through icy chaos—your frozen goods will be stacked like files in a cabinet.
It’s one of those hacks that makes you say, “Why didn’t I think of this before?”
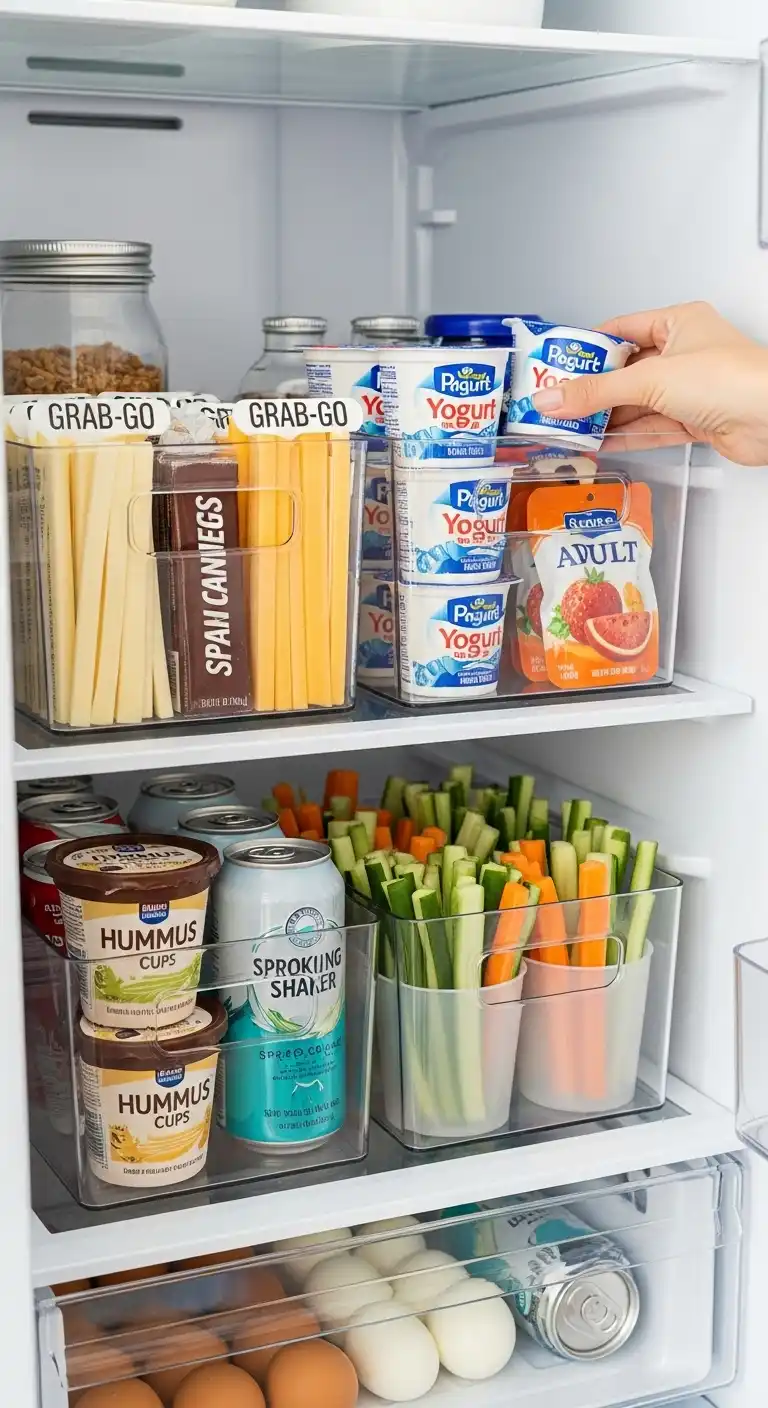
27. DIY Snack Stations
A fridge snack station is a lifesaver.
Dedicate one bin or drawer to easy-grab snacks: string cheese, fruit cups, veggie sticks, boiled eggs, or mini sandwiches.
Label it clearly so no one has to rummage.
DIY Tip:
Repurpose a small plastic drawer unit or even a shower caddy as a snack hub.
Why it works:
- Keeps snacks contained and easy to grab.
- Prevents kids from raiding random shelves.
- Encourages healthier choices when stocked smartly.
It turns your fridge into a mini convenience store, minus the junk.
Common Mistakes to Avoid
- Overstuffing the fridge – Air needs to circulate for food to stay fresh.
- Mixing raw meat with produce – Always separate for safety.
- Ignoring expiration dates – Organize so older items are in front.
- Not labeling leftovers – Leads to mystery containers and wasted food.
- Buying bins before measuring – Always measure your shelves first!
Conclusion
Your fridge doesn’t have to be a black hole of forgotten leftovers and mystery jars.
With these 27 DIY fridge organization ideas, you can create a space that’s not only practical but also worthy.
From lazy Susans and mason jars to snack stations and magazine holder hacks, there’s a solution for every budget and fridge size.
Remember: organization is about making your life easier.
Pick a few hacks that fit your lifestyle, try them out, and watch how much smoother your daily routine becomes.
A little DIY effort today means a cleaner, happier, and way more functional fridge tomorrow.