16 Under Sink Storage Ideas for RV Kitchens

Every RV kitchen has the same problem hiding behind one cabinet door. The space under the sink holds the water lines, the drain, sometimes a filter or a disposal, and somehow it still has to fit dish soap, sponges, trash bags, and backup supplies for weeks on the road.
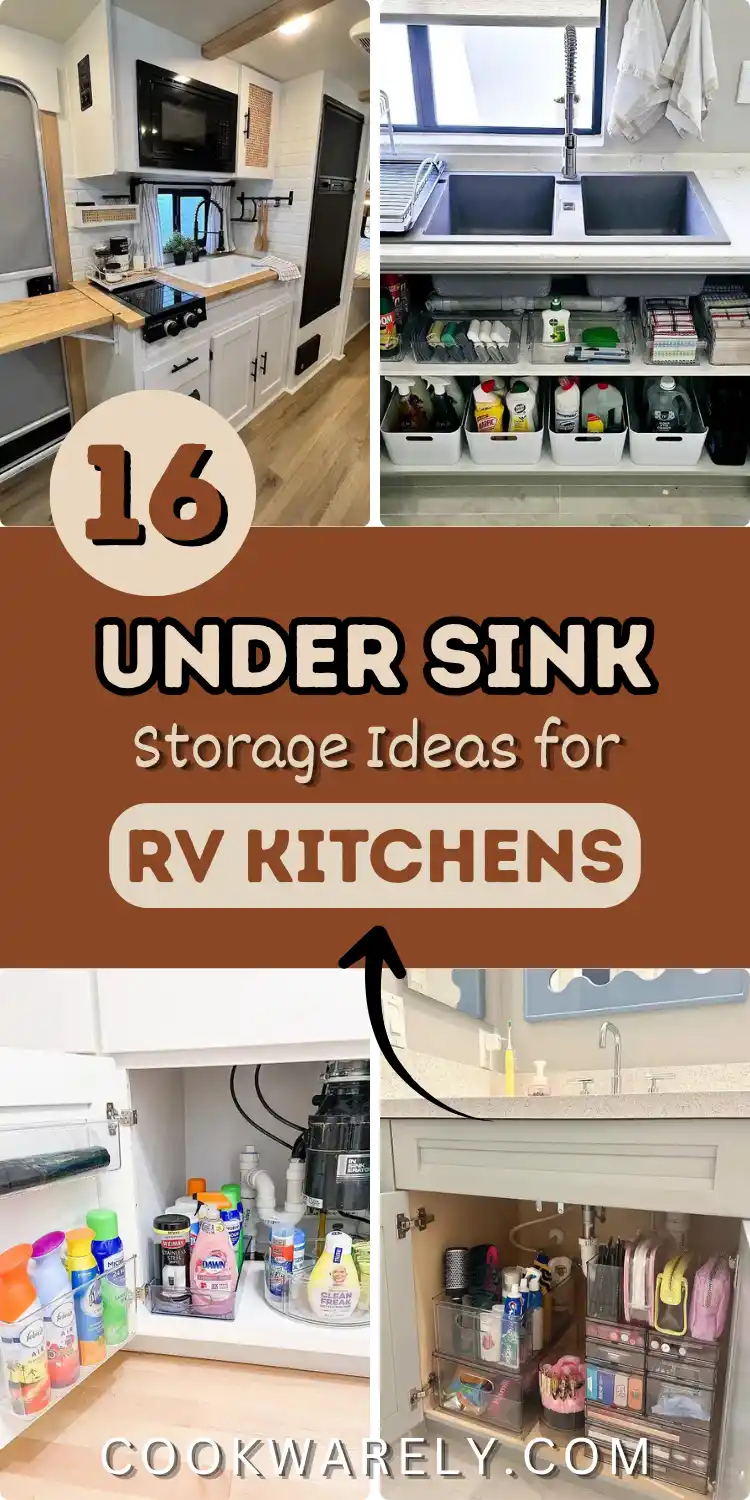
Most stock cabinets waste that space instead of using it, because the plumbing runs right through the middle and nobody plans storage around it.
These under sink storage ideas for RV kitchens come straight from real cabinets, some staged in full size homes and some built into actual rigs, and every one works around plumbing instead of ignoring it.
You will find labeled bins that zone around a center pipe, drawers that turn one deep cabinet into eight small categories, door mounted caddies that free up shelf space, and even a full fresh and waste water station for a sink with no hookup at all.
A few ideas solve problems specific to life on the road, like standing water jugs upright so they will not leak on a bumpy drive.
Scroll through, save what fits your galley, and start with whichever idea solves your most annoying problem first.
1. Zone Your Bins Around the Plumbing Instead of Fighting It
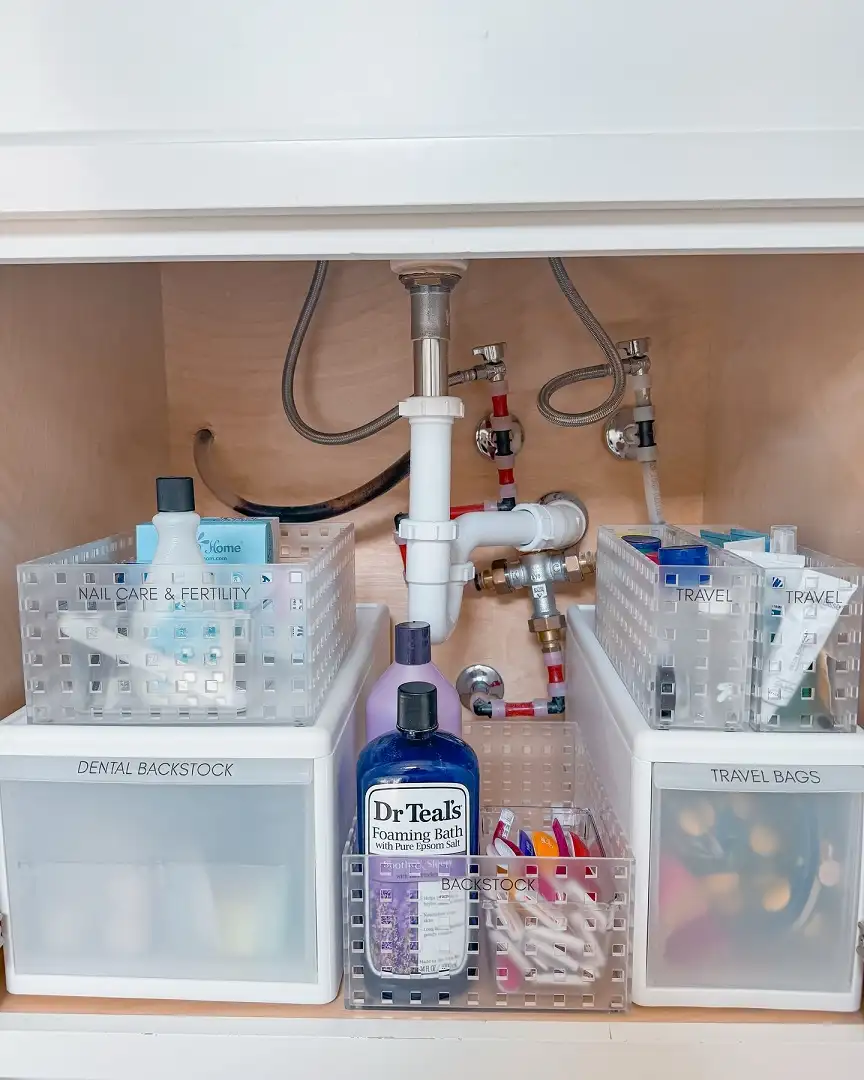
The plumbing trunk down the middle of this cabinet splits the space into two clean pockets, and that split becomes the whole storage plan.
A shallow bin sits on each side, both labeled so nobody has to guess what’s inside, while a tall bottle wedges into the narrow gap right against the pipe.
In an RV galley the same trick solves the same problem, because the drain line and shutoffs almost always run straight down the center too.
- Pick two bins that fit the width on either side of the pipe, not one bin that spans the whole shelf
- Label the front face, not the lid, so it still reads when a drawer is pulled halfway out
- Save the narrow strip against the pipe for tall, skinny bottles that would tip over anywhere else
- Keep backstock supplies low and everyday items at eye level
Two bins flank the center stack instead of one bin spanning the whole shelf.
Labels stay readable even when a bin is only pulled halfway out.
Tall, skinny bottles wedge against the pipe where nothing else fits.
2. Turn Every Drawer Into Its Own Micro Category
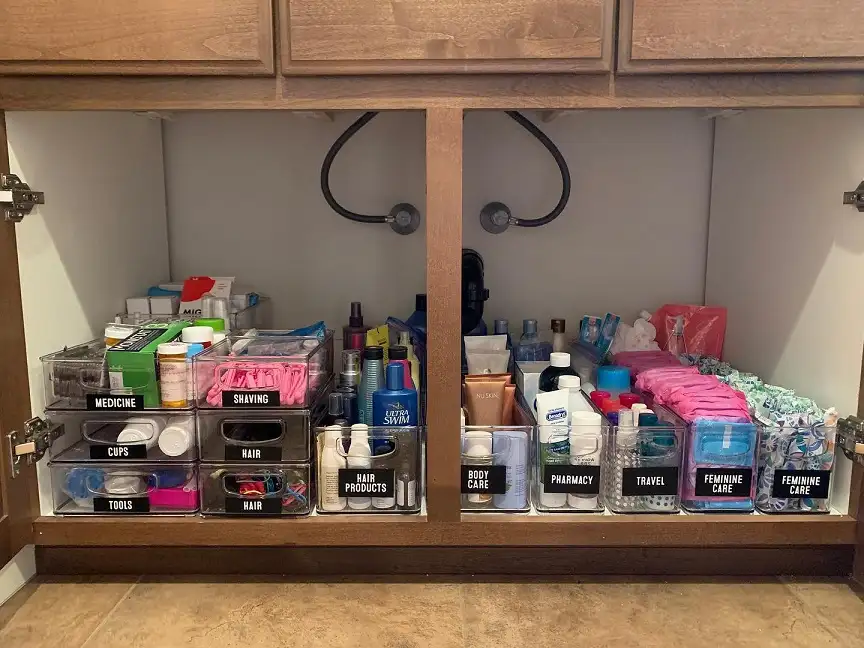
Nine small labeled drawers do more work here than three big totes ever could, because each one only holds one type of thing.
Medicine stays separate from hair tools, shaving gear stays separate from travel sizes, and nothing gets buried under something unrelated.
Stretch that same habit into an RV kitchen cabinet: dish soap and dish tablets get one drawer, sponges and scrub brushes get another, trash bags and produce bags get a third.
Smaller footprint, faster grab. The two approaches side by side below.
| One Big Bin | Micro Category Bins |
|---|---|
| Everything piles together fast. | Each item has one exact home. |
| Digging required to find anything. | Grab and go, no digging. |
| Fewer bins to buy. | More bins, far less mess. |
3. Stack a Wire Basket and a Riser Drawer Side by Side
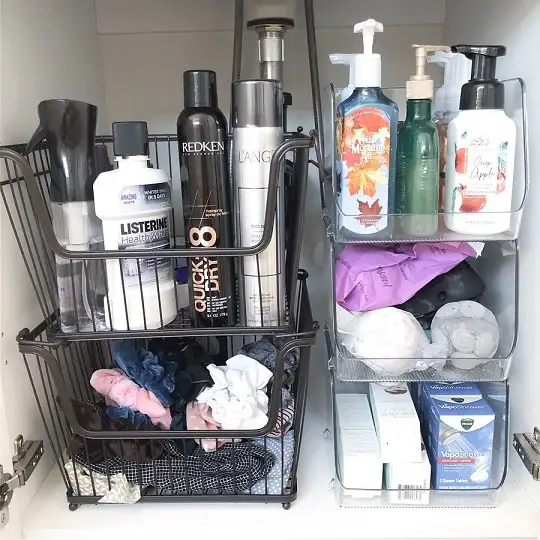
A two tier wire basket carries the tall bottles on this side, hairspray and mouthwash standing up top, soft folded scrunchies caught in the bottom tray so they never spill into the cabinet floor.
Next to it, a stack of clear riser drawers handles the squeeze bottles and boxed items in flat, see through layers.
What works here: the wire basket handles anything top heavy or bottle shaped, while the riser drawers handle anything flat or boxed, so nothing in a mismatched shape gets forced into the wrong bin.
In an RV kitchen, swap the mouthwash for dish soap and hand soap, and let the risers hold sponge refills or dishwasher pods instead.
Check both the basket and riser width before you buy either one.
Flat and boxed items go here, stacked two or three high.
Tall bottles up top, soft folded items in the lower tray.
4. Group Cleaning Bottles by Job, Not by Brand
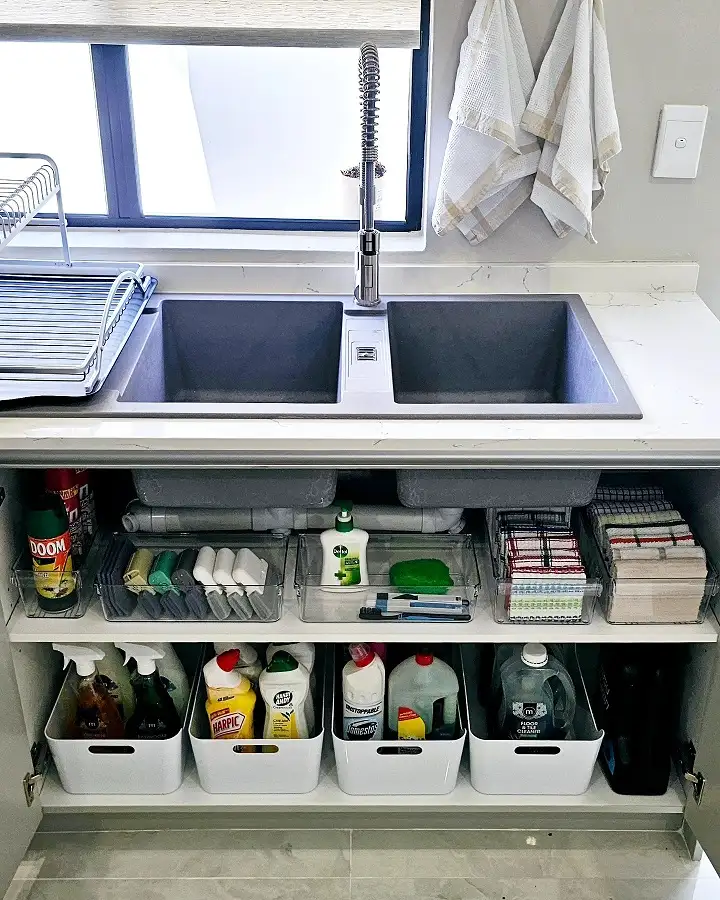
Real plumbing runs behind this sink, not a staged mockup, and the shelf below it proves the grouping works at full scale.
The top shelf keeps small tools together, a caddy of brushes, a folded sponge, and a stack of cloths lined up in their own clear trays.
The bottom shelf lines up four bins, each one holding two or three spray bottles that share a job, glass cleaner grouped away from bathroom spray, floor cleaner grouped away from both.
Quick tip: group by task first, brand second. A bin labeled “glass” still works even after you switch which glass cleaner you buy.
5. Hang a Bag Dispenser on the Inside of the Door
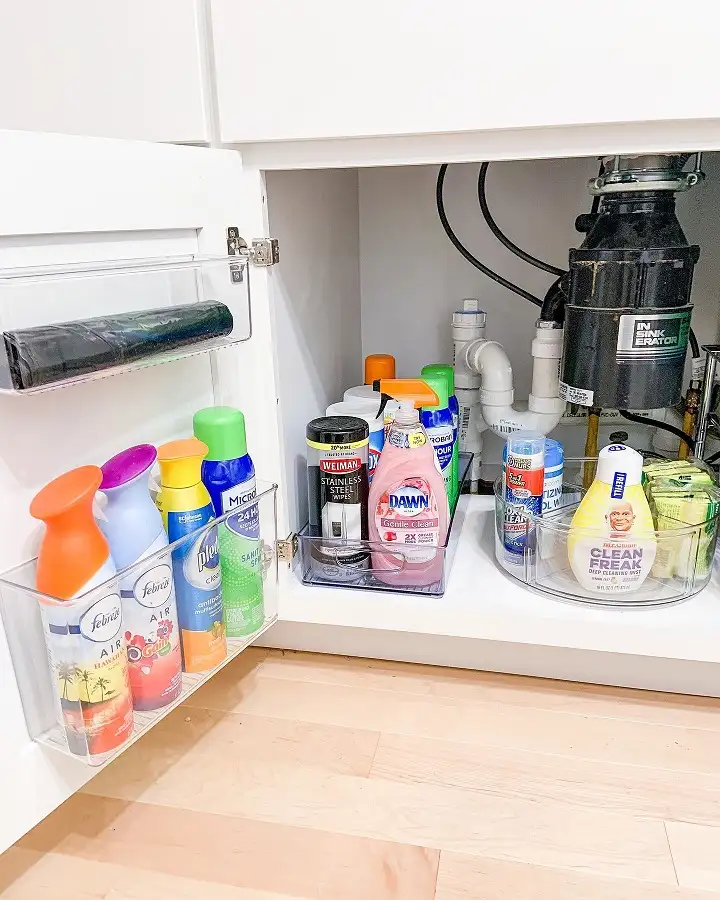
The door on this cabinet is doing as much work as the shelf.
A clear caddy near the top holds a full roll of trash bags flat against the door, and a second caddy lower down catches spray cans that would otherwise topple every time the door swings open.
Inside, a round turntable spins bottles around the garbage disposal instead of making you reach behind it.
Pieces to recreate this:
- One door mounted bag dispenser sized for your roll width
- One shallow door caddy for sprays under 12 inches tall
- One small turntable sized to clear the disposal or P-trap
- Everything left on the door leaves the shelf free for taller bottles
6. Use the Exterior Access Hatch for Bulky Overflow
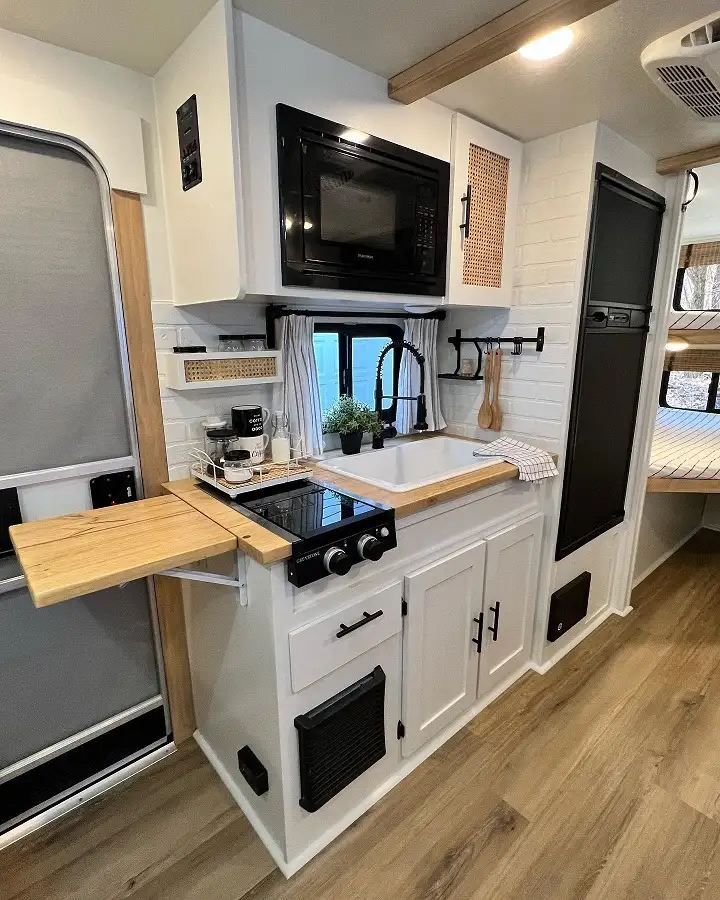
Under sink space in a small RV galley disappears fast once the drain line, water filter, and cleaning bottles all compete for the same few inches.
The low black panel built into this cabinetry base looks like the kind of exterior access hatch many RVs use to reach storage from outside, and it is easy to overlook since it does not look like a cabinet door from the inside.
Reserve it for anything bulky that steals room under the sink instead.
Store spare paper towel rolls or bulk trash bags there.
Keep extra jugs of dish soap or backup cleaner in the hatch.
Anything you need daily, since reaching it means a walk outside.
Anything that can freeze, if the hatch is not insulated.
7. Line Up Pull Out Drawers for Every Cleaning Task
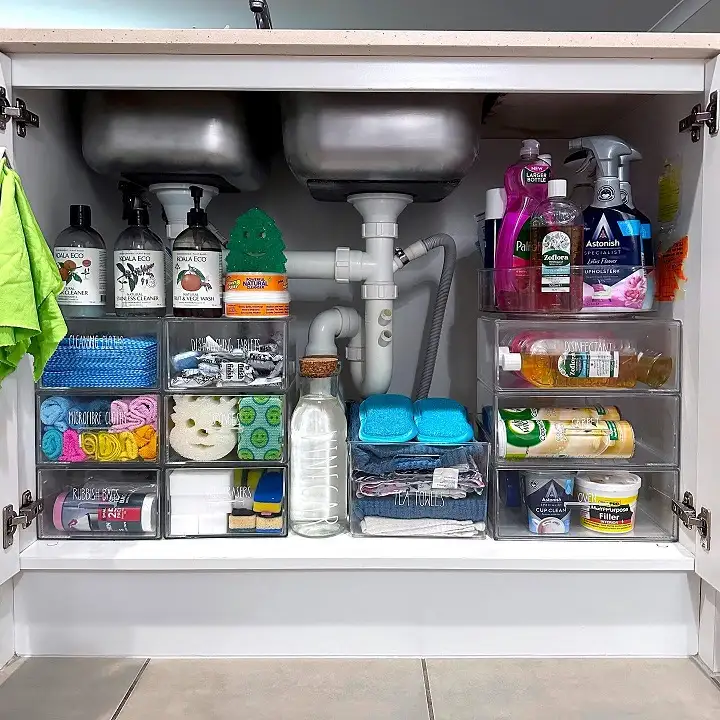
Eight small drawers do the sorting here so nothing under this kitchen sink turns into a junk pile.
Cloths get one drawer, dishwashing tablets get another, three colors of microfiber cloths get split into their own trays instead of tangled together, and even the rubbish bags get a dedicated slot instead of a loose roll.
What works here is the ceiling: pump bottles for hand soap and dish soap stand on top of the plumbing where there is dead vertical space nobody else uses, and the drawers only handle what actually needs sorting.
Copy this by measuring your narrowest usable depth first, since these drawers slide out even with a P-trap running right above them.
8. Hang Zip Pouches on the Door for Grab and Go Kits
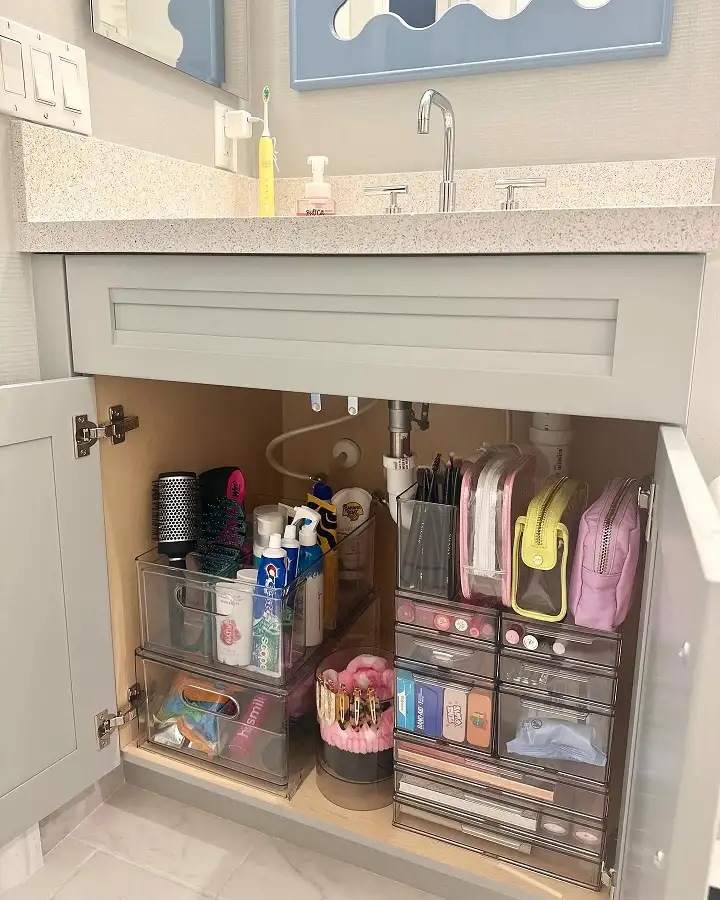
Two zip pouches hang from small hooks on the side wall of this cabinet, one yellow, one pink, each holding a cluster of tools that would otherwise roll loose in a drawer.
The trick works because a hanging pouch takes up almost no shelf space and comes off the hook in one motion.
Set the same thing up under an RV sink for grab and go kits.
- Screw two small hooks into the cabinet side wall, above where bottles usually sit
- Fill one pouch with a compact cleaning kit for quick wipe downs
- Fill a second pouch with paper plates or utensils for picnic table meals
- Hang both so the zipper pull faces out for a one handed grab
9. Build a Real Fresh and Waste Water Station
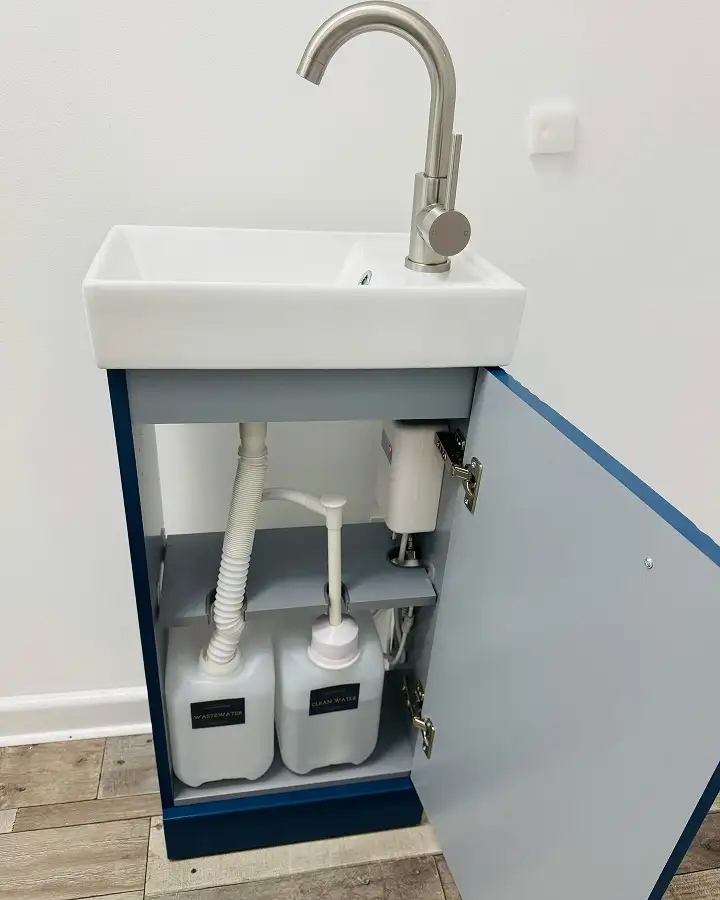
Not every RV sink connects to a full water system, and this small standalone unit shows the fix.
A compact water heater sits tucked against the back wall, and two labeled jugs, one for clean water going in, one for wastewater coming out, fill the shelf below.
- Label the jugs the moment you buy them, since two identical white jugs are impossible to tell apart by feel
- Keep the clean water jug on the side closest to the tap for a shorter hose run
- Give the wastewater jug its own tray or mat in case of a drip
- Leave a few inches of clearance around the heater so nothing blocks its vents
Dedicating the whole cabinet to labeled fresh and waste jugs keeps a portable sink fully self contained, no hookup required.
10. Slide In a Two Tier Wire Cart on Each Side
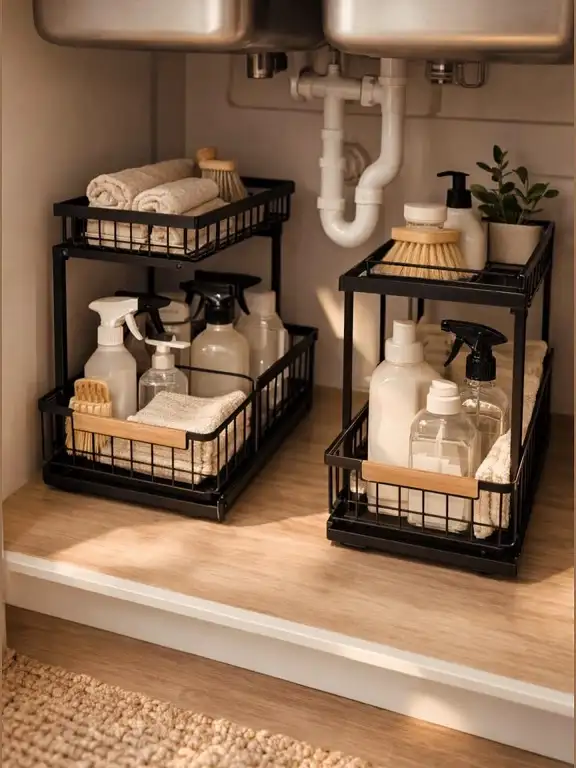
Two matching wire carts sit on either side of the pipe here, each one built with a top shelf for small items like a wooden dish brush and a bottom shelf for taller bottles and a folded towel.
Because both carts slide, nothing behind the front row gets forgotten, you just pull the whole tray forward.
A small potted plant on one cart is a nice touch, not a functional one, so skip it in an RV where counter space actually matters.
The real lesson is symmetry: matching carts on both sides make the whole cabinet feel intentional instead of like two random items got shoved in wherever they fit.
If it slides, it gets used. If it sits still in the back, it gets forgotten.
11. Add a Riser Platform to Double Your Shelf Space
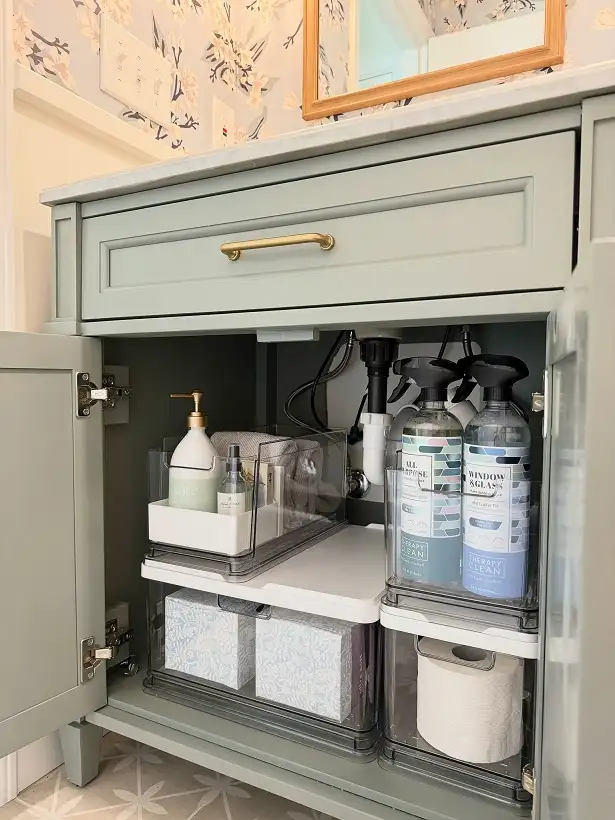
A flat riser platform splits this cabinet into two usable levels instead of one tall gap above a single shelf.
Drawer bins sit right on top of the riser, spray bottles and a spare roll of paper line up underneath it, and none of it touches the plumbing running along the back wall.
The platform itself is doing the real work, since a cabinet this size would otherwise waste the top half on empty air above a single row of bottles.
Good to know: measure the tallest bottle you own before buying a riser, then set the platform just above it so nothing gets crushed when the door closes.
12. Pull Out a Hidden Drawer Beside the Sink Instead
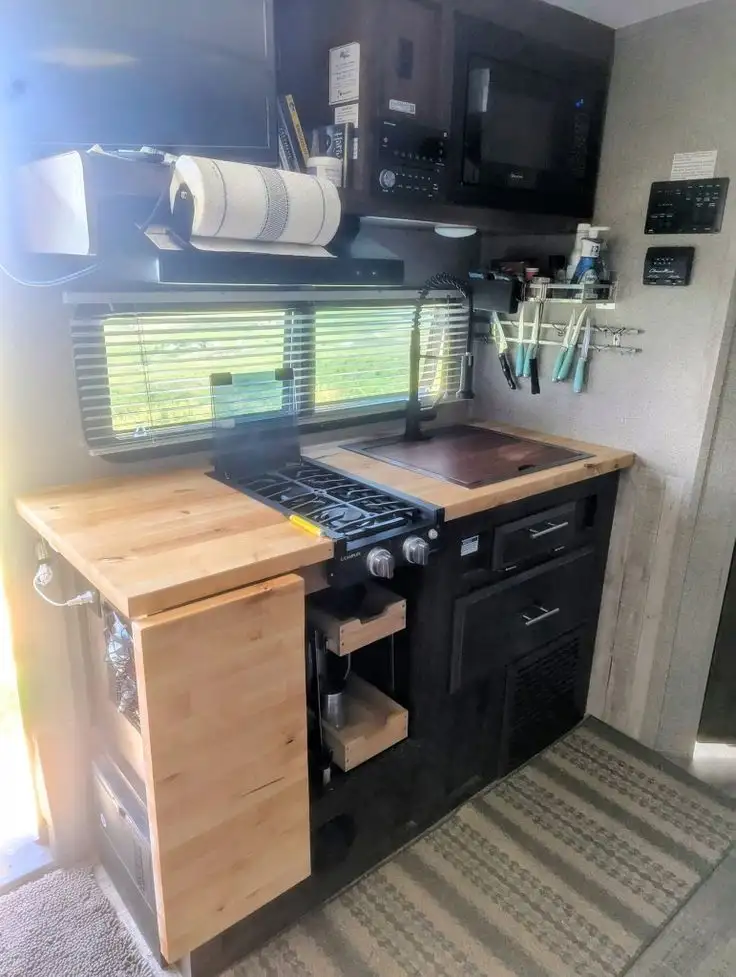
Beside the stove on this RV galley, a narrow pull out drawer holds a small metal lid and an empty tray, proof that the cabinetry run next to a sink does not have to be one deep empty box.
What works here: the drawer front matches the cabinetry so it disappears when closed, the depth is shallow enough that nothing gets lost at the back, and it sits at counter height so grabbing what’s inside does not mean bending down.
If your RV kitchen has a similar run of cabinetry beside the sink, a shallow pull out in that same spot can hold coffee filters, spare sponges, or small dish towels instead of letting that strip go unused.
An empty cabinet strip beside the sink, unused counter height space.
A shallow pull out drawer at counter height, matching the cabinet front.
13. Reserve the High Shelves for Backstock, Not Daily Use
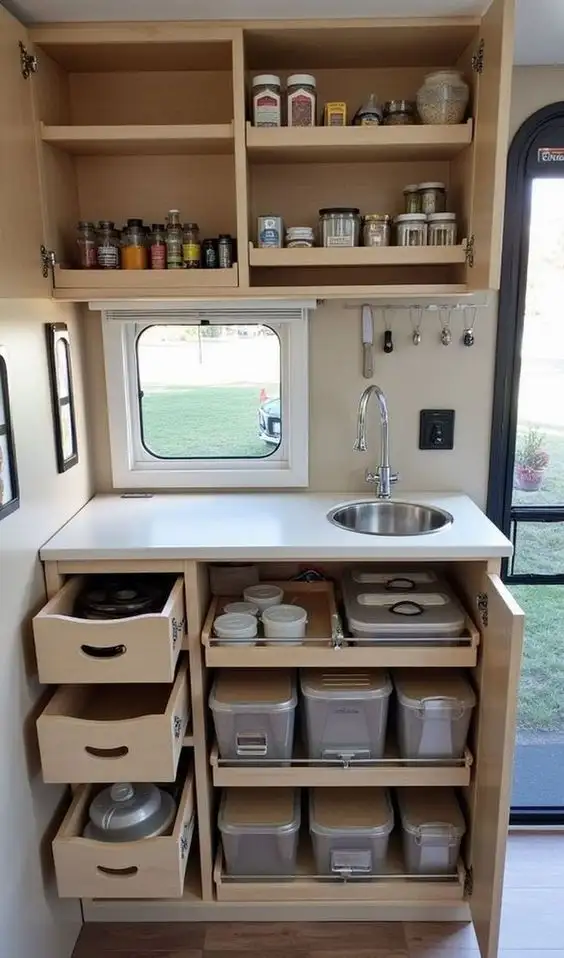
Open shelves above this RV sink hold spice jars and bulk dry goods sorted by size, while three pull out drawers below the counter handle bakeware and stackable containers that get used daily.
The split matters because the high shelves are harder to reach with wet hands right after washing dishes, so anything grabbed often stays low.
Anything only needed once a week, like extra flour or a spare set of jars, moves up top instead.
- Keep the bottom two drawers for daily bakeware and lids
- Move dry good backstock to the highest shelf, away from splash
- Group spice jars by cuisine or by how often you reach for them
- Leave the middle shelf half empty for tall bottles that do not fit elsewhere
14. Turn the Cabinet Below a Console Table Into Bin Storage
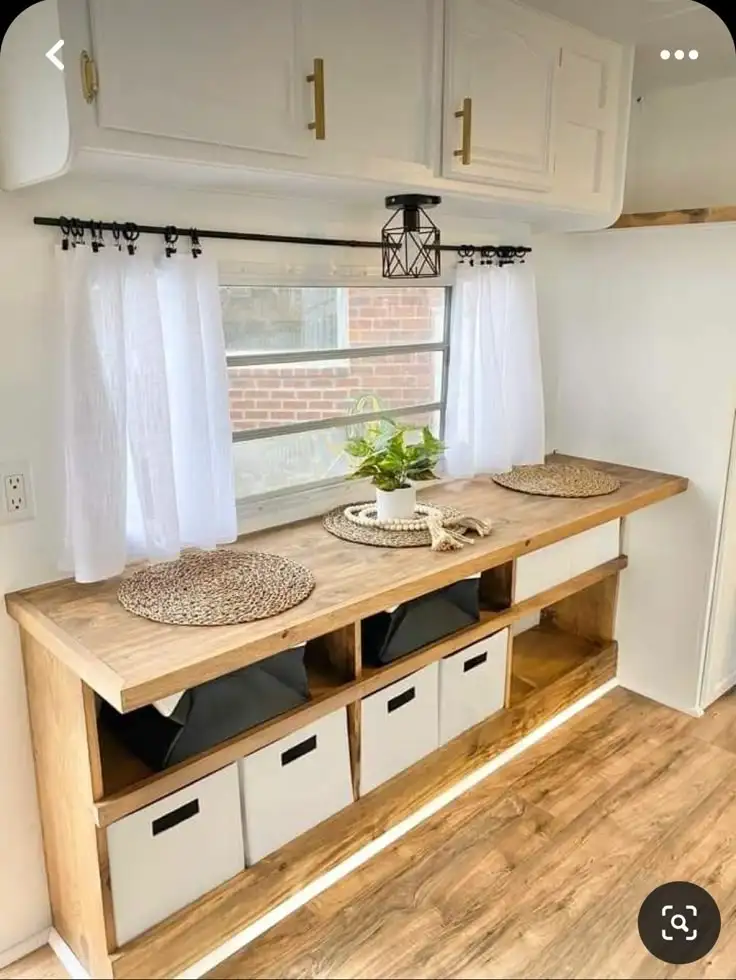
An RV console sits away from the sink itself, but the open cubby storage below it solves the same overflow problem every small galley runs into eventually, there is simply nowhere else to put extra linens once the under sink cabinet fills up.
Four fabric bins slide into the open squares, two dark and two light, holding folded dish towels and cleaning cloths that do not fit anywhere near the plumbing.
- Measure the open cubby before buying bins, since off the shelf sizes vary by an inch or two
- Sort by fabric type, dish towels in one bin, cleaning rags in another
- Leave one cubby open for whatever overflows that week
- Use the tabletop above for anything that needs to stay visible, like a spare roll of towels
15. Stand Fresh Water Jugs Upright Beside the Propane Tank
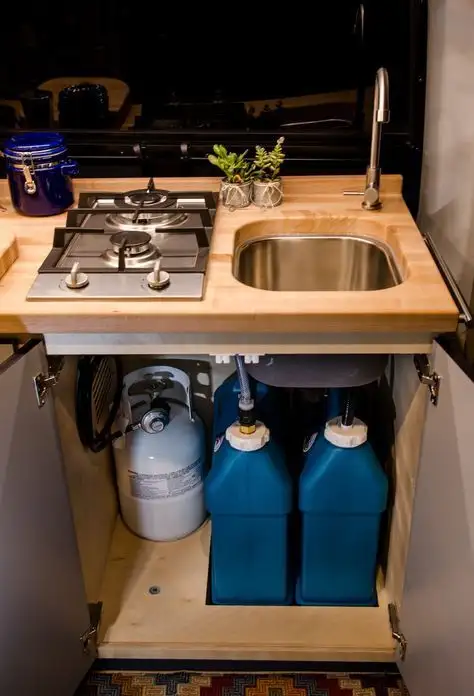
A single propane tank sits on one side of this compact RV kitchenette, and two tall water jugs stand upright on the other, each one kept in its own lane instead of crowding the same shelf.
Standing the jugs up instead of laying them flat is the detail worth copying, since an upright jug takes a smaller footprint and is far less likely to leak through a loose cap.
Laying jugs flat saves height but risks a slow drip every time the rig hits a bump, while standing them up costs a bit of vertical space but keeps the cap on top where gravity works in your favor.
For a small galley like this one, upright wins almost every time.
16. Hide the Trash Bin Right Under a Farmhouse Sink
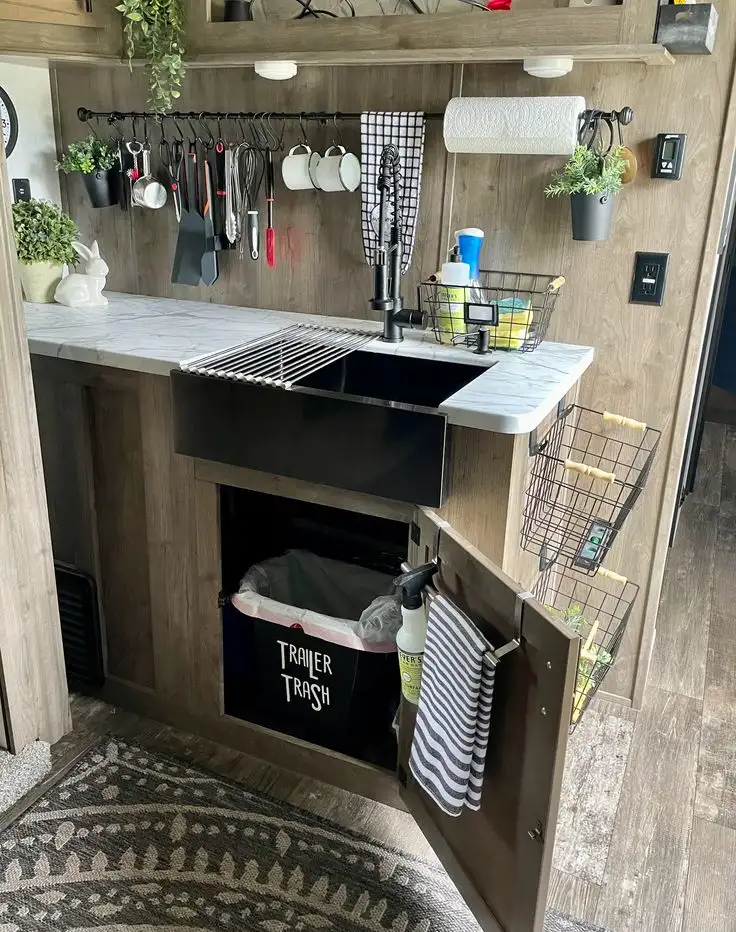
Trailer Trash gets its own canvas bin directly under the drain of this farmhouse sink, catching food scraps and packaging before they ever touch the cabinet floor.
A rail above the sink holds tongs, a whisk, and a cloth on hooks, keeping the counter clear, while a spray bottle and a striped towel hang off the inside of the door for a fast wipe down.
- Put the liner bin in the spot closest to the drain so scraps travel the shortest distance
- Choose a bin with a rigid rim so the liner does not collapse in on itself
- Hang the towel on the door, not a hook inside the cabinet, so it dries in open air
- Keep the spray bottle upright near the hinge where it will not tip when the door swings
Keep the trash liner closest to the drain and pick a bin with a rigid rim, so it never collapses when you toss something in.