17 RV Kitchen Drawer Organization Ideas That Survive Travel Days

If you’ve ever opened an RV drawer after a long stretch of highway and found spoons tangled with spice jars and a rogue peeler rolling around loose, you already know the real problem with camper kitchens.
It isn’t a lack of space, it’s a lack of systems built for motion. A drawer that works perfectly parked in a driveway can turn into chaos the second you hit a gravel road, and most standard kitchen organizers were never designed with that in mind.
This roundup pulls together 17 real rv drawer organization setups from actual campers and RVs, each one solving a different piece of the puzzle.
You’ll find grip mats and cargo nets for anything that slides, peg racks and honeycomb grids for cookware and cutlery that need to lock in place, wall rails and hanging hooks for pulling loose items out of drawers entirely, and zoned layouts that keep forks from ever meeting spice jars.
Some ideas cost nothing but a Saturday afternoon of resorting what you already own. Others are worth building from scratch if you’re renovating a rig top to bottom.
Whether you’re outfitting a first camper or fixing a kitchen that rattles every time you brake, there’s a setup here that fits your space and your budget.
1. Hang a Utility Rail So Your Drawers Never Have to Hold Loose Utensils
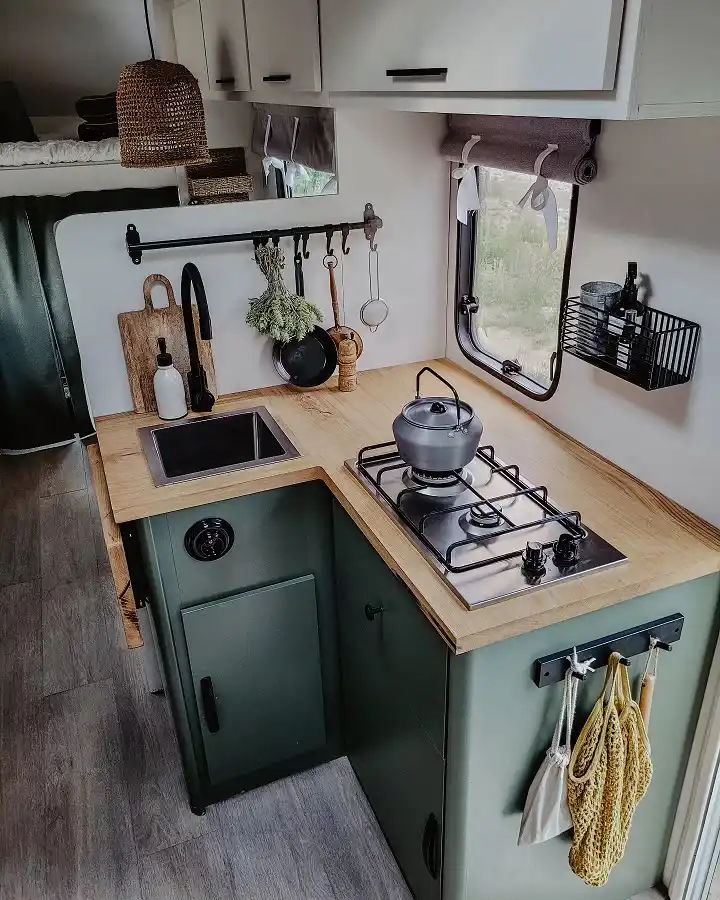
That black rail above the counter is doing more for drawer organization than any bin ever could.
Ladles, a strainer, a paring knife, even the cutting board are lifted right off the workspace and off drawer duty entirely.
Fewer loose tools means less shifting metal on curvy roads, and it means your top drawer stays reserved for things that actually need to stay closed and quiet while you drive.
Start with the items that rattle the most. A wooden spoon or a peeler barely makes noise in a drawer, but a metal strainer or a heavy ladle will slide and clang every time you brake. Those are the pieces to move up onto hooks first.
2. Line the Drawer With a Grip Mat Before You Fill It With Glassware
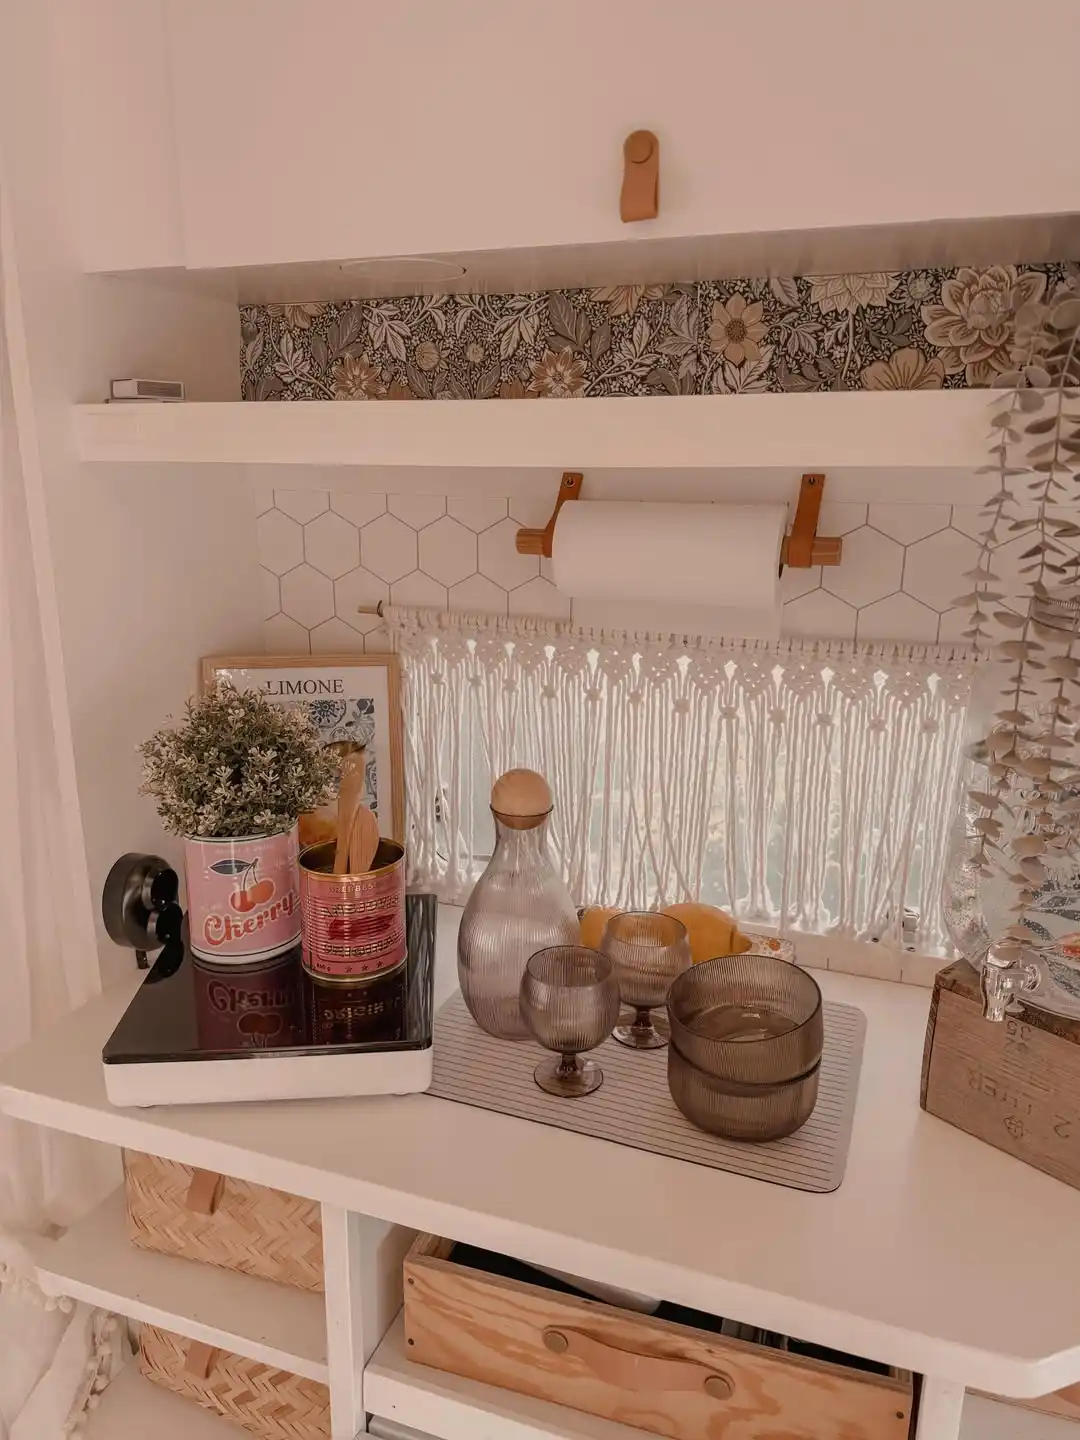
That ribbed non-slip mat under the glasses is the real trick here, and it works just as well inside a drawer as it does on a counter.
Cut a piece to fit the bottom of any drawer holding cups, jars, or bottles, and everything grips the surface instead of skating around every time you take a corner.
Pair it with repurposed tins, like the cherry can holding wooden spoons, and you get built in dividers that cost nothing and never rattle against each other.
- Measure the drawer bottom. Cut the grip mat a half inch smaller on each side so it lies flat without bunching.
- Group by shape, not by use. Tall glasses go together, short bowls go together, so nothing tips into an empty gap.
- Drop in a tin or small box as a divider. It keeps one grouping from sliding into the next during a sharp turn.
Cut the grip mat a half inch smaller than the drawer on each side.
Keep tall glasses together and short bowls together so nothing tips into a gap.
A repurposed can or small box keeps one grouping from sliding into the next.
3. Choose a Perforated Metal Drawer If You Want a Fridge That Survives Bumps
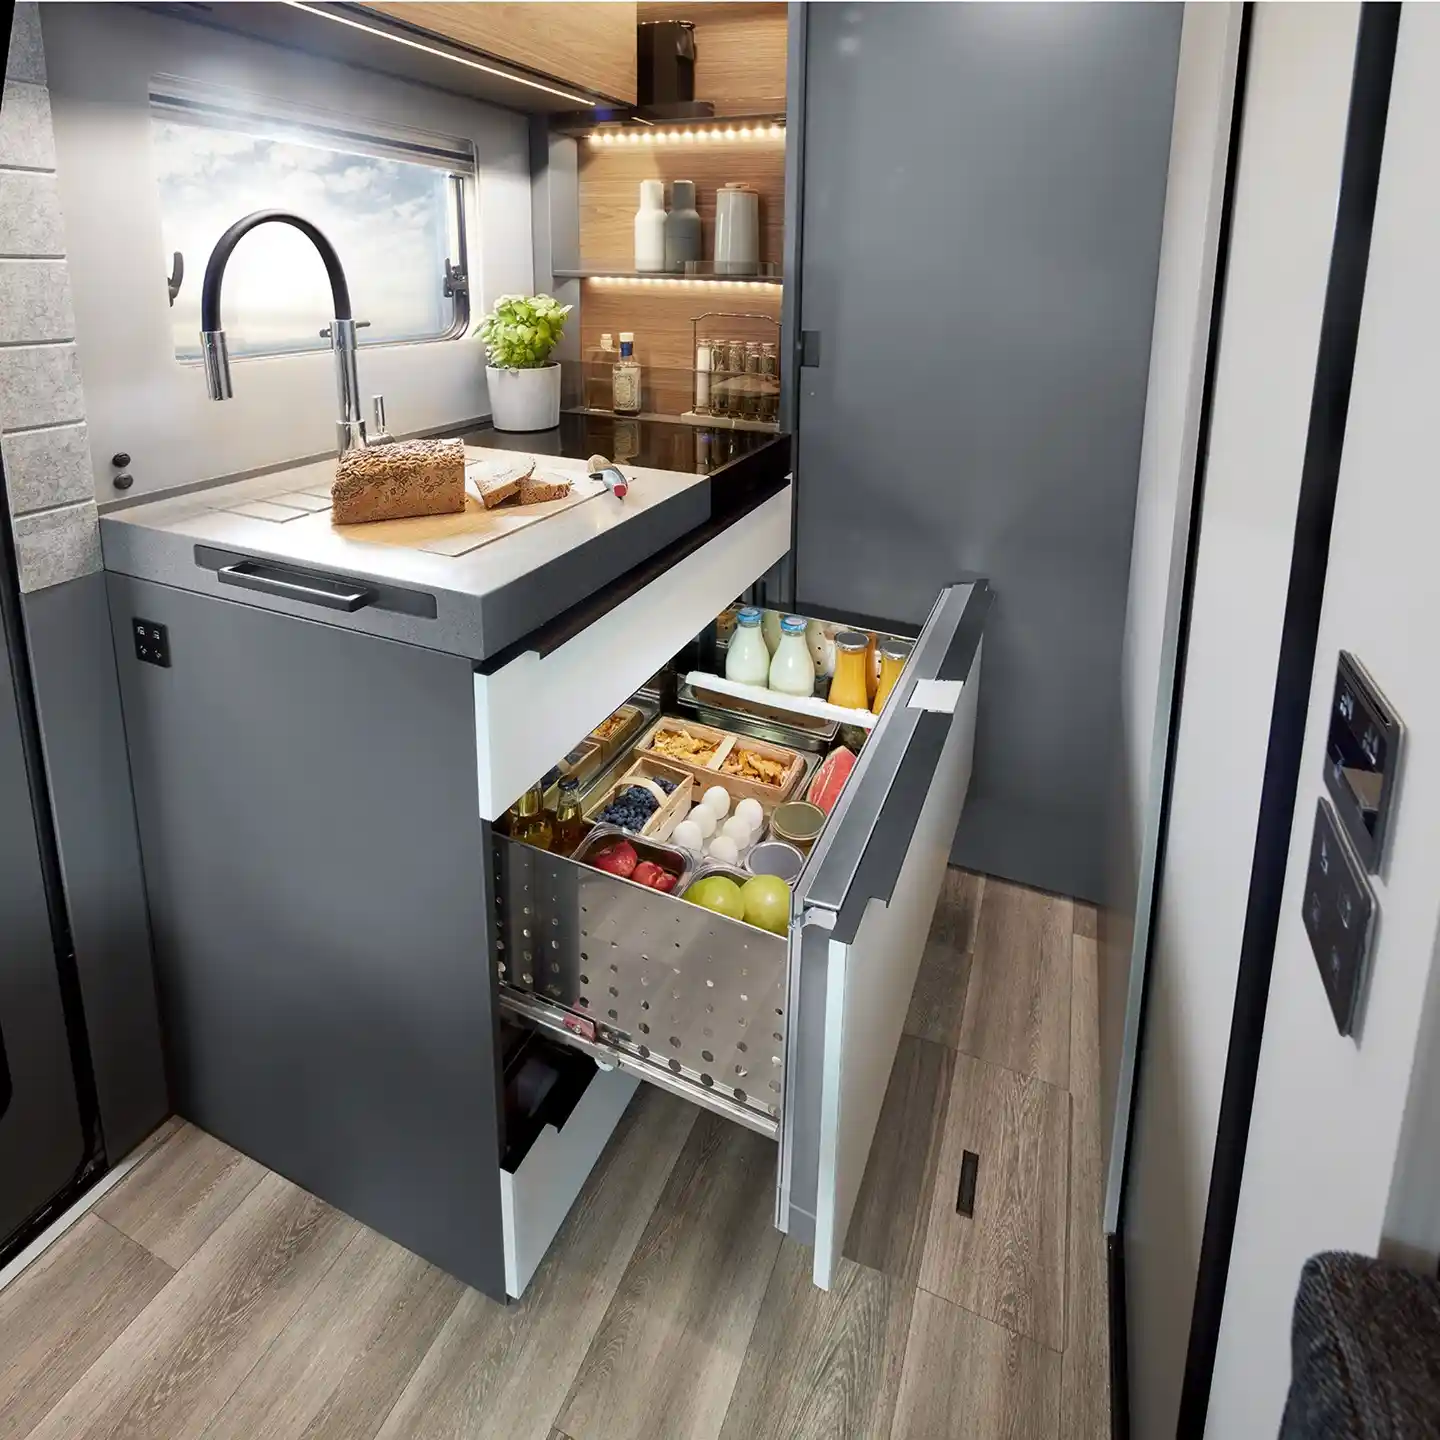
That pull out drawer fridge is built for exactly the kind of motion a fridge dreads. The perforated stainless steel tray keeps air moving around every bottle and egg carton, while the raised edges and tight compartments stop produce from rolling the second the road gets rough.
Notice how the milk and juice sit upright in their own tray at the back, completely separated from the loose fruit up front.
That separation is the whole point. Soft produce gets its own zone so a hard bump from a canned good never bruises it.
4. Mount Your Knives on the Wall Instead of Storing Them Loose in a Drawer
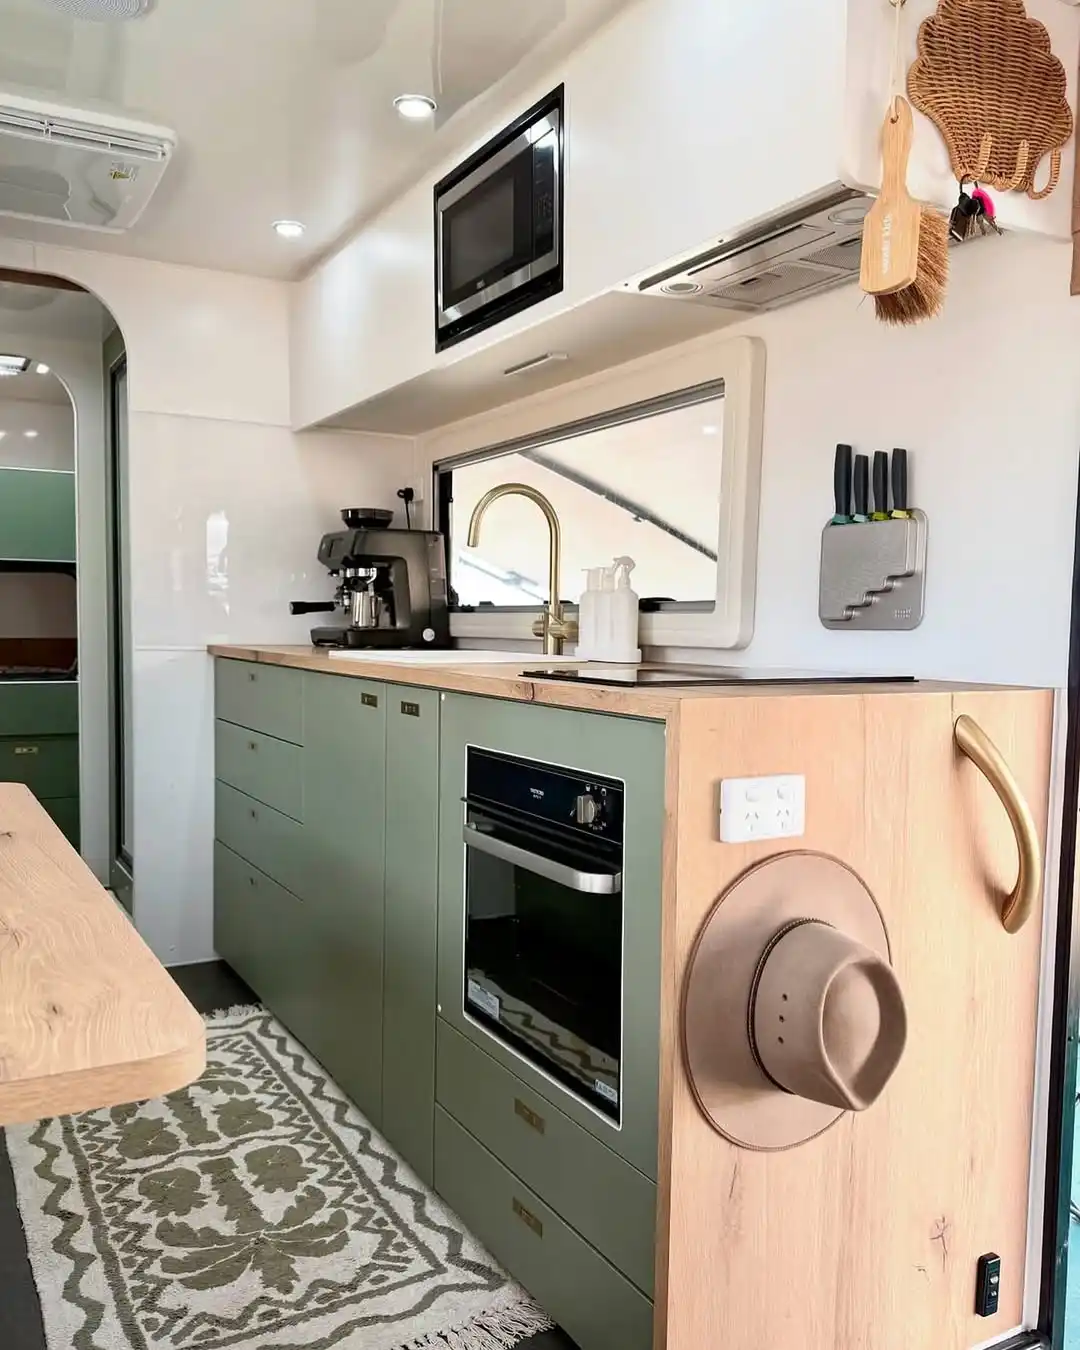
Knives rattling around in a drawer is one of the more dangerous habits in a moving kitchen.
This setup skips that risk entirely with a magnetic strip mounted right by the window, holding four knives blade up and completely secured.
No drawer, no sheath, no reaching around for the right one while the rig is swaying.
It also frees up an entire drawer slot for something else, which matters a lot when your whole kitchen is four narrow drawers stacked under the oven.
Those stacked drawers are worth copying too. Instead of one deep drawer holding everything, four shallow ones let you zone by category: utensils in one, dish towels in the next, spices below that. Shallow drawers naturally limit how much can shift around inside them.
Mount the strip somewhere it won’t be brushed while walking through the kitchen, and always point blade tips toward the wall, not toward the counter edge.
5. Hang Everyday Mugs on Hooks So the Drawer Below Holds Only Flatware
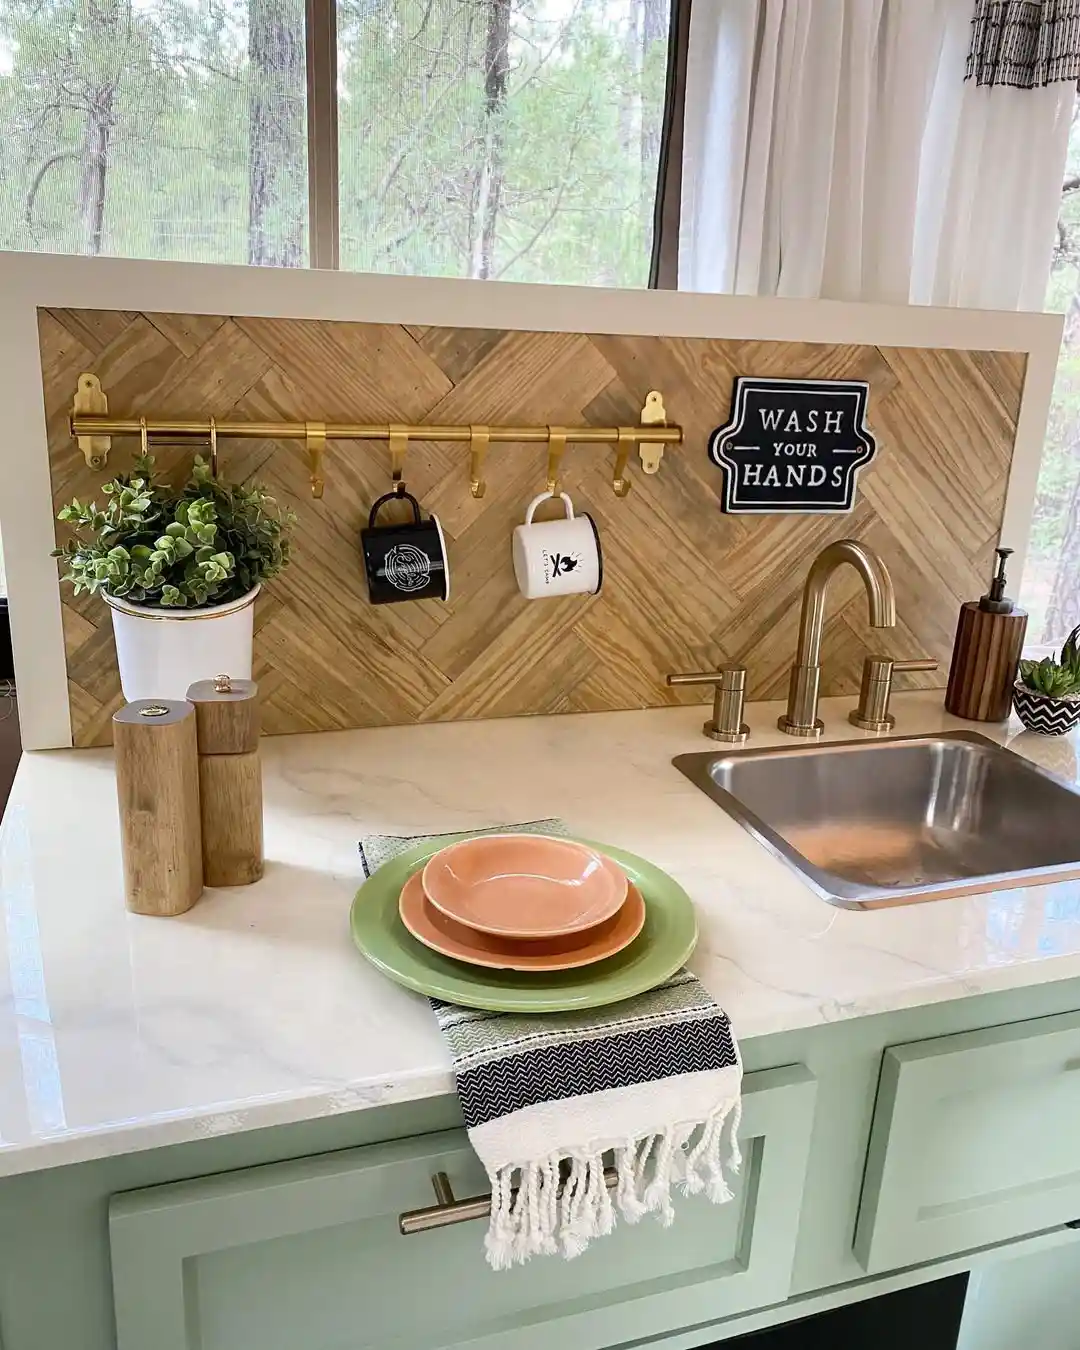
Mugs are heavy, oddly shaped, and they clink louder than almost anything else in a kitchen.
This brass hook rail solves that by pulling them off the shelf entirely, which means the drawer underneath never has to hold anything besides flat, stackable items like spoons and forks.
The wood herringbone backing also does quiet work here, since a textured surface hides small water spots and marks far better than a smooth painted wall would on travel days.
Salt and pepper grinders standing upright on a rubber base, like the wooden ones on this counter, are another easy swap.
They sit heavier and lower than shaker bottles, so they are far less likely to tip during a stop.
Hang mugs on hooks, handles facing out for an easy grab.
Keep grinders upright on a wide, heavy base.
Stacking mugs loose in a drawer where handles can snap.
Storing tall, narrow shaker bottles that tip on a curve.
6. Clip Glasses and Spice Jars to an Overhead Rail Instead of Packing Them Below
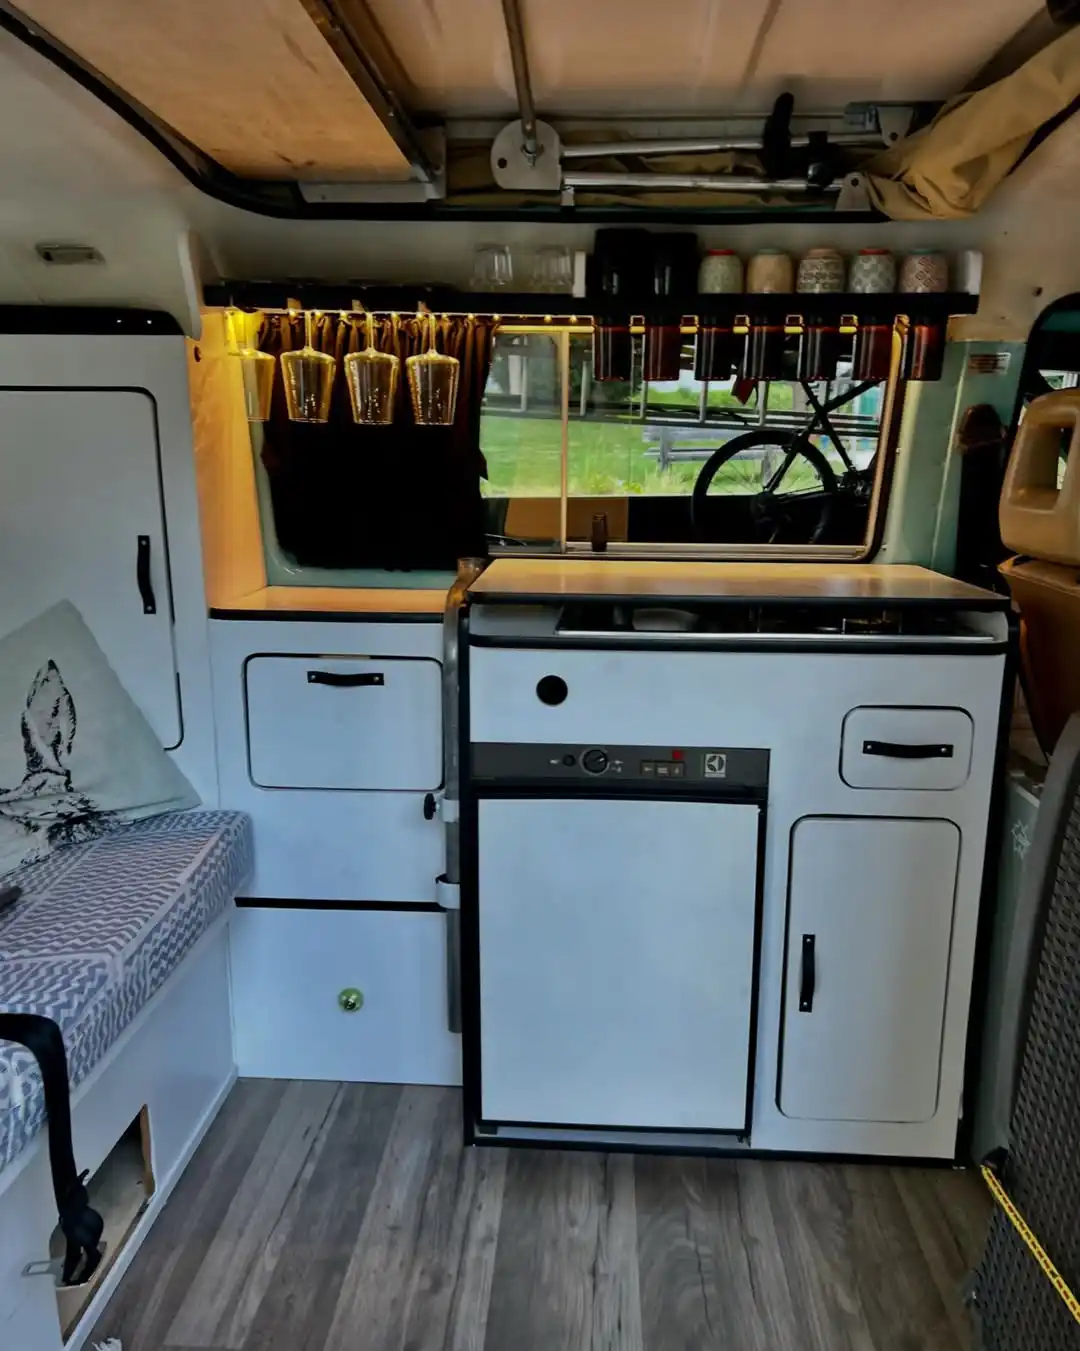
Drawer space runs out fast in a small camper, and this setup solves it by moving glassware and spice jars up and out of the way completely.
Each glass hangs upside down from a metal rail with a dedicated clip, so it stays locked in place even on gravel roads, and the spice jars sit in a second row of holders just above the window.
Nothing in either row touches the drawers at all, which means the drawers under the counter stay free for heavier items that actually need a solid base.
The tradeoff worth knowing: anything clipped overhead needs a rail rated for the weight, and glass is the riskier choice compared to shatterproof camping cups.
If you’re building this from scratch, camping grade acrylic glasses get you the same look with a lot less worry.
Anything clipped overhead is one less item your drawers have to hold, and one less thing that can rattle loose while you drive.
7. Pack Spice Jars Standing Upright So Nothing Tips When the Drawer Opens Midway
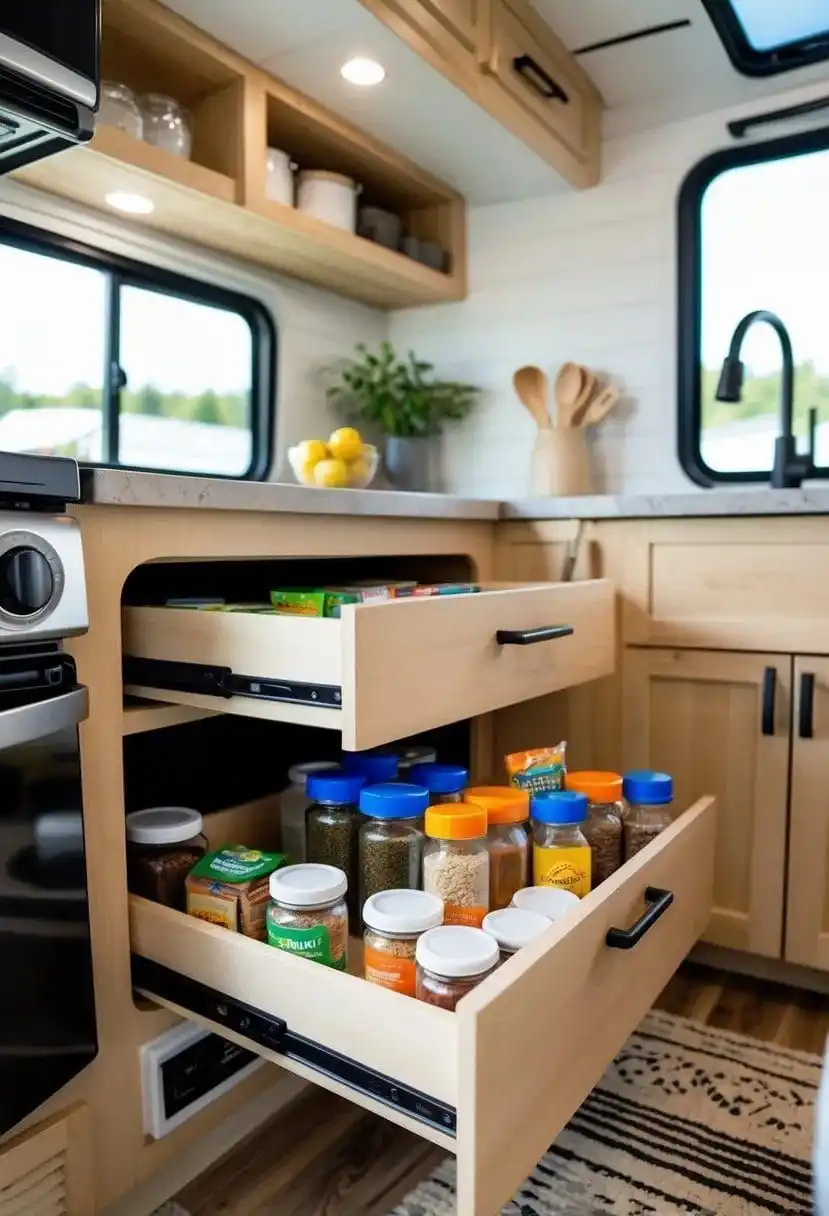
Lay a spice jar on its side and a rough road will roll it straight to the back of the drawer within an hour of driving.
Every jar here stands upright instead, packed close enough that neighboring jars act as their own bracing.
Notice how the lids alternate colors by type, which turns this drawer into a spot you can scan at a glance instead of picking up every jar to read a label.
The wooden utensil crock on the counter follows the same upright logic, holding spoons vertical instead of letting them slide loose in a drawer.
This only works if the jars are a similar height. Mixing a tall bottle in with short spice jars gives the tall one room to tip, so sort by height first, then group by how often you reach for each one.
8. Label Each Drawer by Category So Everyone Packing the Rig Puts Things Back in the Right Spot
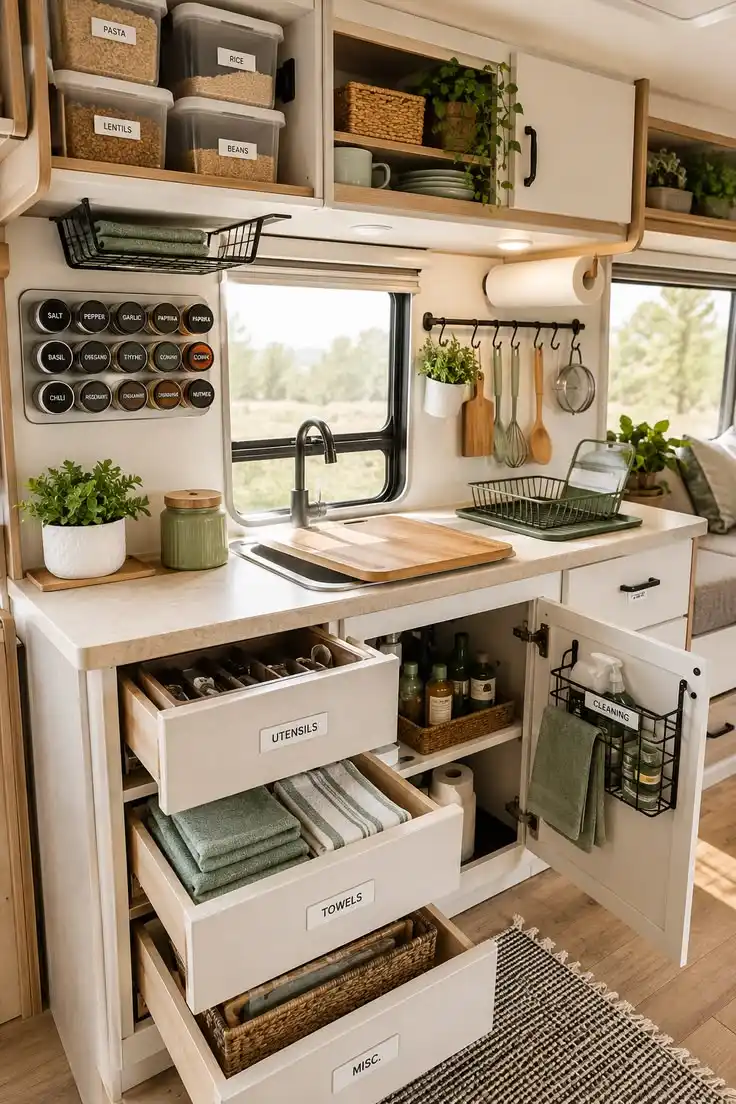
Labeled drawers turn a shared camper kitchen into something anyone in your group can use without asking where things go.
Utensils, towels, and misc each get a dedicated drawer here, with a fitted insert in the utensils drawer keeping forks and knives from sliding into one tangled pile.
The door mounted caddy on the cabinet is worth copying too. It holds spray bottles and a towel vertically on the inside of a door that would otherwise be wasted space, freeing up a full drawer for something else.
The magnetic spice wall to the left is doing similar work outside the drawers entirely. Every tin is labeled and visible at a glance, so no drawer has to hold a spice rack at all.
9. Custom Cut Every Slot to the Exact Tool Instead of Buying One Generic Tray
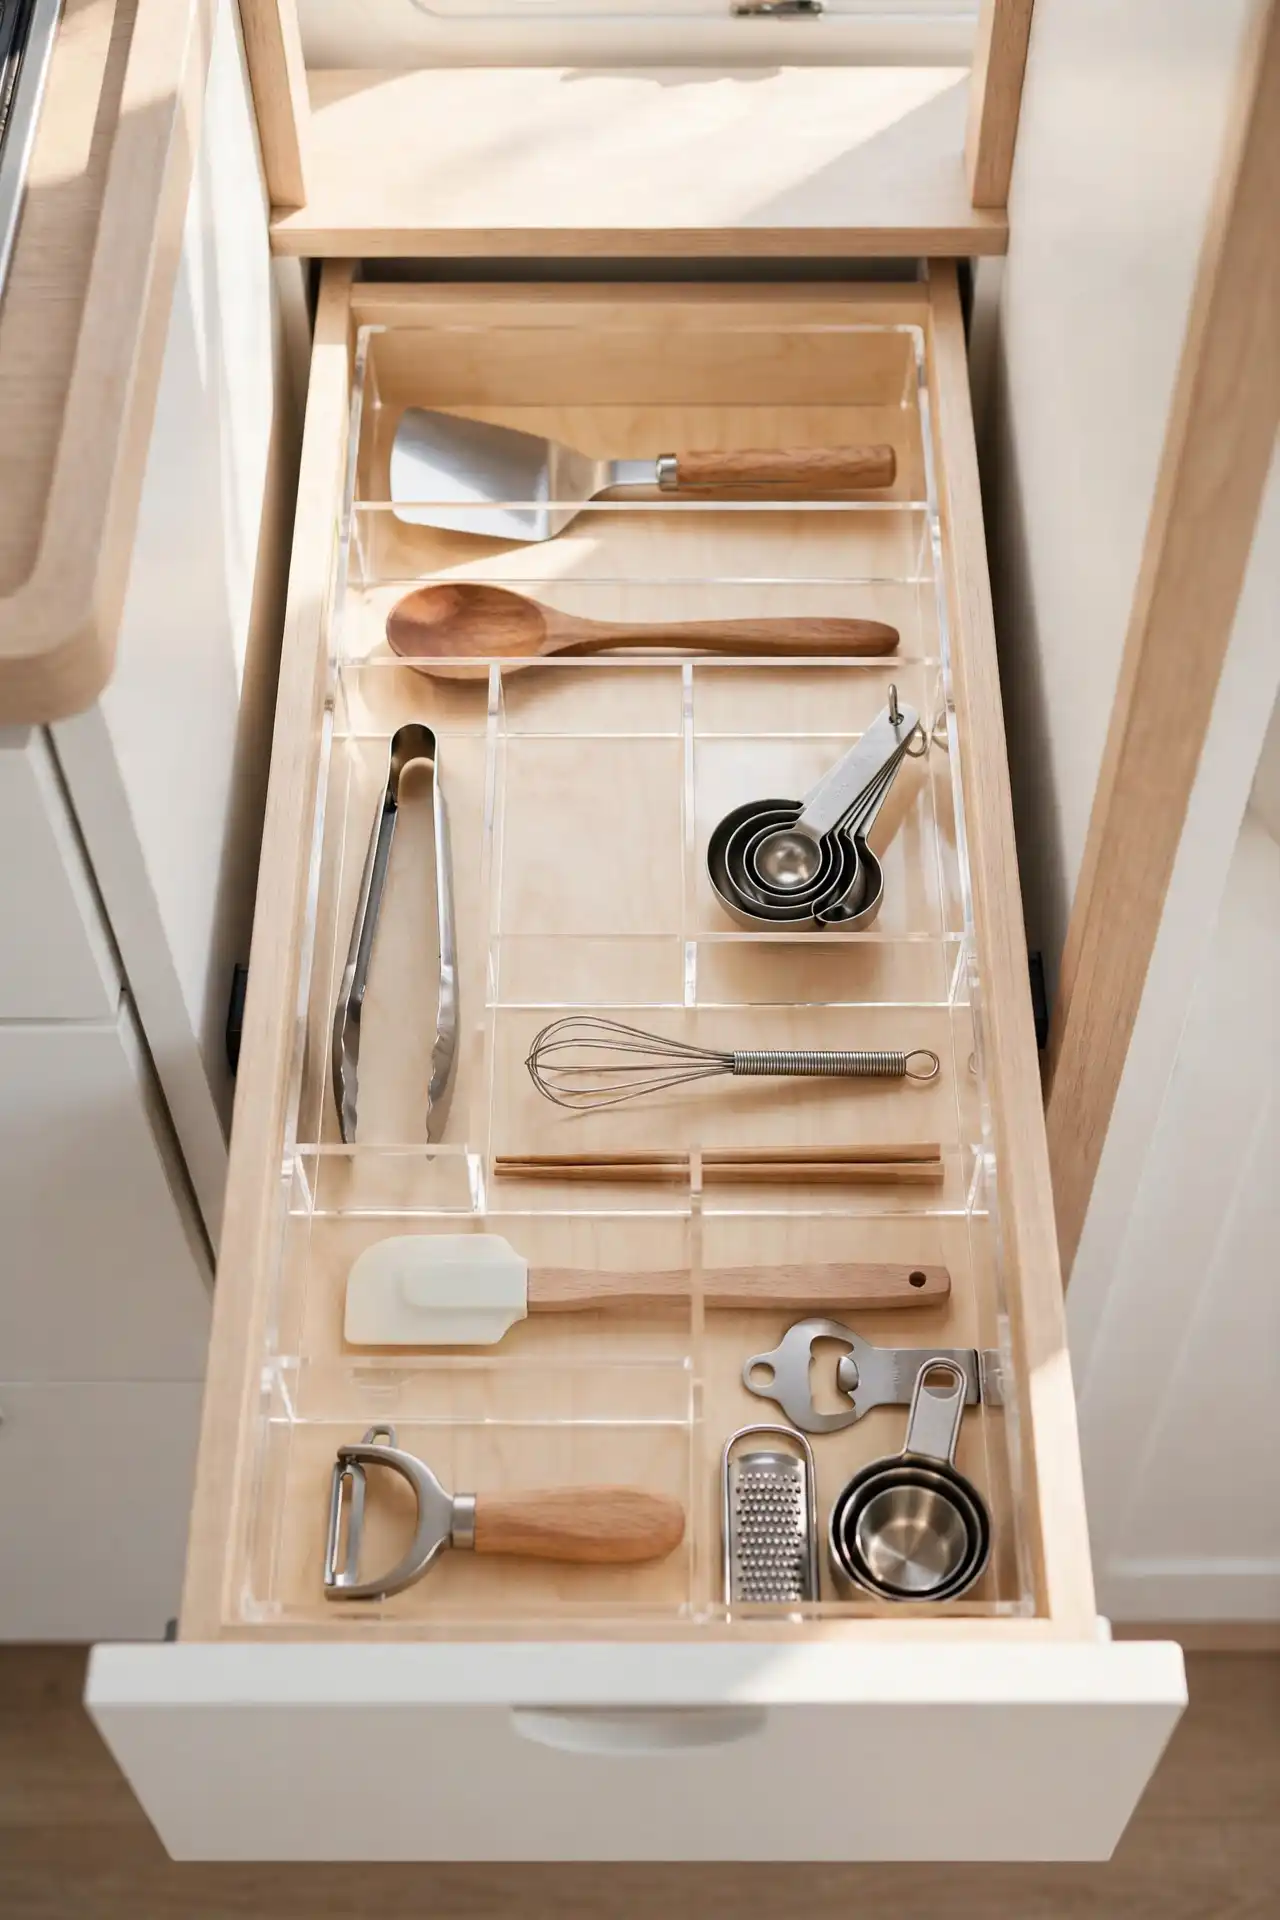
A generic utensil tray leaves gaps, and gaps are exactly where things slide during a drive.
This tray skips that problem by cutting a slot for each specific tool, from the spatula down to the single row built just for measuring cups.
Nothing here has room to shift because nothing here has extra room at all. The tongs get their own narrow column, the whisk lies flat in its own channel, and even the bottle opener sits snug against the grater instead of floating loose.
If a fully custom insert feels like too much work, a stack of clear acrylic drawer dividers gets you close.
Buy a few different widths, then arrange and rearrange them until each tool has its own tight-fitting lane.
| Generic tray | Custom cut tray |
|---|---|
| Leftover gaps let tools slide and knock together. | Each tool sits in its own snug slot with no room to move. |
| One size fits most, but not every drawer. | Built to match your exact drawer and tool set. |
| Cheaper and ready right away. | Takes more planning but stays quiet on every drive. |
10. Stretch a Cargo Net Across the Drawer to Cage in Pots and Pans
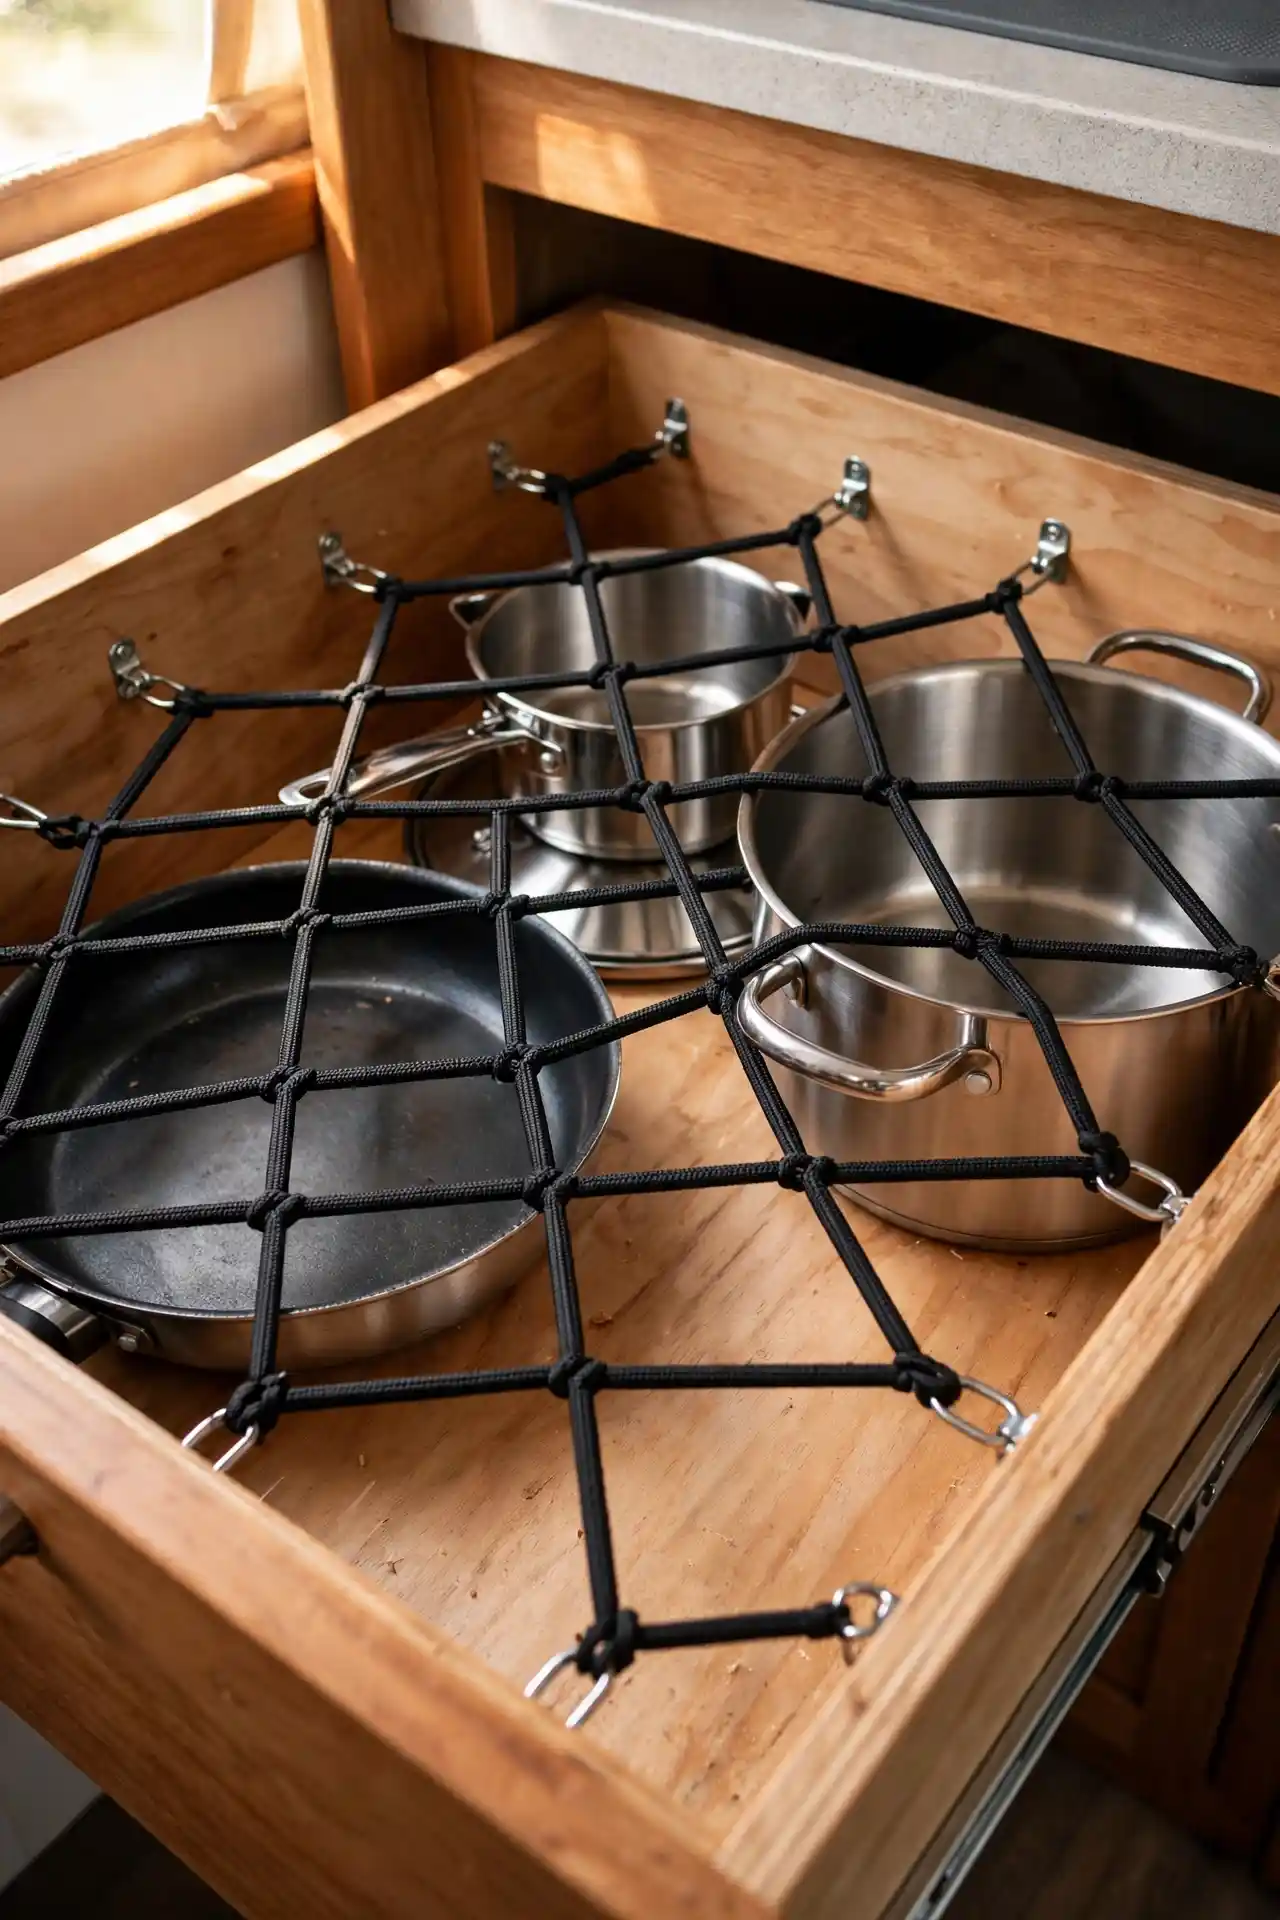
Bulky items like pots and skillets are the hardest to organize because they don’t stack neatly and they’re heavy enough to do real damage if they slide.
This drawer solves it with a bungee cargo net, hooked into small anchors screwed into the drawer’s corners and edges.
The crisscross pattern presses down on the cookware from above, so nothing lifts or shifts even if the drawer bounces open on a rough patch.
It’s a simple fix that costs less than most drawer organizers and takes about ten minutes to install.
- Screw small eye hooks into the drawer’s inner walls, one near each corner.
- Stretch a bungee cargo net across the top of your cookware and clip each corner into a hook.
- Leave enough slack that the net presses down firmly without straining the anchors.
11. Skip the Divided Tray for a Honeycomb Grid If You Want Every Piece to Stand Alone
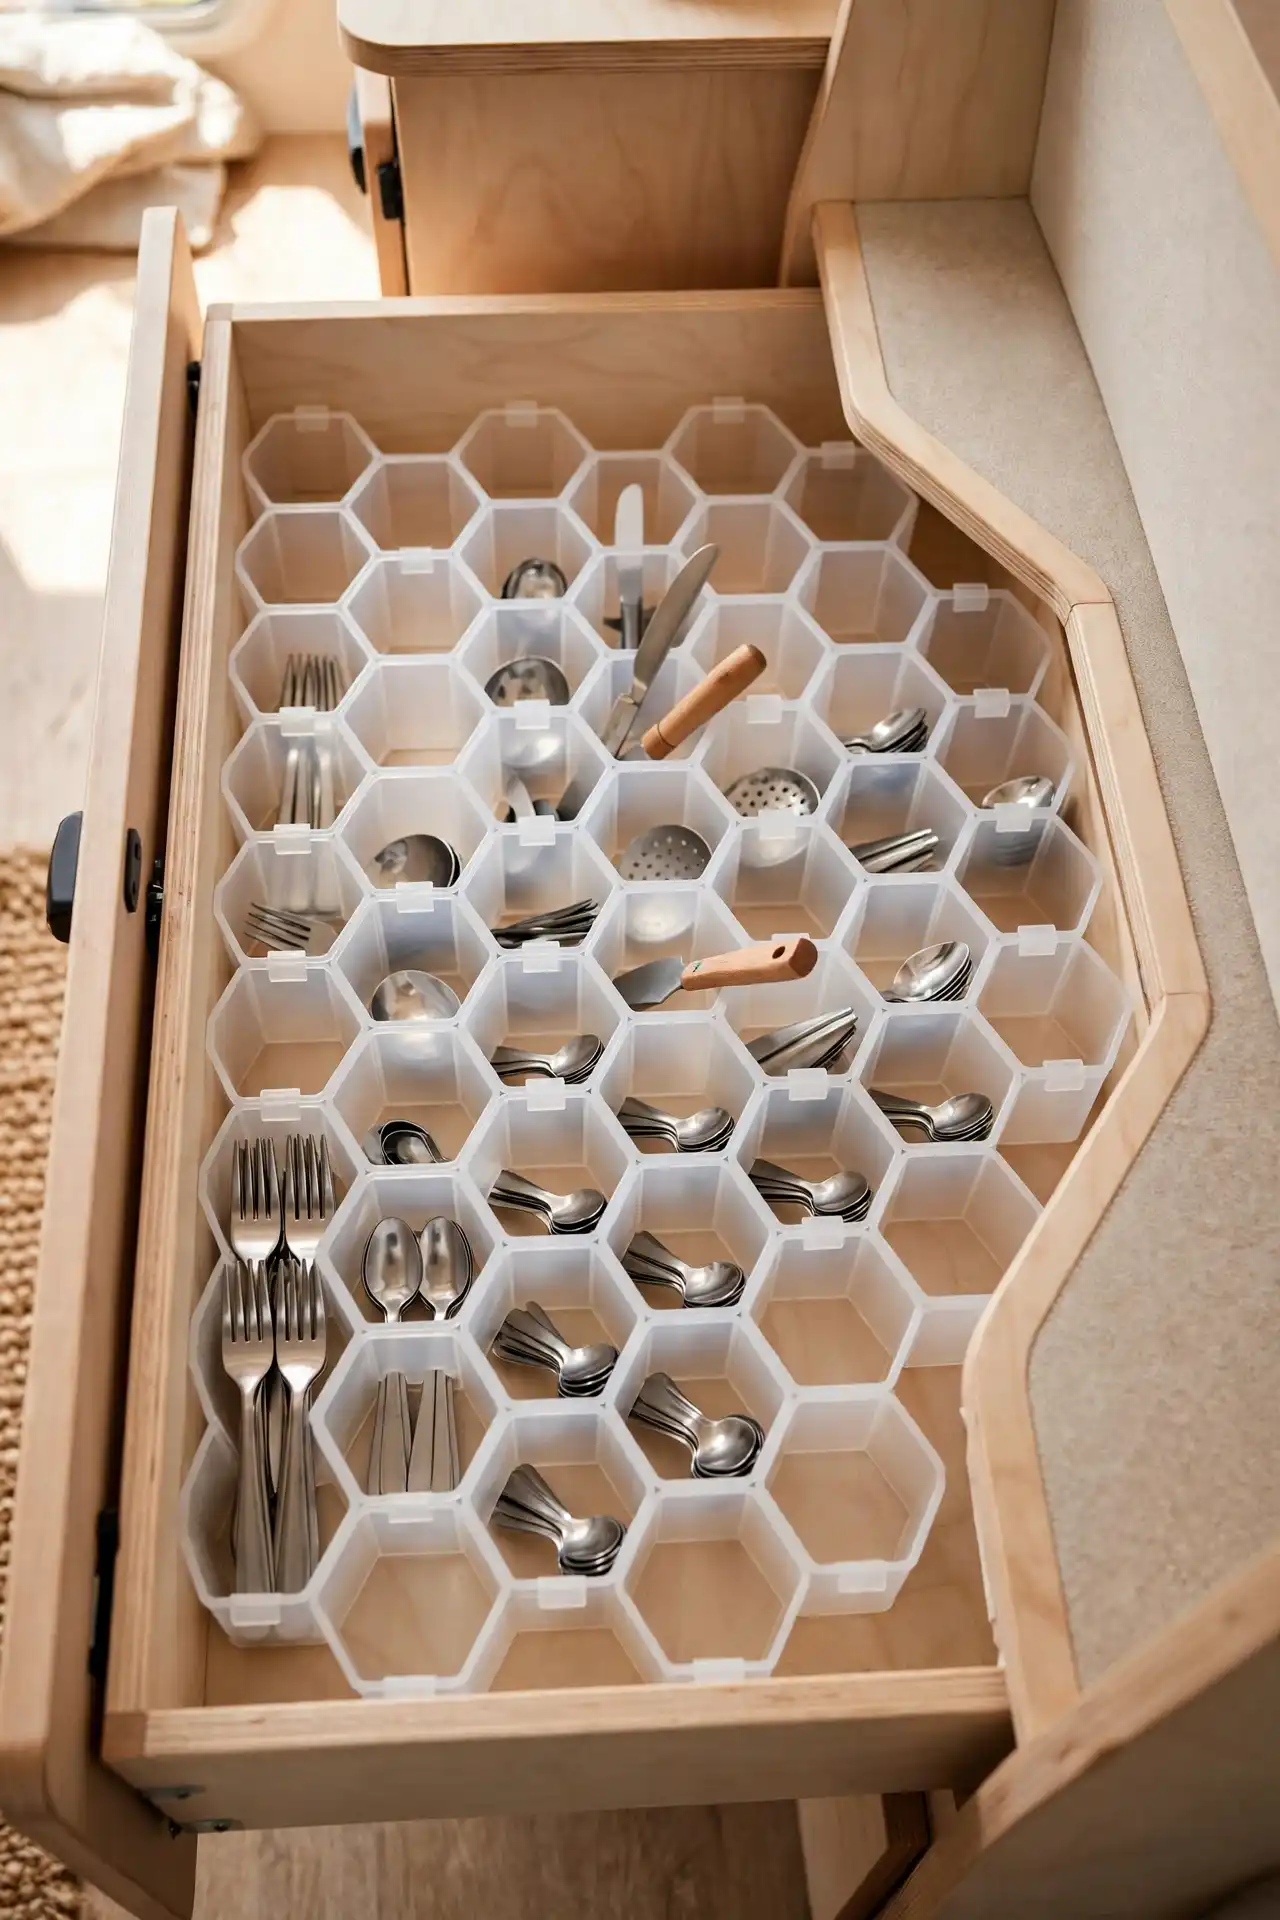
A standard divided tray gives you four or five wide sections, which still leaves plenty of room for spoons to slide into forks.
This honeycomb grid skips that problem entirely by giving nearly every single piece its own individual cell.
Forks lean upright in one column, spoons nest in twos and threes in the next, and small tools like the paring knife and zester get their own private slot instead of sharing space with anything else.
Because each cell is small and enclosed on all sides, cutlery can shift only a fraction of an inch no matter how rough the road gets.
The tradeoff is setup time. Sorting a full flatware set into dozens of tiny cells takes longer than dropping utensils into a few wide slots, but you only have to do it once.
12. Anchor a Locking Bar Across Stacked Plates So They Never Slide Off the Shelf
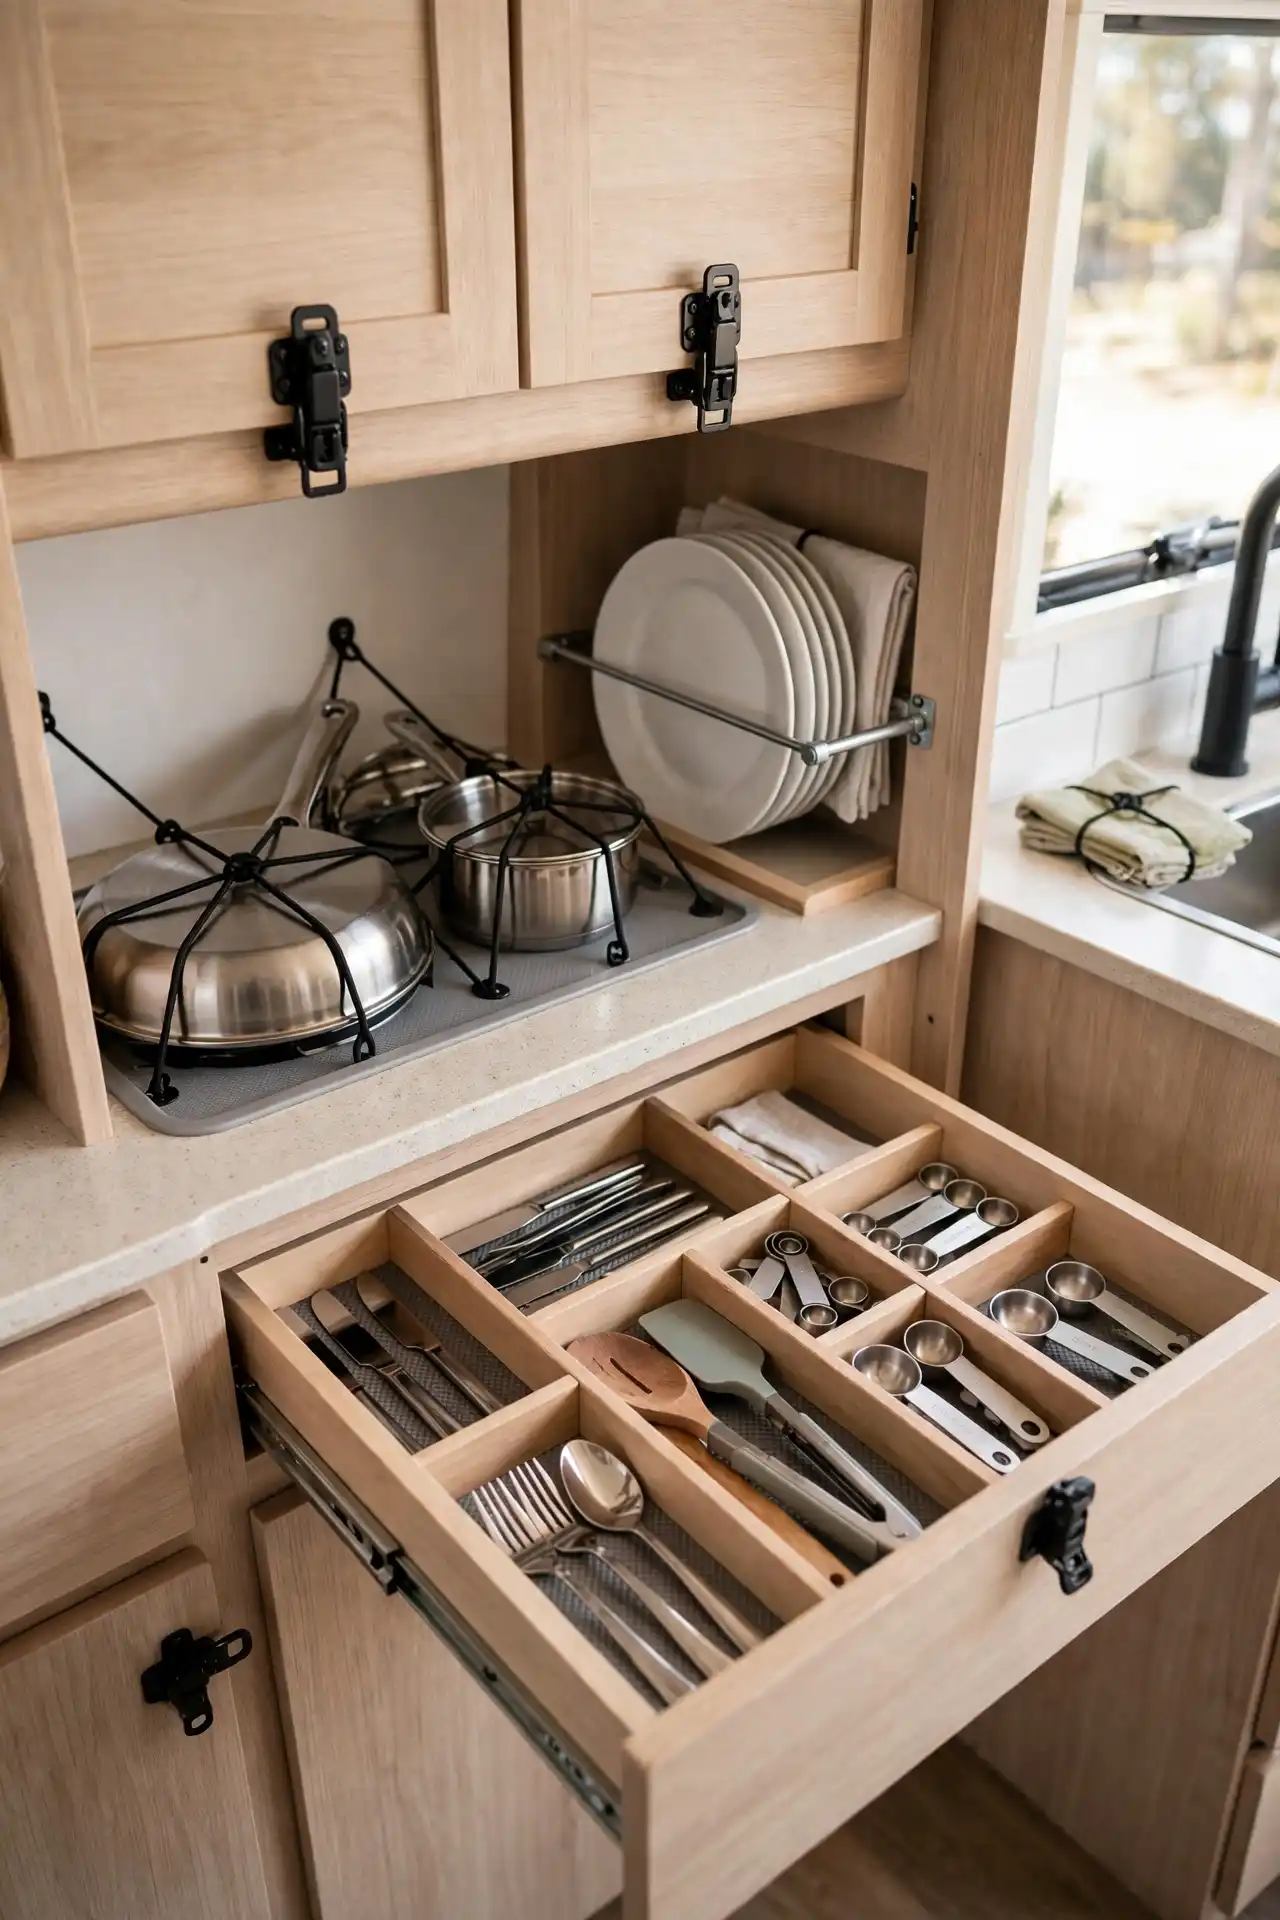
Plates are some of the easiest things to lose to a sudden stop, since a bare stack has nothing holding it in place front to back.
This cabinet solves it with a simple metal locking bar mounted across the front edge of the shelf, keeping the whole stack pinned even when the cabinet door swings open mid drive.
The same bungee cross straps from the pots and pans drawer make a second appearance here too, holding the skillet and saucepan down against a rubber mat so neither one can slide sideways into the plates.
Down in the open drawer, wooden dividers split the space into distinct lanes for flatware, measuring spoons, and small tools, each lane just wide enough to hold its contents snug without extra room to rattle.
A bare stack of plates with nothing holding the front edge in place.
A locking bar pinned across the stack, holding every plate in place even with the door open.
13. Build a Peg Rack Under the Stove So Cast Iron Stops Shifting Entirely
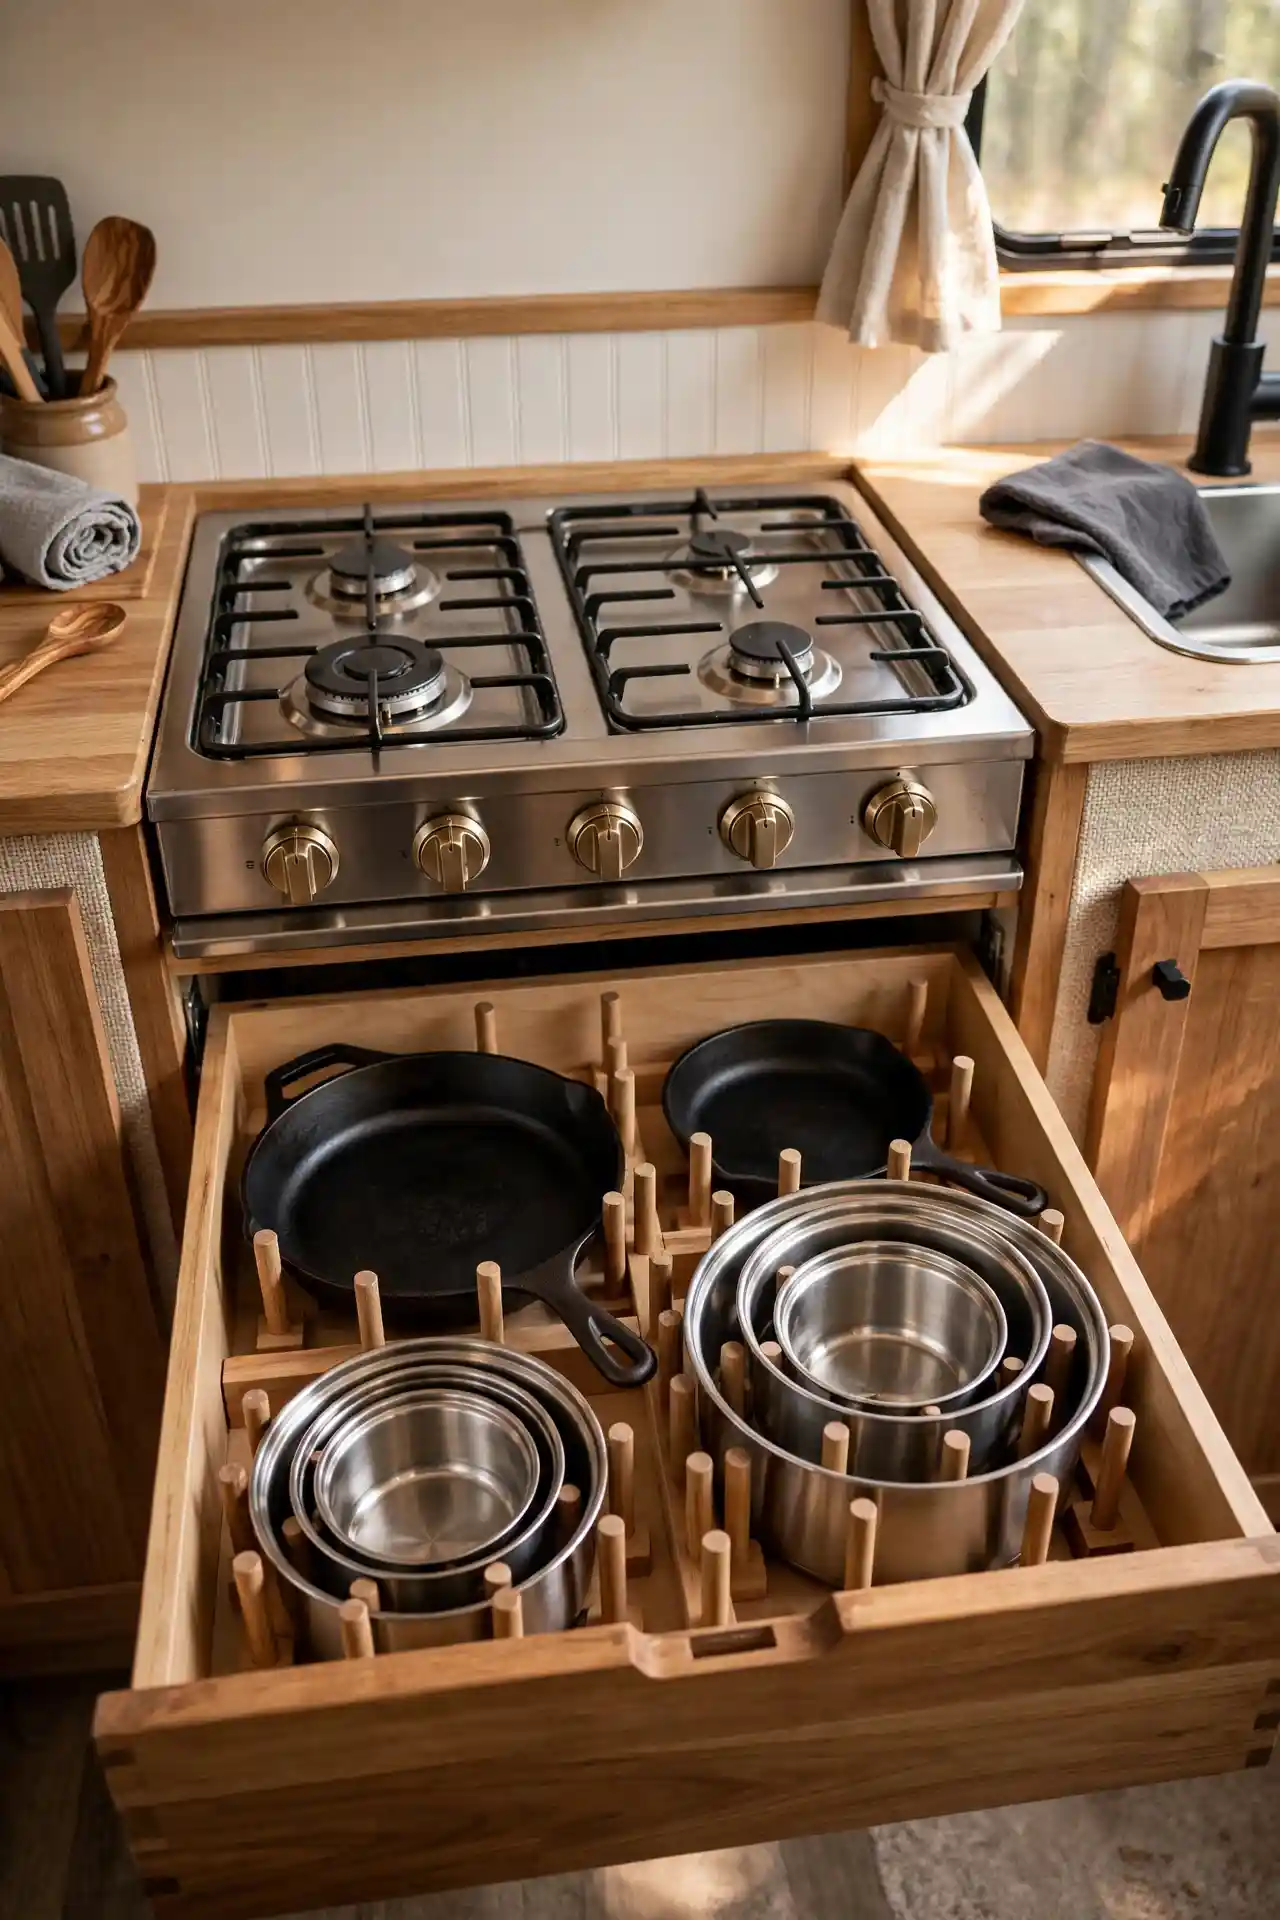
Wooden pegs turn a plain drawer into a locking system for the heaviest pieces in your kitchen.
Each skillet and pot slides down between a ring of dowels sized to its exact base, so cast iron pans that would normally slam sideways stay locked in one spot no matter how the road moves underneath them.
Look closely and you’ll notice the pots are even nested by size within their own peg ring, smallest on top, largest on the bottom, so the whole stack rides low and stable instead of top heavy.
Building this yourself just means drilling holes in a scrap board and gluing in dowels around the outline of each pan’s base.
No brackets, no hardware, and it costs almost nothing beyond a trip to the hardware store.
14. Angle the Drawer Dividers So Knife Blades Point Down and Away From Your Hand
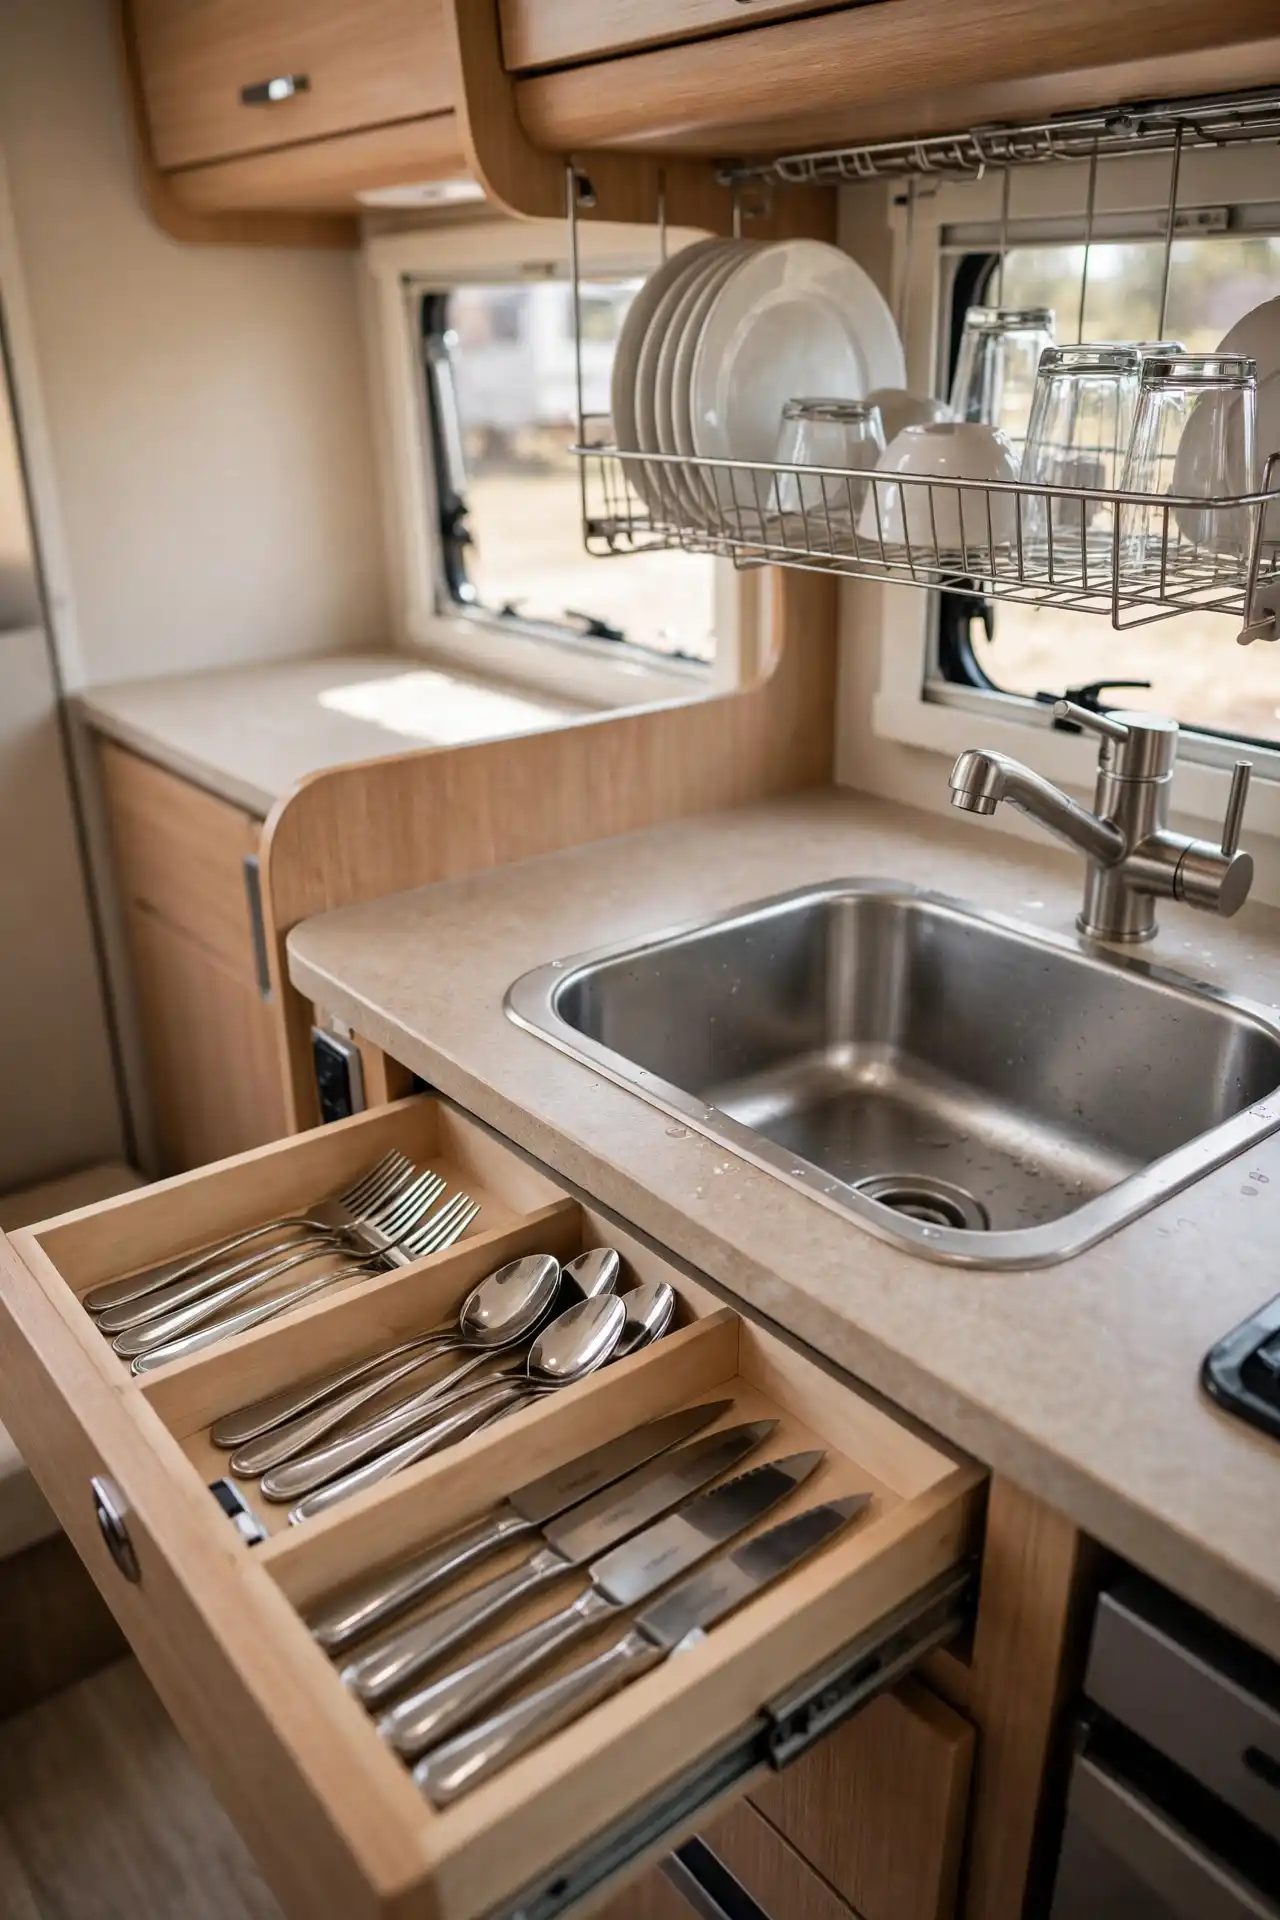
The angled wooden slats in this drawer do double duty. They keep forks, spoons, and knives in tidy rows, and the slight tilt means every blade edge points down toward the drawer bottom instead of up toward whoever reaches in.
That small detail matters more on the road than at home, since a sudden stop is exactly when a hand goes into a drawer without looking first.
The wire dish rack hanging above the sink follows the same safety-first thinking, holding plates and glasses vertically so nothing needs to touch a wet countertop while the rig is still rolling to a stop.
15. Sort Peg Rows by Weight, Not by Size, So the Heaviest Pans Sit Closest to the Stove
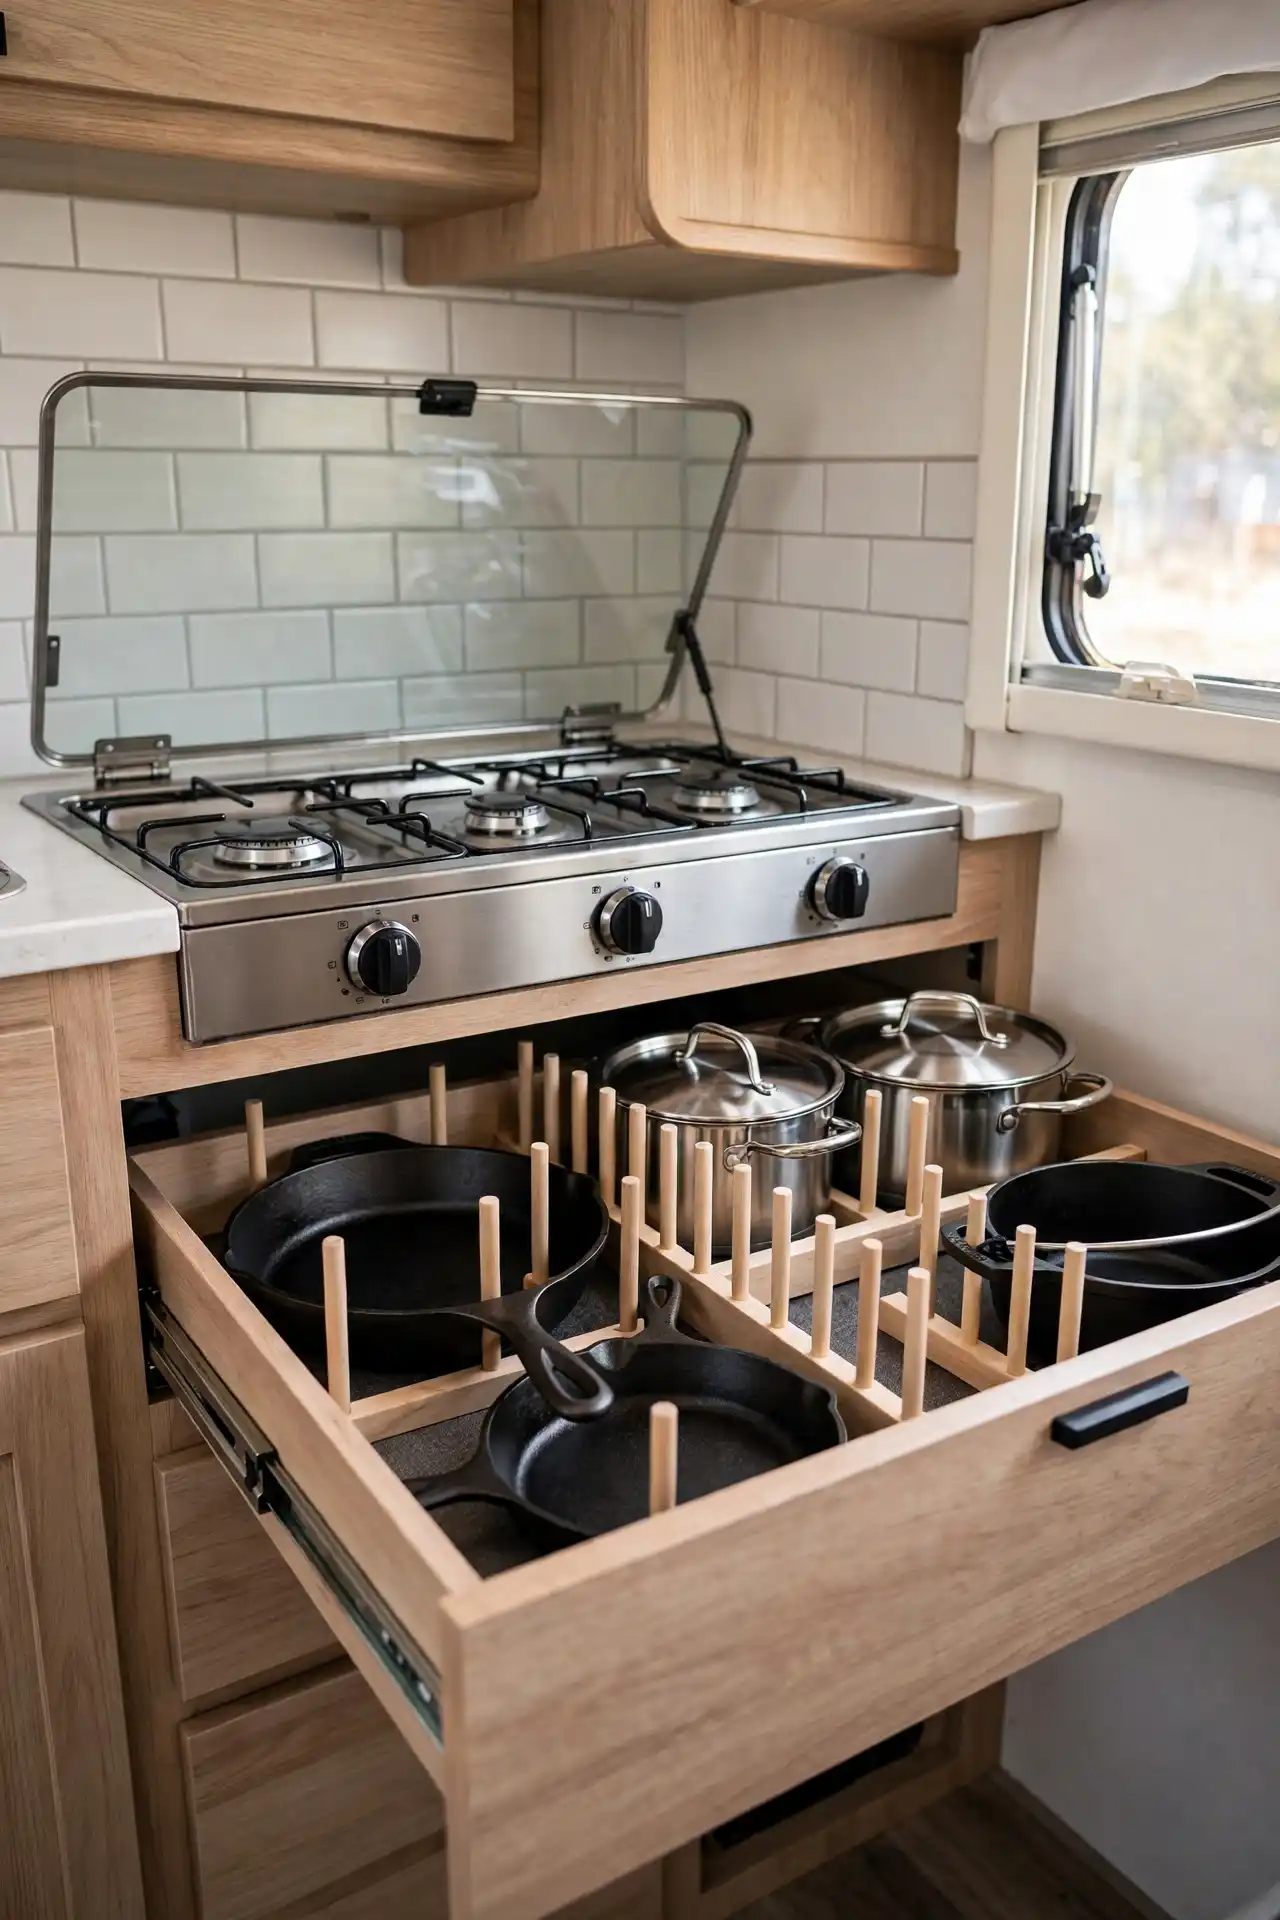
Storage right under the stove only works if what you put there actually needs to come out often, and this drawer nails that by grouping cookware by how it gets used rather than just by shape.
Skillets sit in the front row where a quick reach doesn’t mean bending far, stockpots with their lids still on sit in the taller back row where the extra height has room to clear, and the dutch oven claims its own side slot since it is both the heaviest piece and the one used least.
Every single item still locks between its own set of dowels, so the sorting logic works with the peg system instead of against it.
Keeping lids on the pots here is worth noting too. It means one less loose piece to track down when you are trying to start dinner during a short stop.
16. Dedicate a Shallow Drawer to Spices Only, Laid on Their Sides in Tight Rows
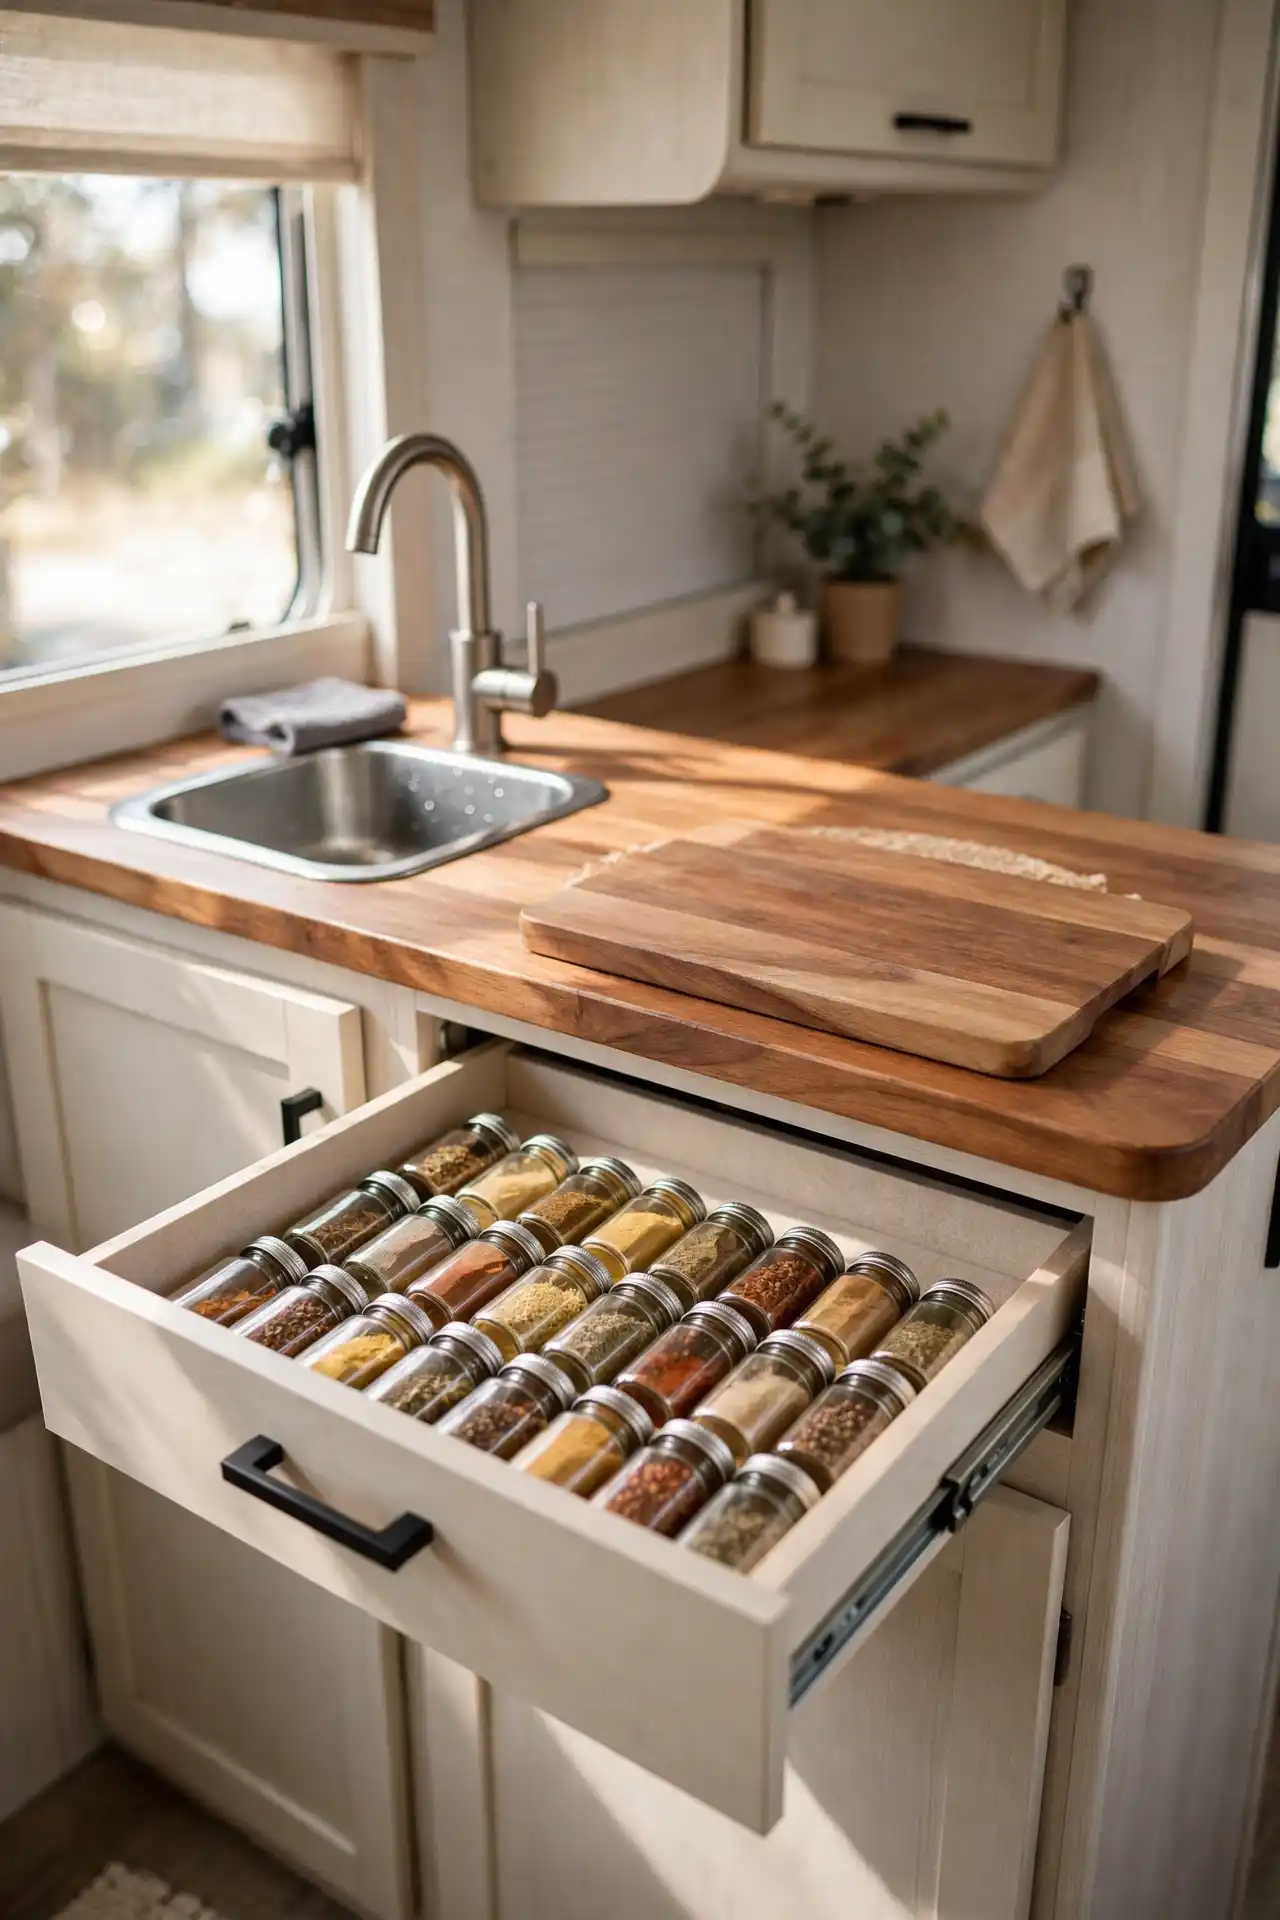
A drawer this shallow would go to waste holding almost anything else, but it is exactly right for spice jars laid flat instead of standing up.
Packed shoulder to shoulder in neat rows, the jars have no room to roll because there is nowhere for them to roll to.
Every label faces up too, so a glance down into an open drawer tells you exactly what is where without lifting a single jar out.
It is a completely different approach from stacking spices upright in a taller drawer, and it works because the drawer depth does the job dividers usually have to do.
If your camper only has one shallow drawer to spare, this is the one to claim for spices. Everything else can make do with a deeper space, but spices rarely can.
Give spices the shallowest drawer you have, not the deepest one you can spare.
17. Dedicate the Deepest Corner Drawer to Both Flatware and Cooking Utensils, Split by Zone
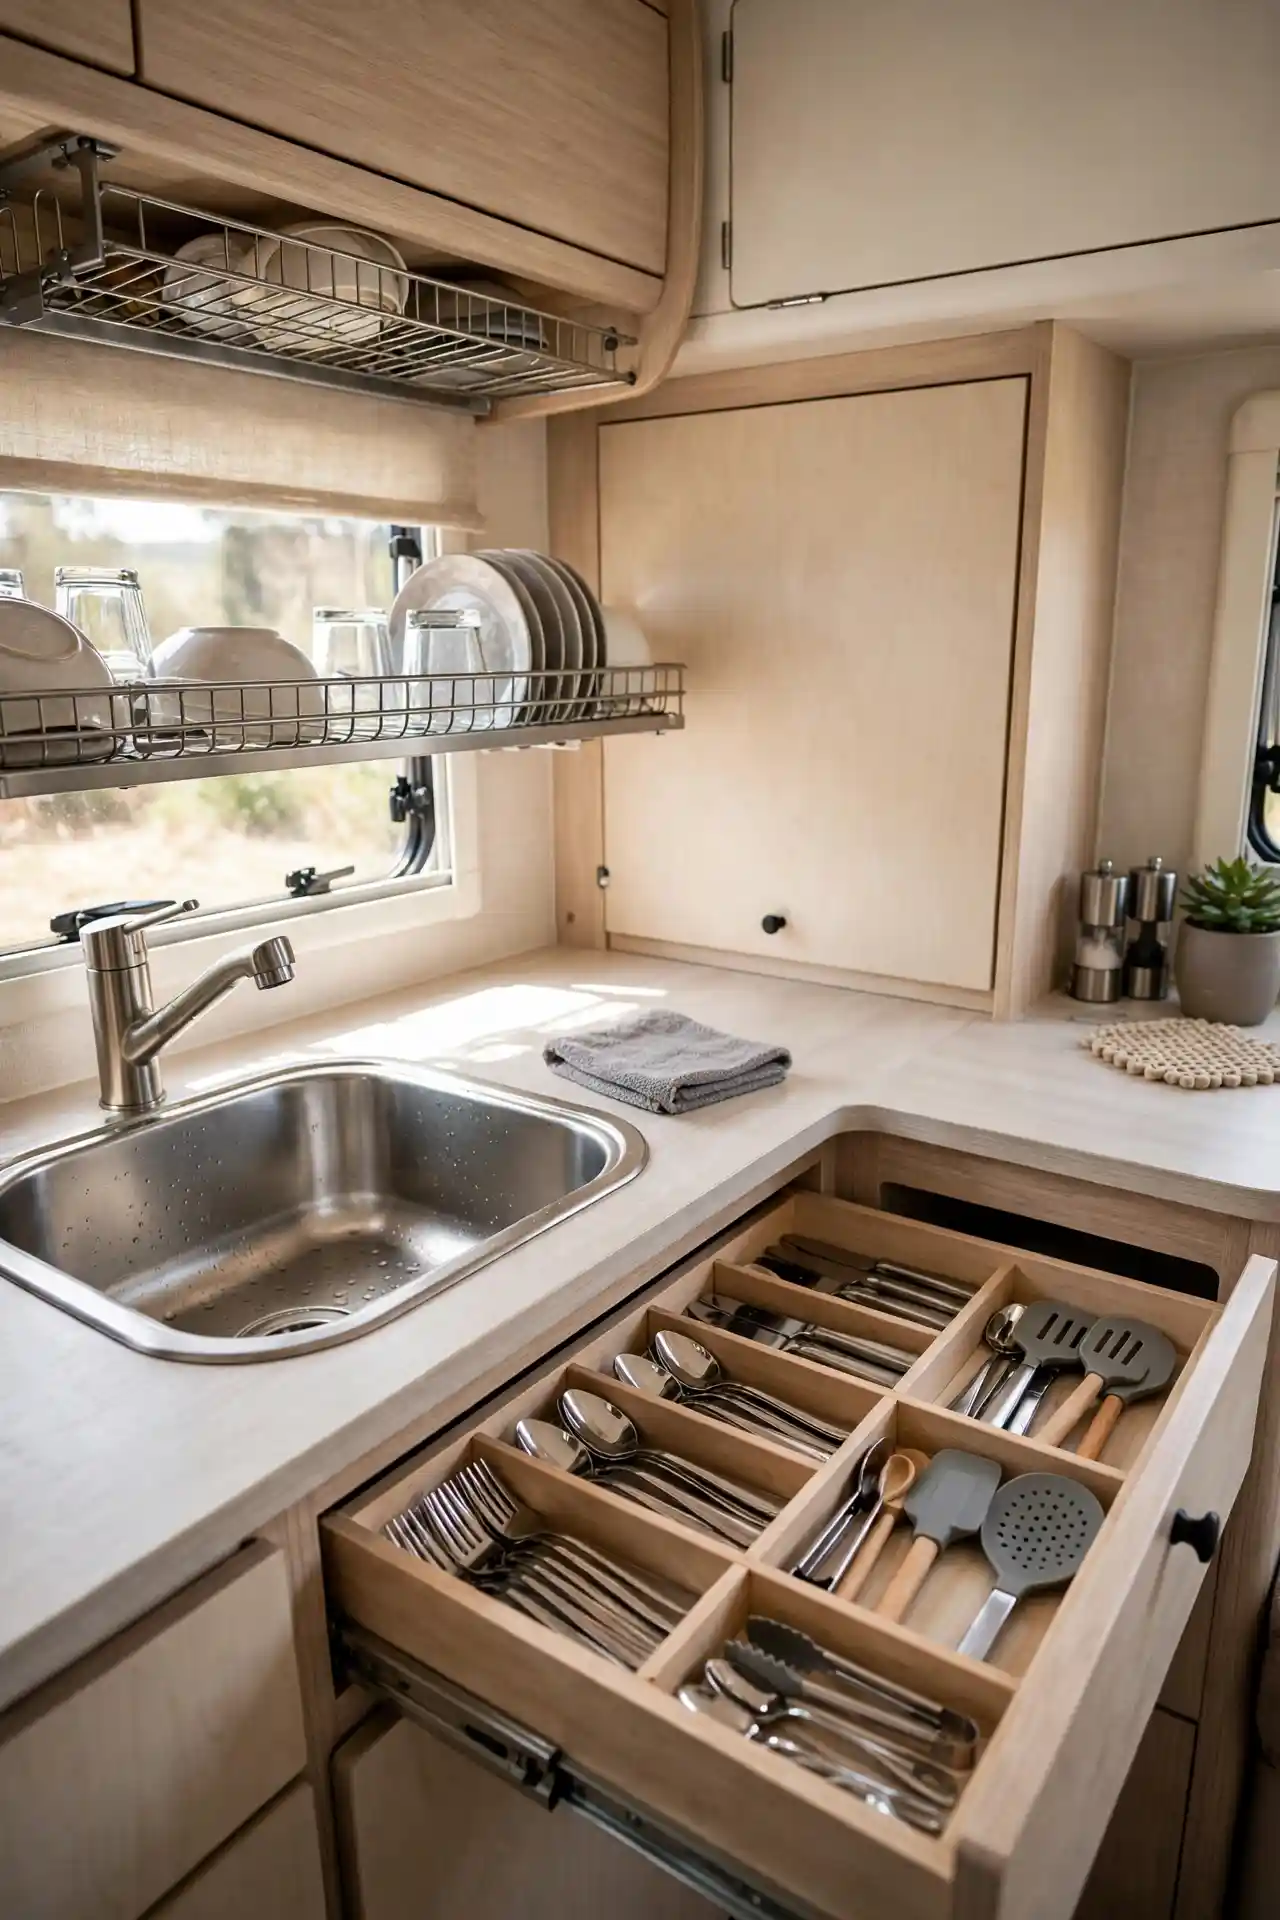
A corner drawer is awkward space in most kitchens, but this one turns that extra depth into an advantage by splitting it into eight zones instead of the usual four or five.
Forks and spoons take the front two lanes, knives get their own narrow strip, and the back third holds full sized cooking tools like tongs, a slotted spoon, and a spatula standing on end.
Nothing crosses into another zone’s space, so a fork drawer never turns into a junk drawer just because there was room left over.
The double tier wire rack above the sink picks up the same logic for dishes, letting bowls and plates air dry without ever competing with drawer space below.