17 Hidden Storage Ideas Every Camper Owner Overlooks

If your camper kitchen feels smaller every time you pack for a trip, the problem usually is not space, it is how that space gets used.
Most rigs waste layers of storage under benches, behind panels, and inside bays that never get a second look, while loose gear piles up on the one open shelf everyone can see.
This is the kind of hidden storage camper owners find only after living in their rig for a season or two, once the daily friction of digging for a can opener or a wrench finally wears them down.
The ideas below come from real builds, slide-out drawers under raised decks, tension rods that stop a stack from sliding, hinged panels that turn dead wall space into a working pantry.
Some take a weekend with basic tools, others cost a few dollars in dividers or baskets. None of them require gutting your rig from scratch.
Save this for the next time your camper kitchen feels like it is working against you instead of for you.
1. Build a Raised Deck With a Full Pull-Out Drawer Underneath
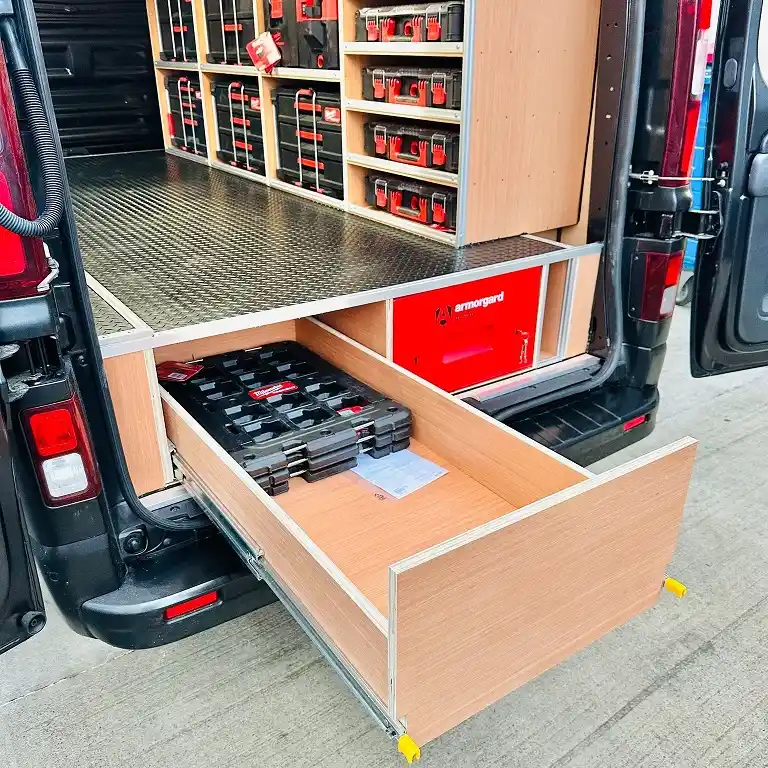
Camper kitchens waste an entire layer of space every time gear just sits on the floor.
This setup raises the whole platform a few inches and tucks a full width drawer underneath it, so you get a stable galley floor on top and a deep, organized bin below that slides out on its own rails.
What makes this work:
- The deck stays flush and solid, so it doubles as extra counter or seating space when the drawer is closed
- Heavy duty drawer slides mean you can load it with cookware, cutting boards, or bins and still pull it open with one hand
- Plywood construction with a sealed edge holds up to grease, spills, and constant use in a small kitchen
- The drawer face can be sized to match your cabinetry so it does not look bolted on
If your camper kitchen has any dead space under a bench, counter, or bed platform, this is the fix.
It costs a weekend of work and gives back a whole layer of storage you were stepping on before.
2. Add a Slide-Out Cook Station That Rolls Out the Back Doors
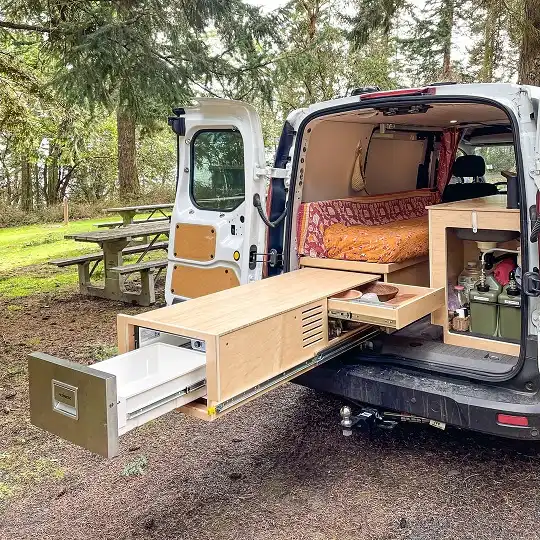
A stainless steel drawer at the base holds gear, but the real trick sits above it: a second wooden module that rolls out on its own rails and turns the rear bumper into a full outdoor kitchen counter.
Everything from the stove to the water jugs stays organized inside until you need it.
How to get this in your own build:
- Frame a slide-out box sized to your bumper opening, with a stainless or aluminum drawer underneath for muddy gear
- Mount a two burner stove flush on top so it slides out ready to light
- Line the back wall with fuel bottles and water jugs, secured so nothing tips when the drawer moves
- Leave a shallow open shelf for bowls or a cutting board you grab first
This setup means you never cook inside a cramped galley when the weather is decent. Pull the drawer, and your kitchen is already set up facing the trees.
3. Divide a Drawer Into Zones So Nothing Gets Lost in the Bottom
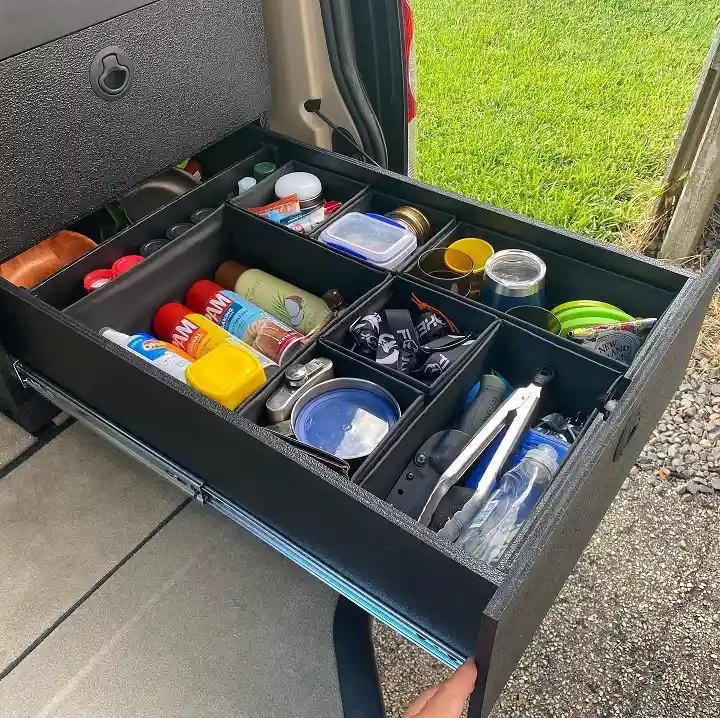
Loose gear in an open bin turns into a dig session every time you need one thing. This owner solved it by dropping foam dividers straight into a drawer, splitting the space into small zones for cooking oil, snacks, bug spray, mugs, and tongs so every item has one exact spot.
Cost stays low since foam inserts or cardboard dividers work just as well as molded plastic ones.
Effort is minimal too, mostly measuring your drawer and cutting to fit. The payoff shows up fast: you can find the can opener in the dark, by feel, because it always lives in the same square.
Skip the junk drawer approach in your camper kitchen. A few dollars in dividers buys you back the minutes you used to spend hunting for a lighter.
4. Mount Your Fridge on a Slide-Out Tray Under the Counter
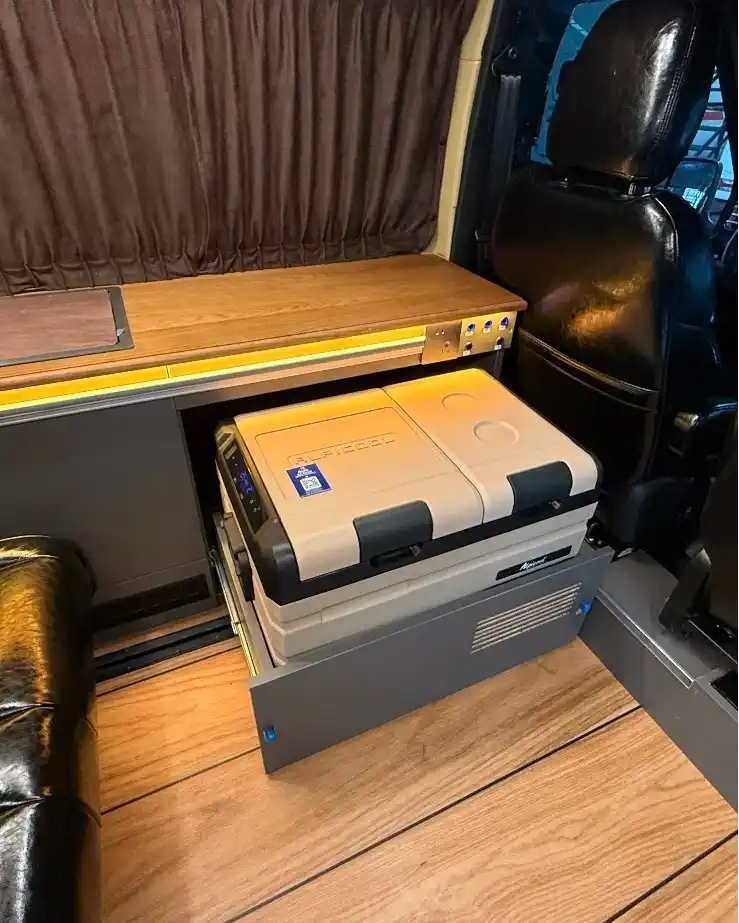
Tucking a compressor fridge into a low cabinet sounds smart until you are bent over digging for a cold drink every night.
This build puts the fridge on its own sliding tray under a fixed wood counter, right beside the driver seat, so it pulls out toward you instead of making you crawl in after it.
The counter above stays solid for prep work and doubles as a spot for switches and outlets, since nothing needs to move to access them.
The tray itself rides on drawer slides rated for the fridge’s full weight, which matters more than people expect once you load it with drinks and food.
Anyone who has cracked their head reaching into a cabinet fridge will get why this matters. It turns a daily annoyance into a two second reach.
A sliding fridge tray turns bending and reaching into one smooth pull, no crawling required.
5. Stack Modular Crates on a Slide-Out Tray Under the Bed
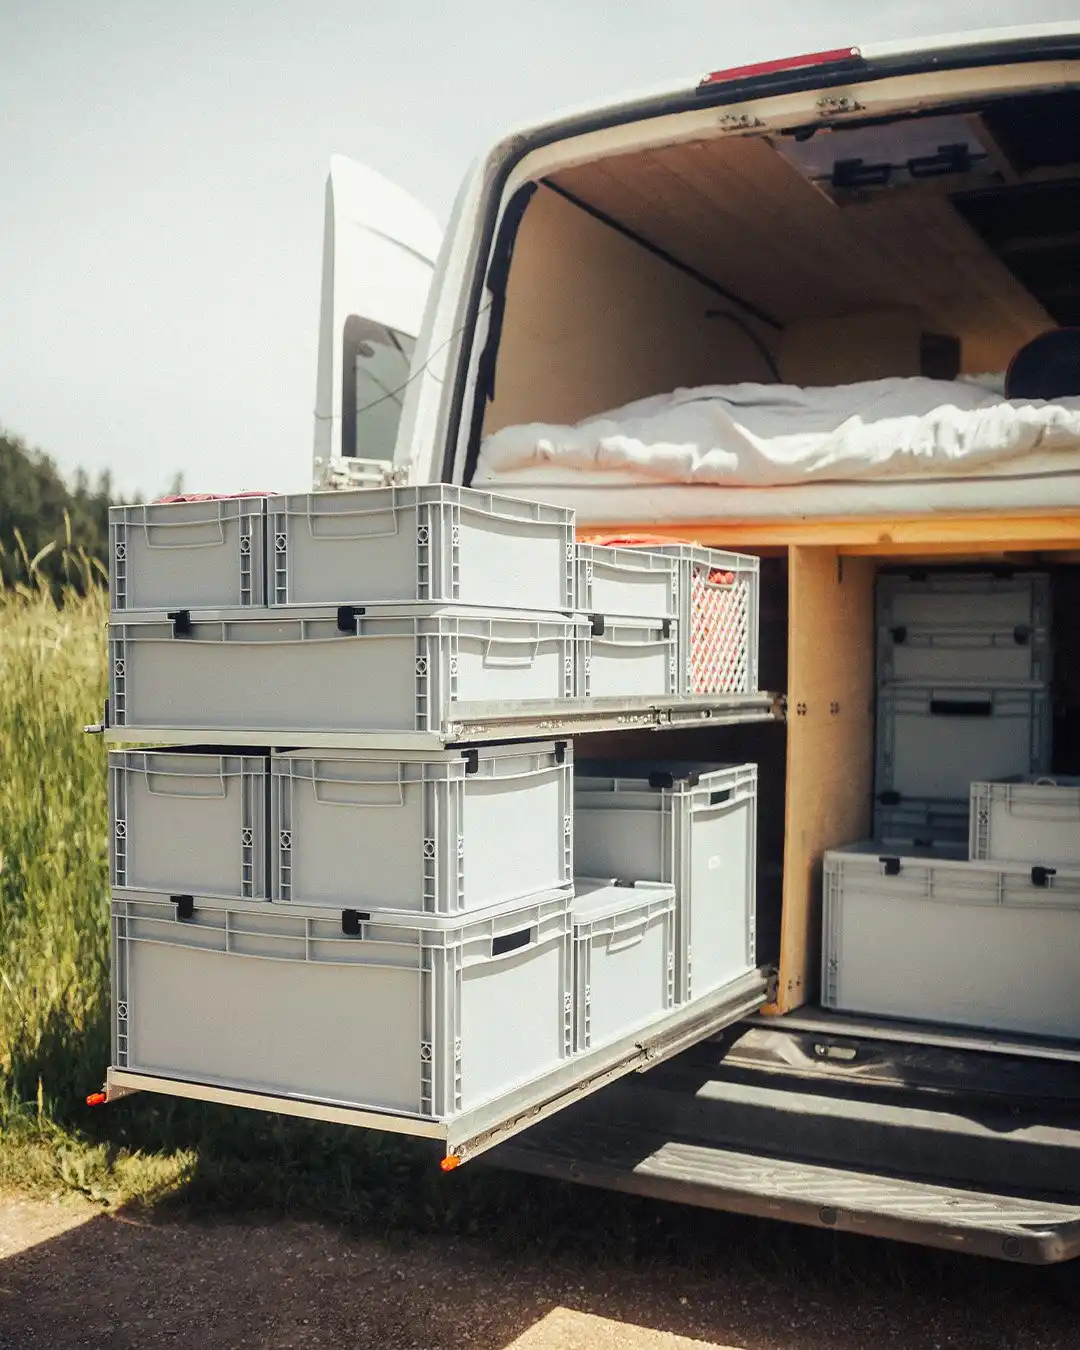
Two full tiers of stackable plastic crates ride on one heavy rail system here, giving this camper bulk kitchen storage without eating into cabinet space up front.
The whole stack slides out from under the bed platform as one unit, so nothing has to be unpacked to reach the crate in back.
Each crate holds a category on its own, canned goods in one, cooking gear in another, so you are never rifling through a mixed bin to find the can opener.
Pair this with rated slide rails since a fully loaded double stack gets heavy fast, and cheap hardware will sag or bind over time.
6. Copy This Lift-Top Bed Trick for Your Kitchen Bench Seat
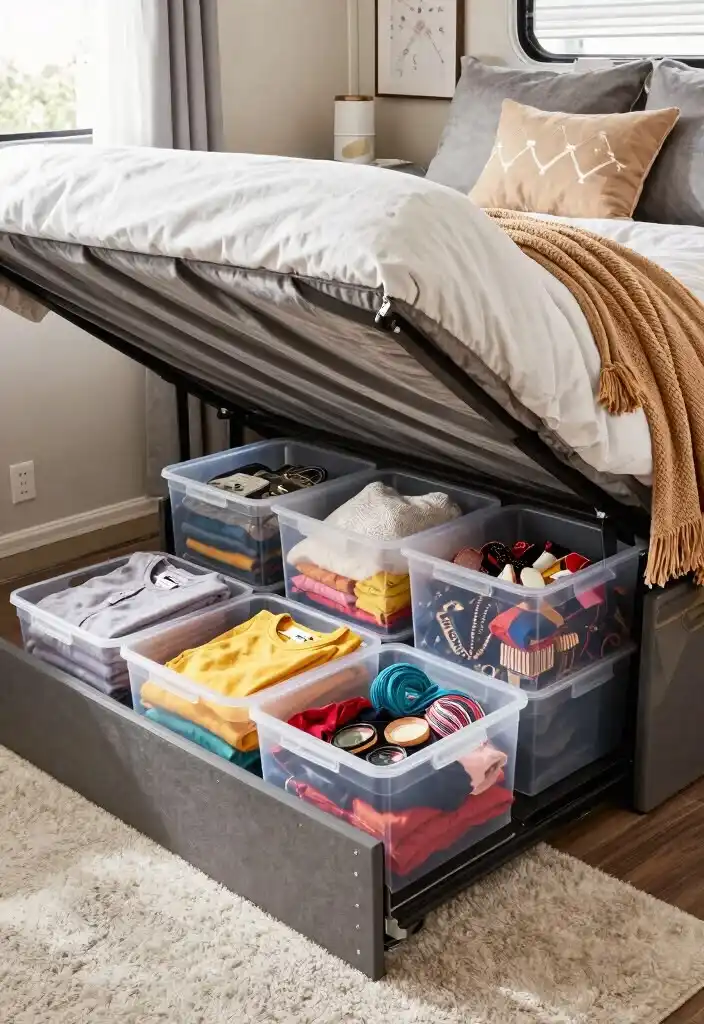
This particular bed lifts on gas struts to reveal a full bin of clear totes underneath, currently holding folded clothes and small accessories.
The mechanism is the real idea here, not the contents, and it transfers directly to a camper kitchen bench or dinette seat where pantry overflow usually gets crammed into whatever gap is left.
Swap the clothing totes for clear food storage bins and you get the same win in the kitchen: everything visible at a glance, nothing buried, and a lid that closes flush so the bench still works as seating.
Label the bins if your pantry runs deep, since even clear containers get confusing once you have six of them lined up.
Lid stays open on its own so both hands are free to load food bins.
You see contents without opening every single one first.
The bench still doubles as seating when you are not digging for supplies.
7. Turn a Pass-Through Bay Into a Slide-Out Gear Tray
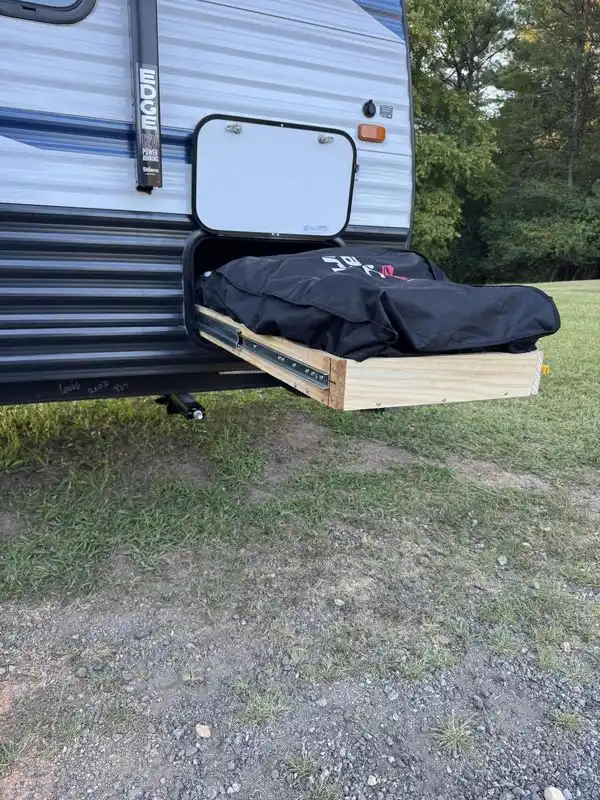
A dark pass-through bay usually becomes a shove-and-forget space. A simple plywood tray on drawer slides fixes that:
- Rolls the whole bay out into daylight, so nothing stays buried at the back
- Fits bulky items that never worked inside a cabinet, like a folding table or portable grill
- Works for bagged gear too, an awning or tent sits fine on a flat tray
- Turns a five minute dig into a two second grab
Build the tray a few inches narrower than the bay opening.
Use slides rated well above your loaded weight estimate.
Skip a tray with no lip or edge, gear slides off in transit.
Skip leaving raw wood exposed to weather at the tray face.
8. Don’t Ignore the Dead Space Under a Dinette Bench
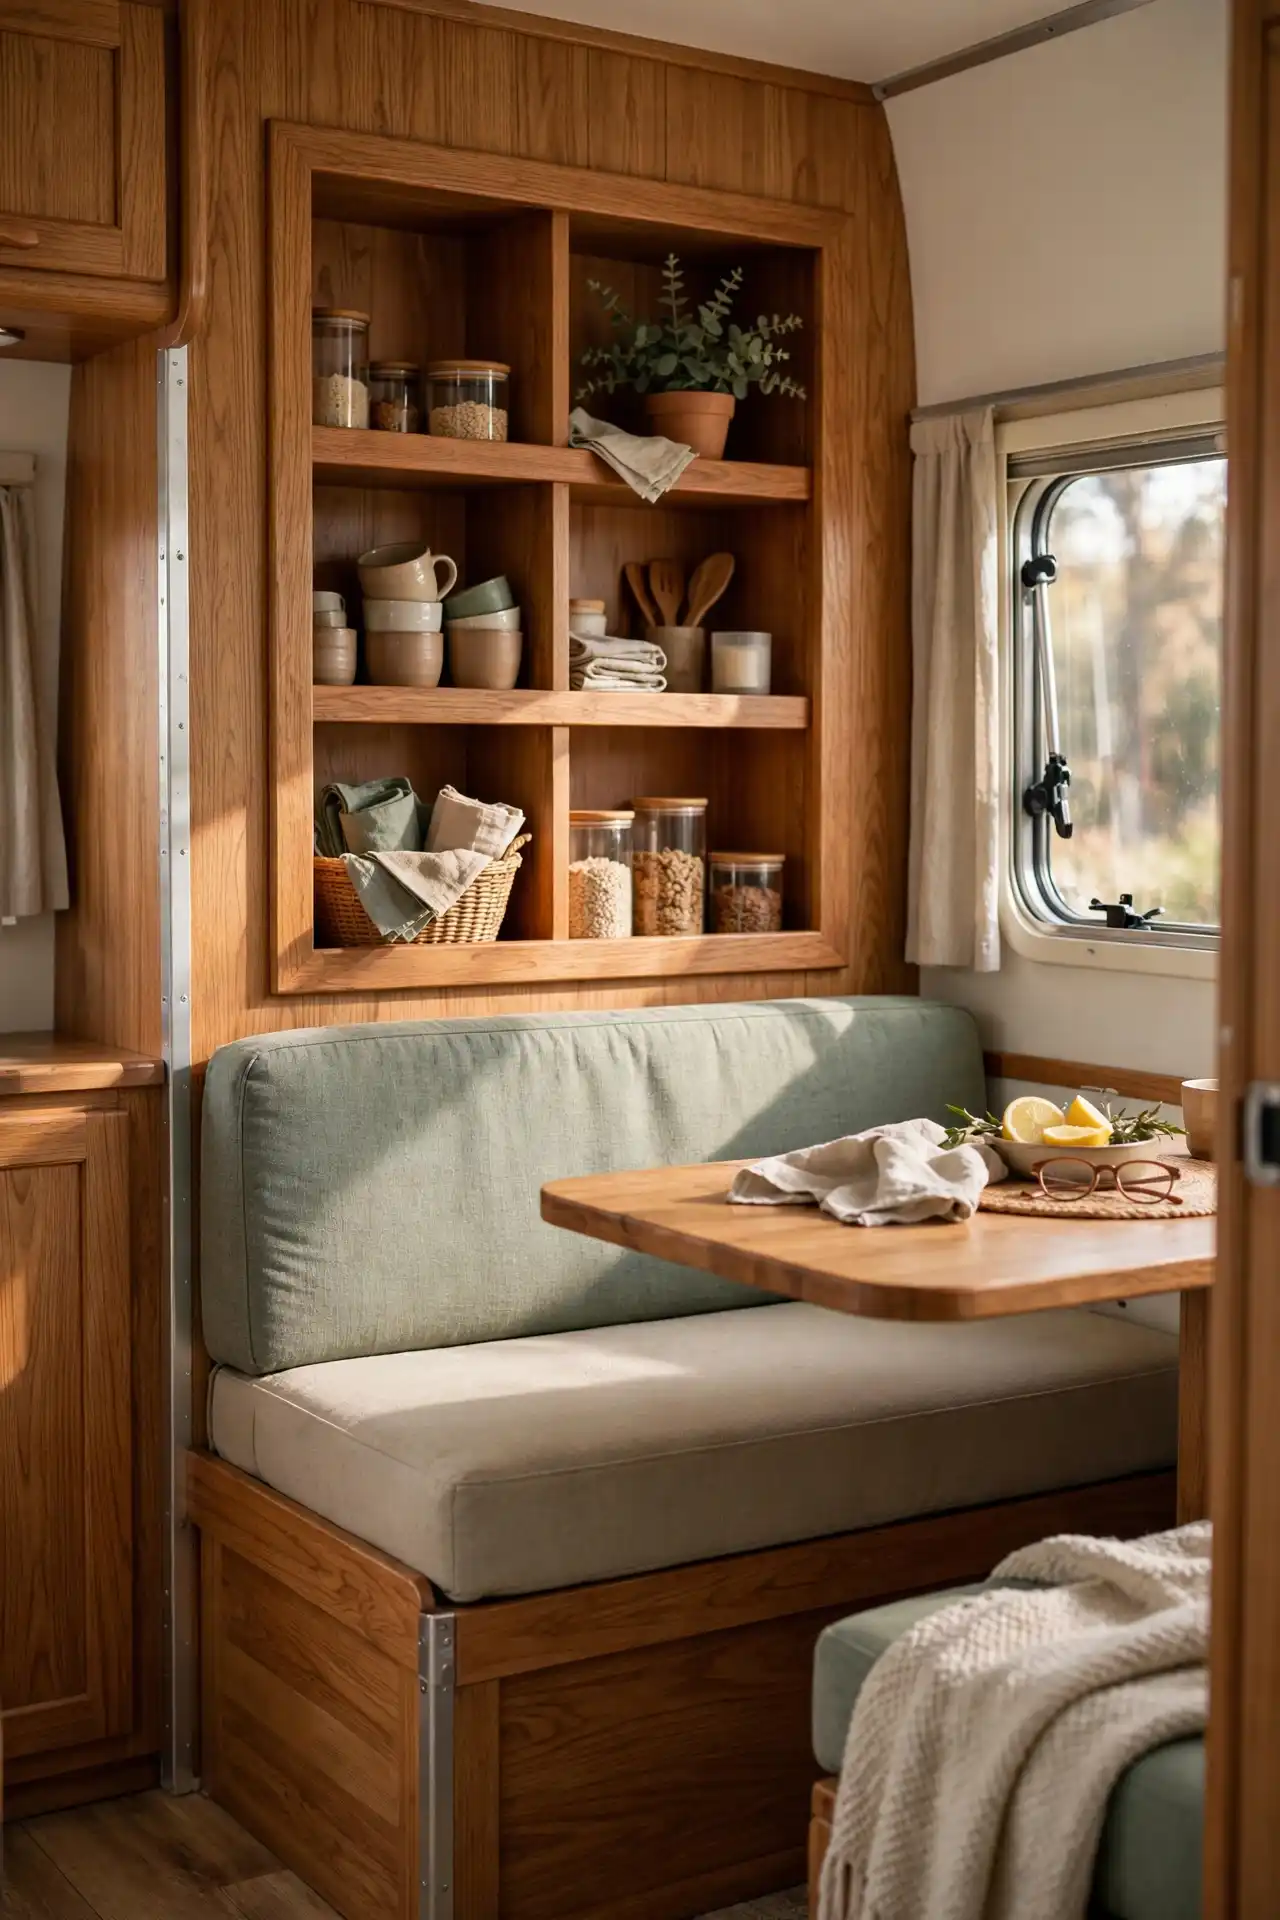
That cushioned bench doing double duty as seating and a lounge spot is also sitting on a wooden base built to hide storage most owners never open.
Look closely at the seams along the front panel and the metal hardware at the corners, that’s a lift-up or removable base, not a solid block.
Pull cookware, folded linens, or bulk pantry bags out of sight under there instead of stacking them on the open shelving above, which works better for things you actually want visible and reachable, like jars, mugs, and daily utensils.
The paneled front and corner hardware signal a lift or slide compartment underneath the cushion.
Jars, mugs, and linens up top stay for daily reach, not for bulk storage.
Bulk goes hidden below, daily items stay out where you can grab them.
9. Hang a Mesh Pocket Organizer on the Inside of a Cabinet Door
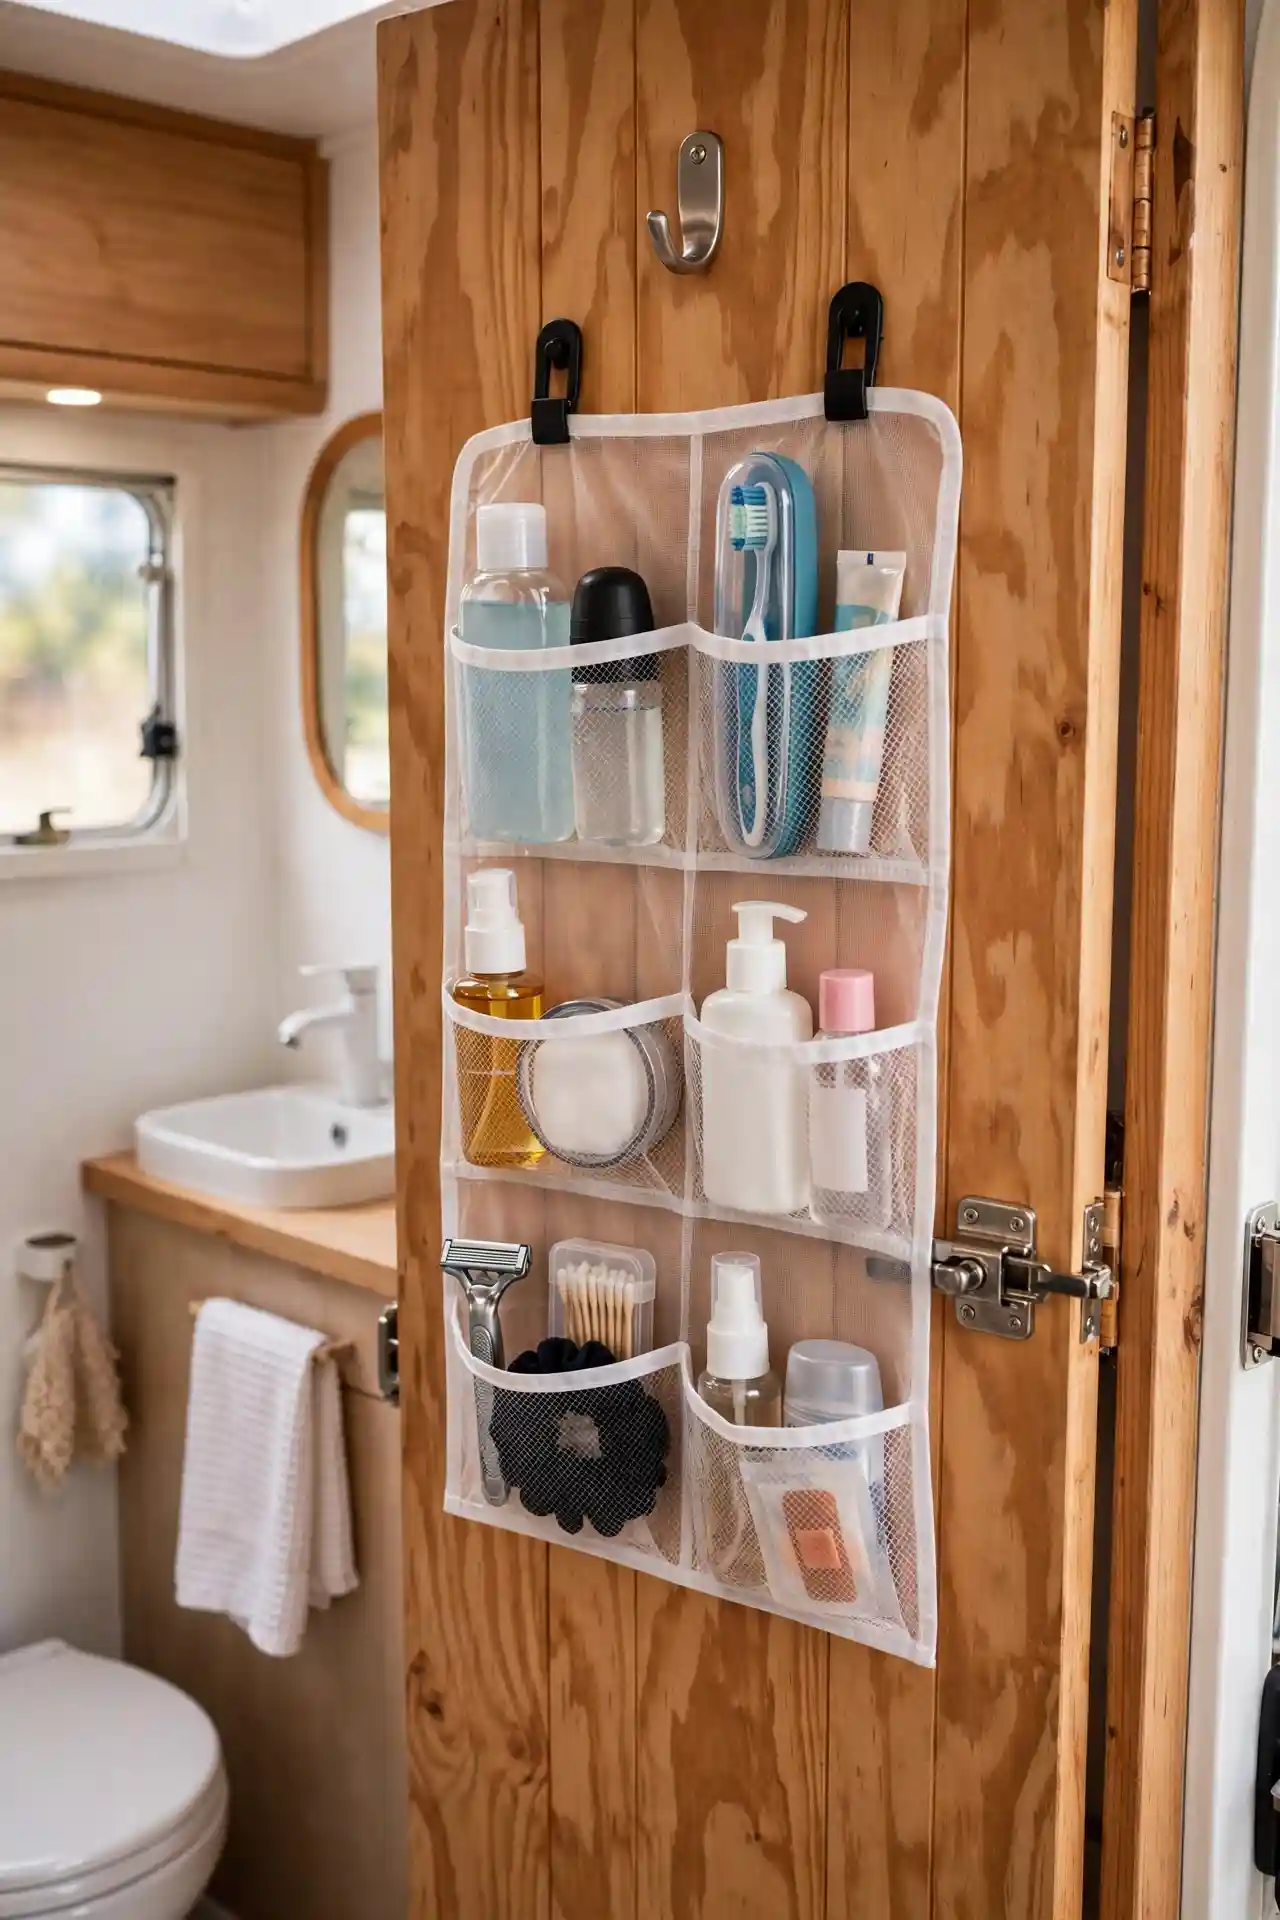
Small bottles and condiment packets get lost in a cabinet the second you stack anything in front of them.
This bathroom door organizer makes the case for doing the same trick on a kitchen cabinet door, over the pantry, or even the door under the sink, since the pockets keep dozens of small items upright and visible instead of rolling to the back.
Getting it into your kitchen:
- Pick a mesh or vinyl pocket organizer with adjustable straps so it clears your hinges
- Use the top pockets for tall items like oil bottles or spice jars
- Save the bottom rows for anything you grab daily, packets, snack bars, tea bags
- Check that the door still closes fully once loaded, since packed pockets add real depth
Small bottles buried behind whatever got stacked in front last.
Every bottle upright in its own pocket, visible the second the door opens.
10. Line a Cabinet Shelf With Tension Rods So Stacks Stop Sliding
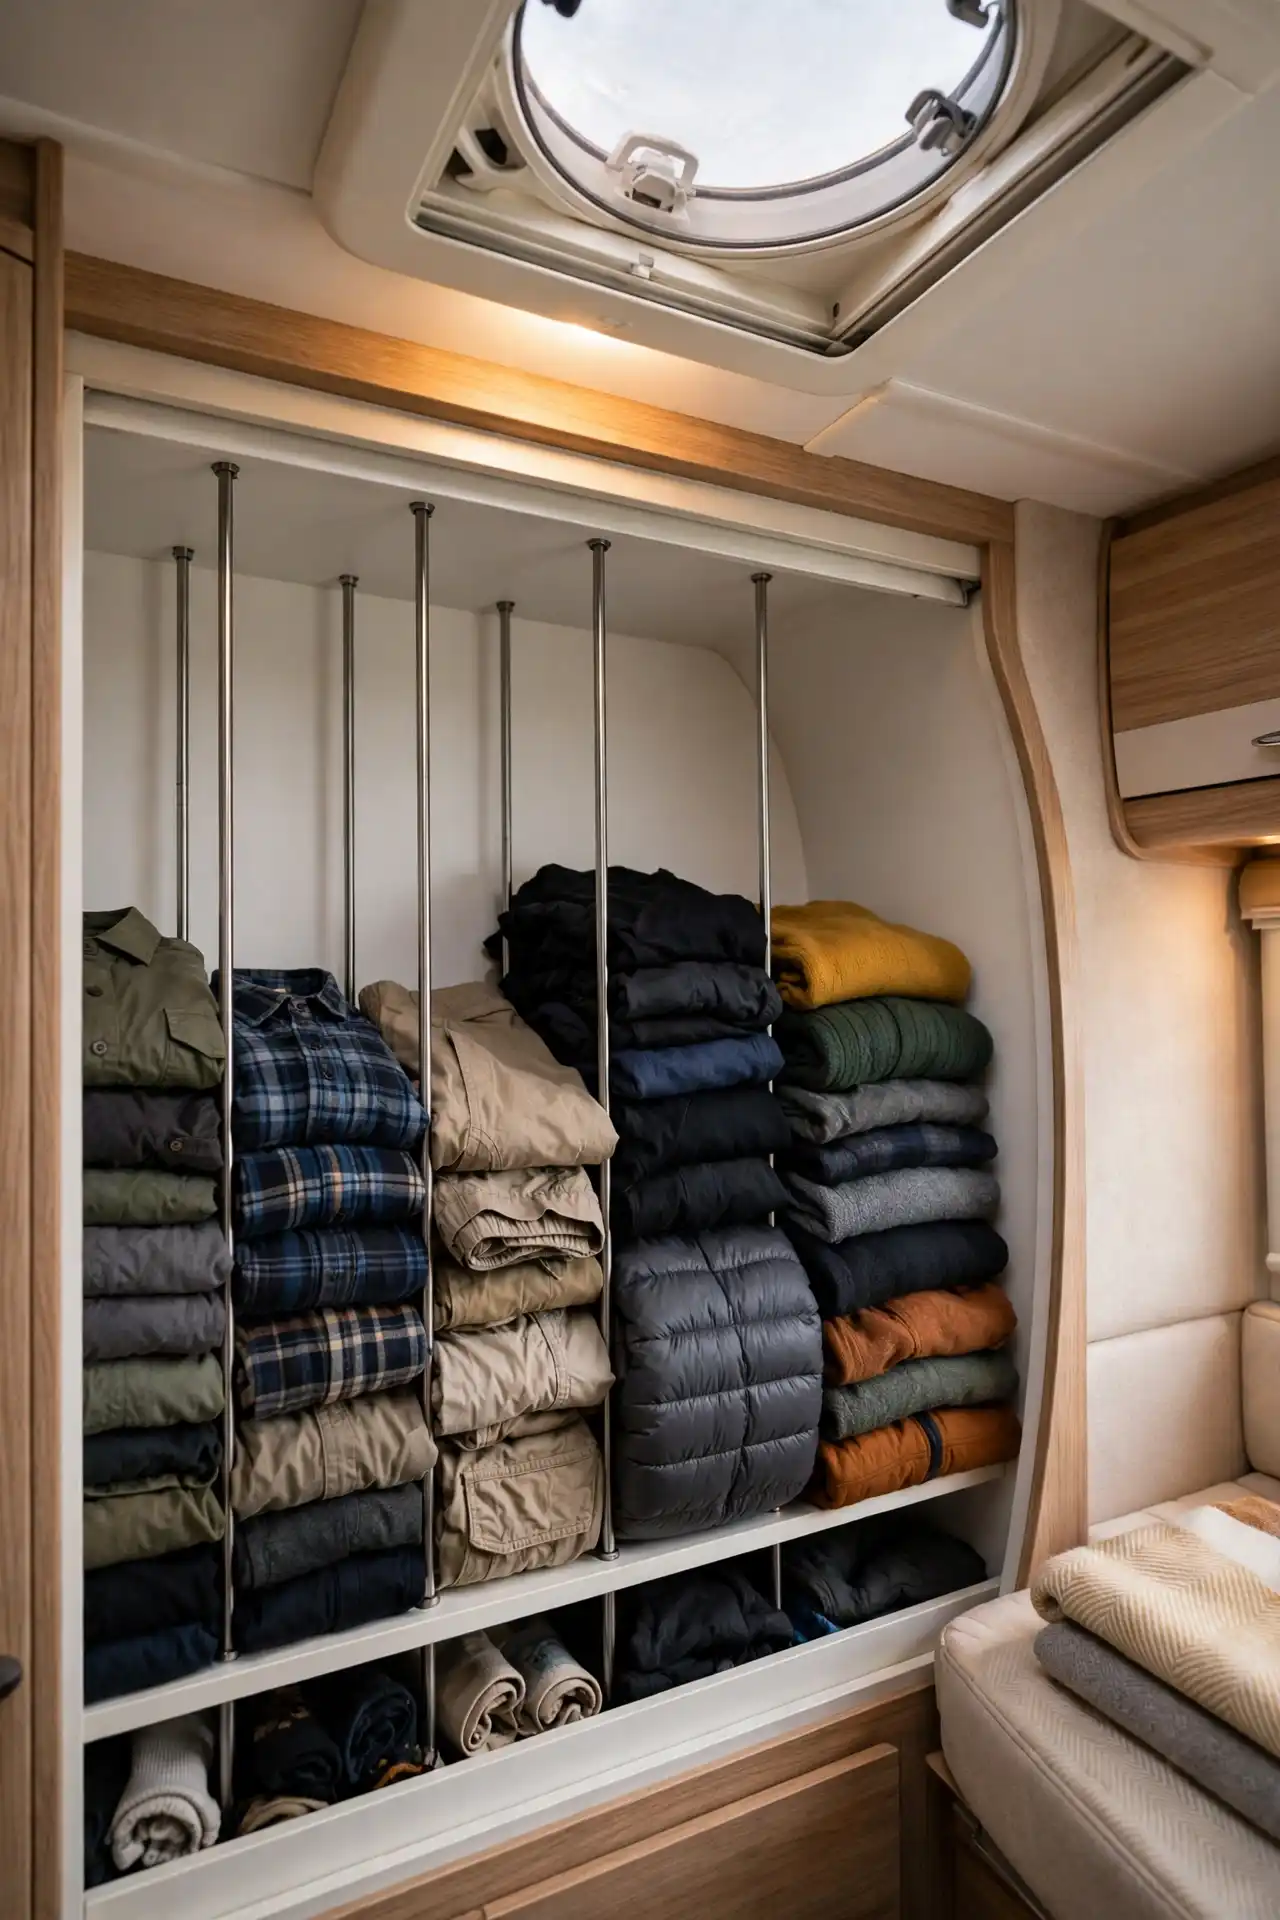
Vertical tension rods are doing the heavy lifting in this closet, splitting one open shelf into narrow columns so each folded stack stays upright no matter how rough the road gets.
The same trick works just as well in a kitchen cabinet for stacked plates, folded towels, or bagged dry goods that normally slide into a heap the second you take a turn.
At a few dollars a rod, this beats bungee nets or shelf liners for anything that stacks tall, since the columns keep each pile contained instead of just slowing the slide.
11. Build a Deep Hinged Box Under the Dinette for Bulky Soft Goods
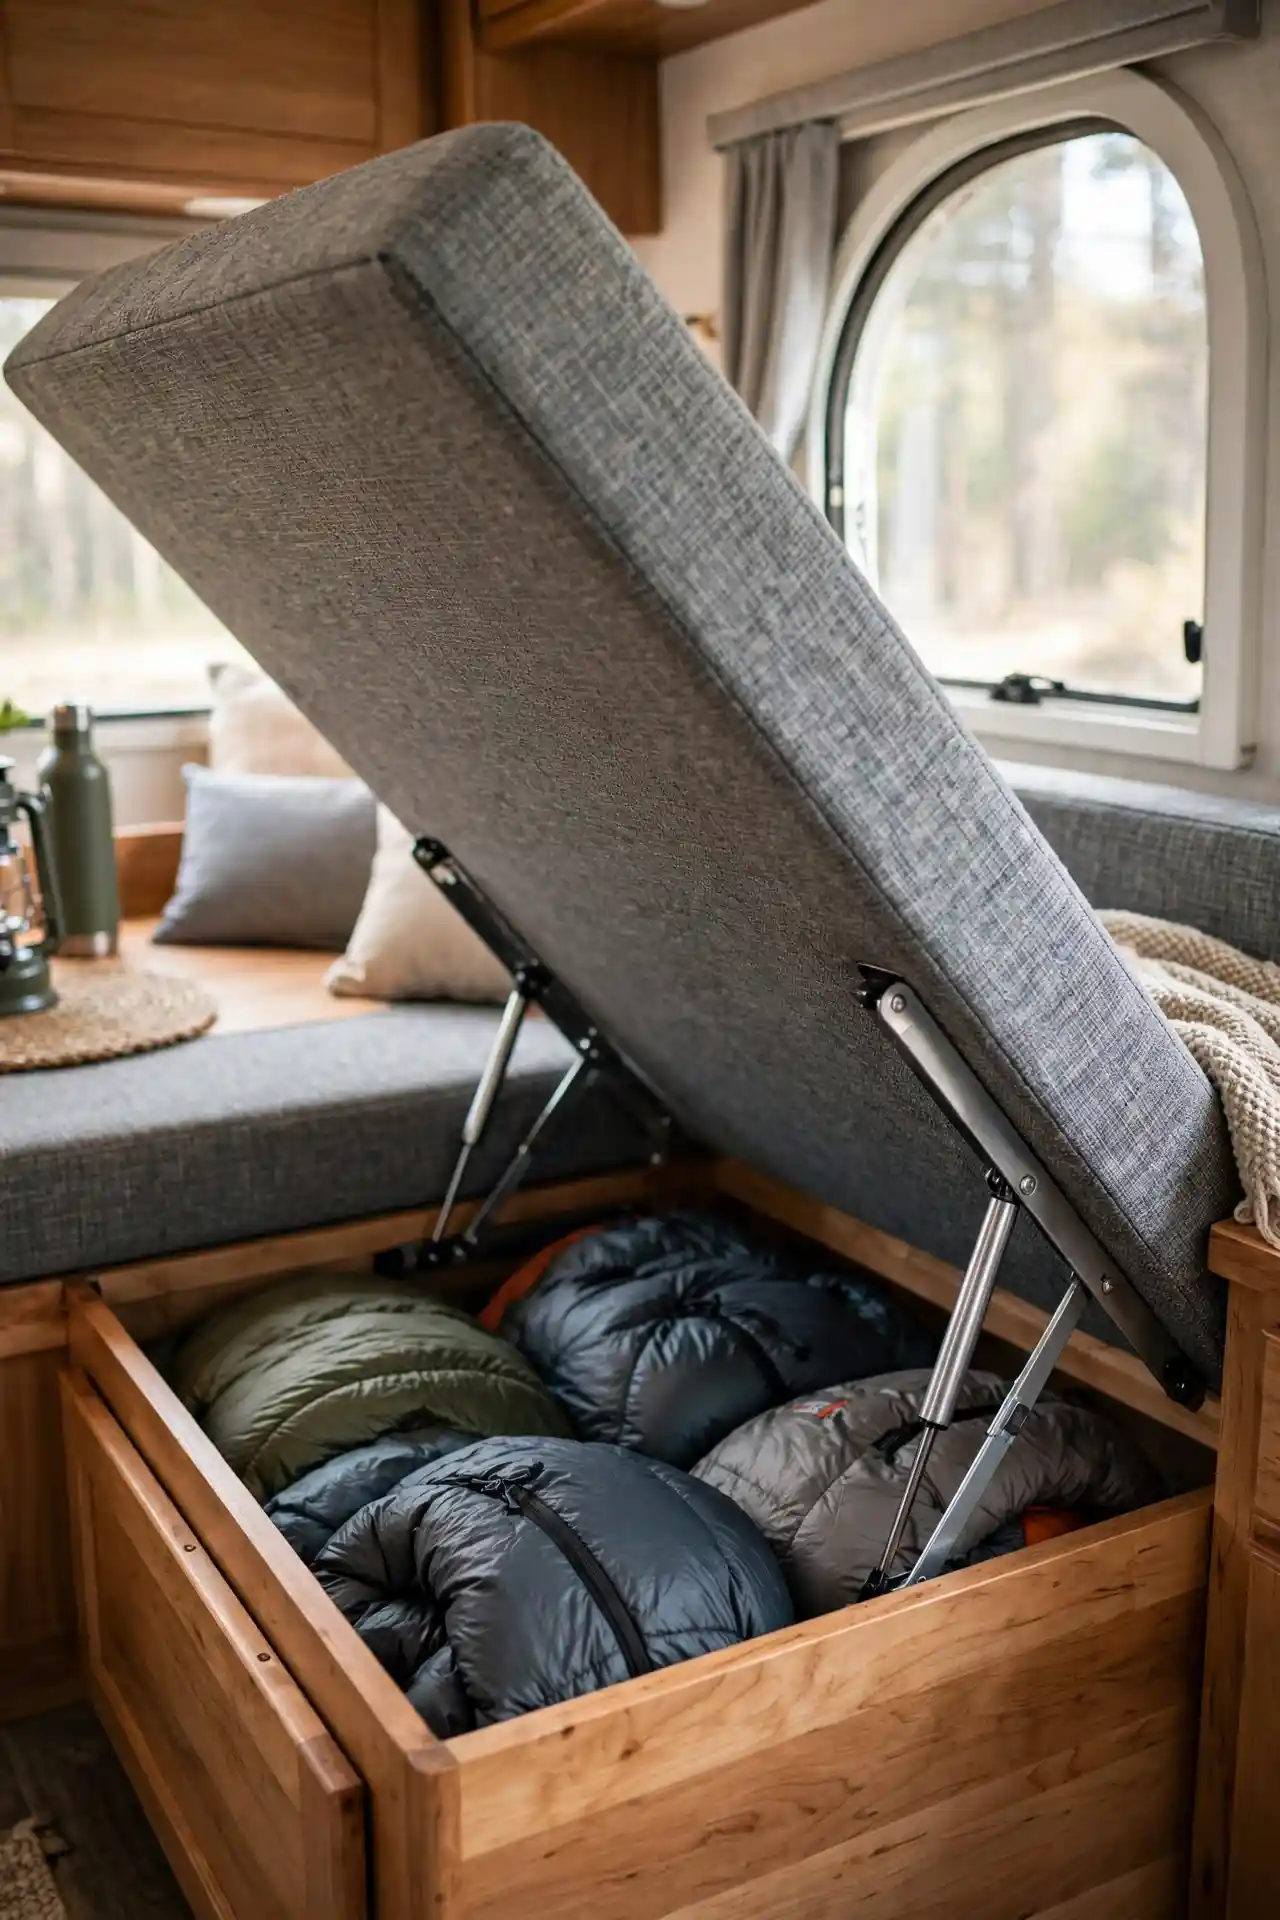
Sleeping bags and packed bedding eat space fast, and neither fits well in a shallow drawer.
This dinette bench solves it with a full depth wooden box under the seat, propped open on gas struts strong enough to hold the whole cushion up on its own while you dig around inside.
The struts are the detail worth copying even if you build the box a different size. Cheap versions sag over time and let the cushion drop on your hands mid-dig, so look for ones rated well above the actual lid weight, cushion included.
A liner or waterproof bag inside the box also helps, since anything stored under a seat picks up condensation on humid nights.
| Deep hinged box | Shallow bin drawer |
|---|---|
| Fits bulky soft goods like sleeping bags and camp chairs | Fits food bins and kitchen supplies better |
| Gas struts free both hands for loading | Slides open without lifting anything |
| Whole cushion tilts up, slower to access | Faster grab for daily items |
12. Use the Ceiling Hatch Above Your Cabinets for a Grab Kit
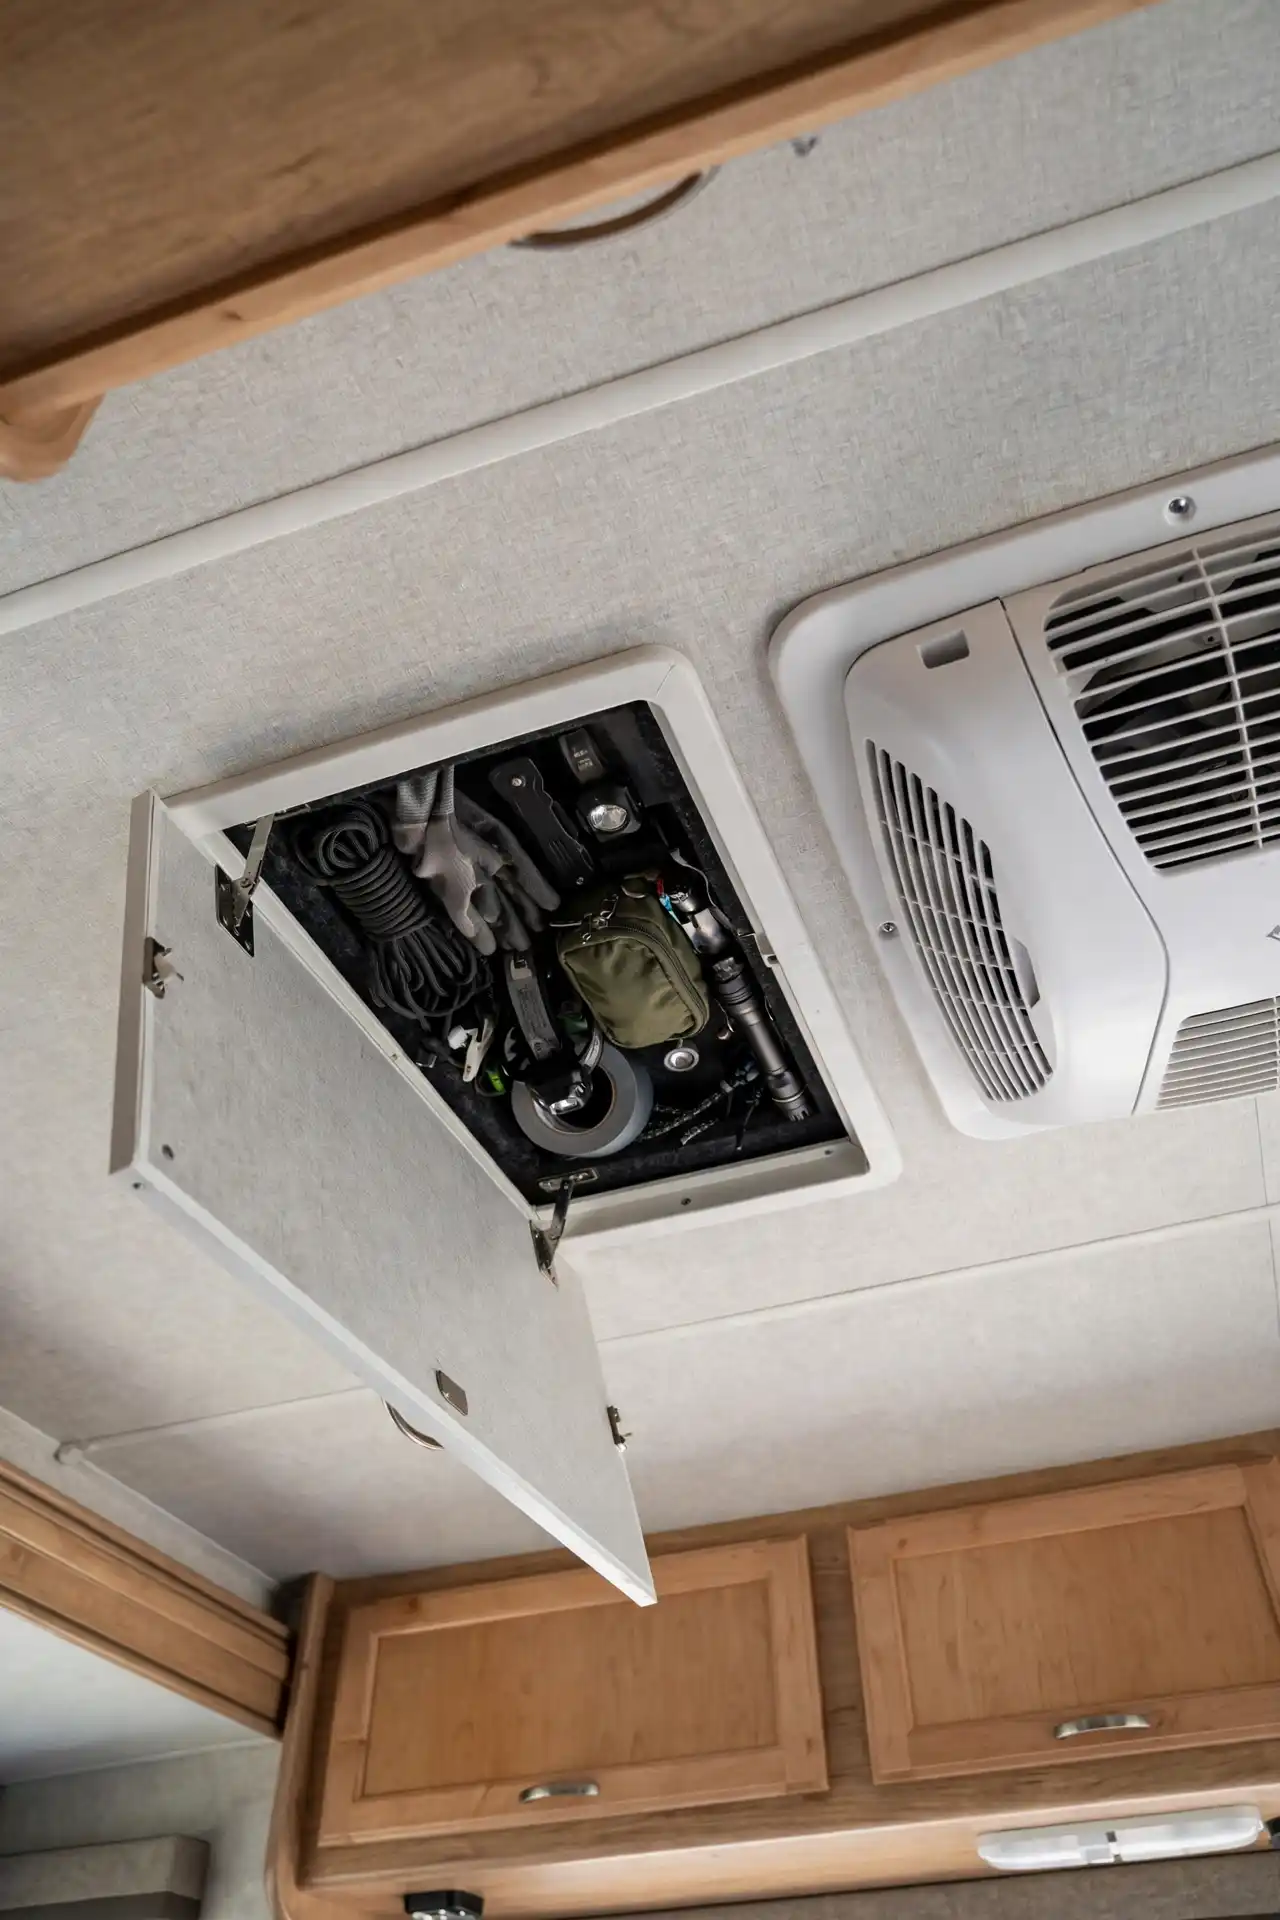
Overhead access panels usually sit empty or get forgotten entirely, but this one is packed tight with a rope coil, gloves, a knife, duct tape, and a small pouch of odds and ends, all sitting flush against the AC unit housing.
It is dead space most owners never think to open, right above the kitchen cabinets where it stays within easy reach on a step stool.
Skip stuffing this space with anything you would need in a hurry, since a hatch overhead is not a fast grab in an emergency. Save it for tools and backups you reach for occasionally, not daily kitchen items.
13. Rig an Exterior Access Door as a Dedicated Tool Bay
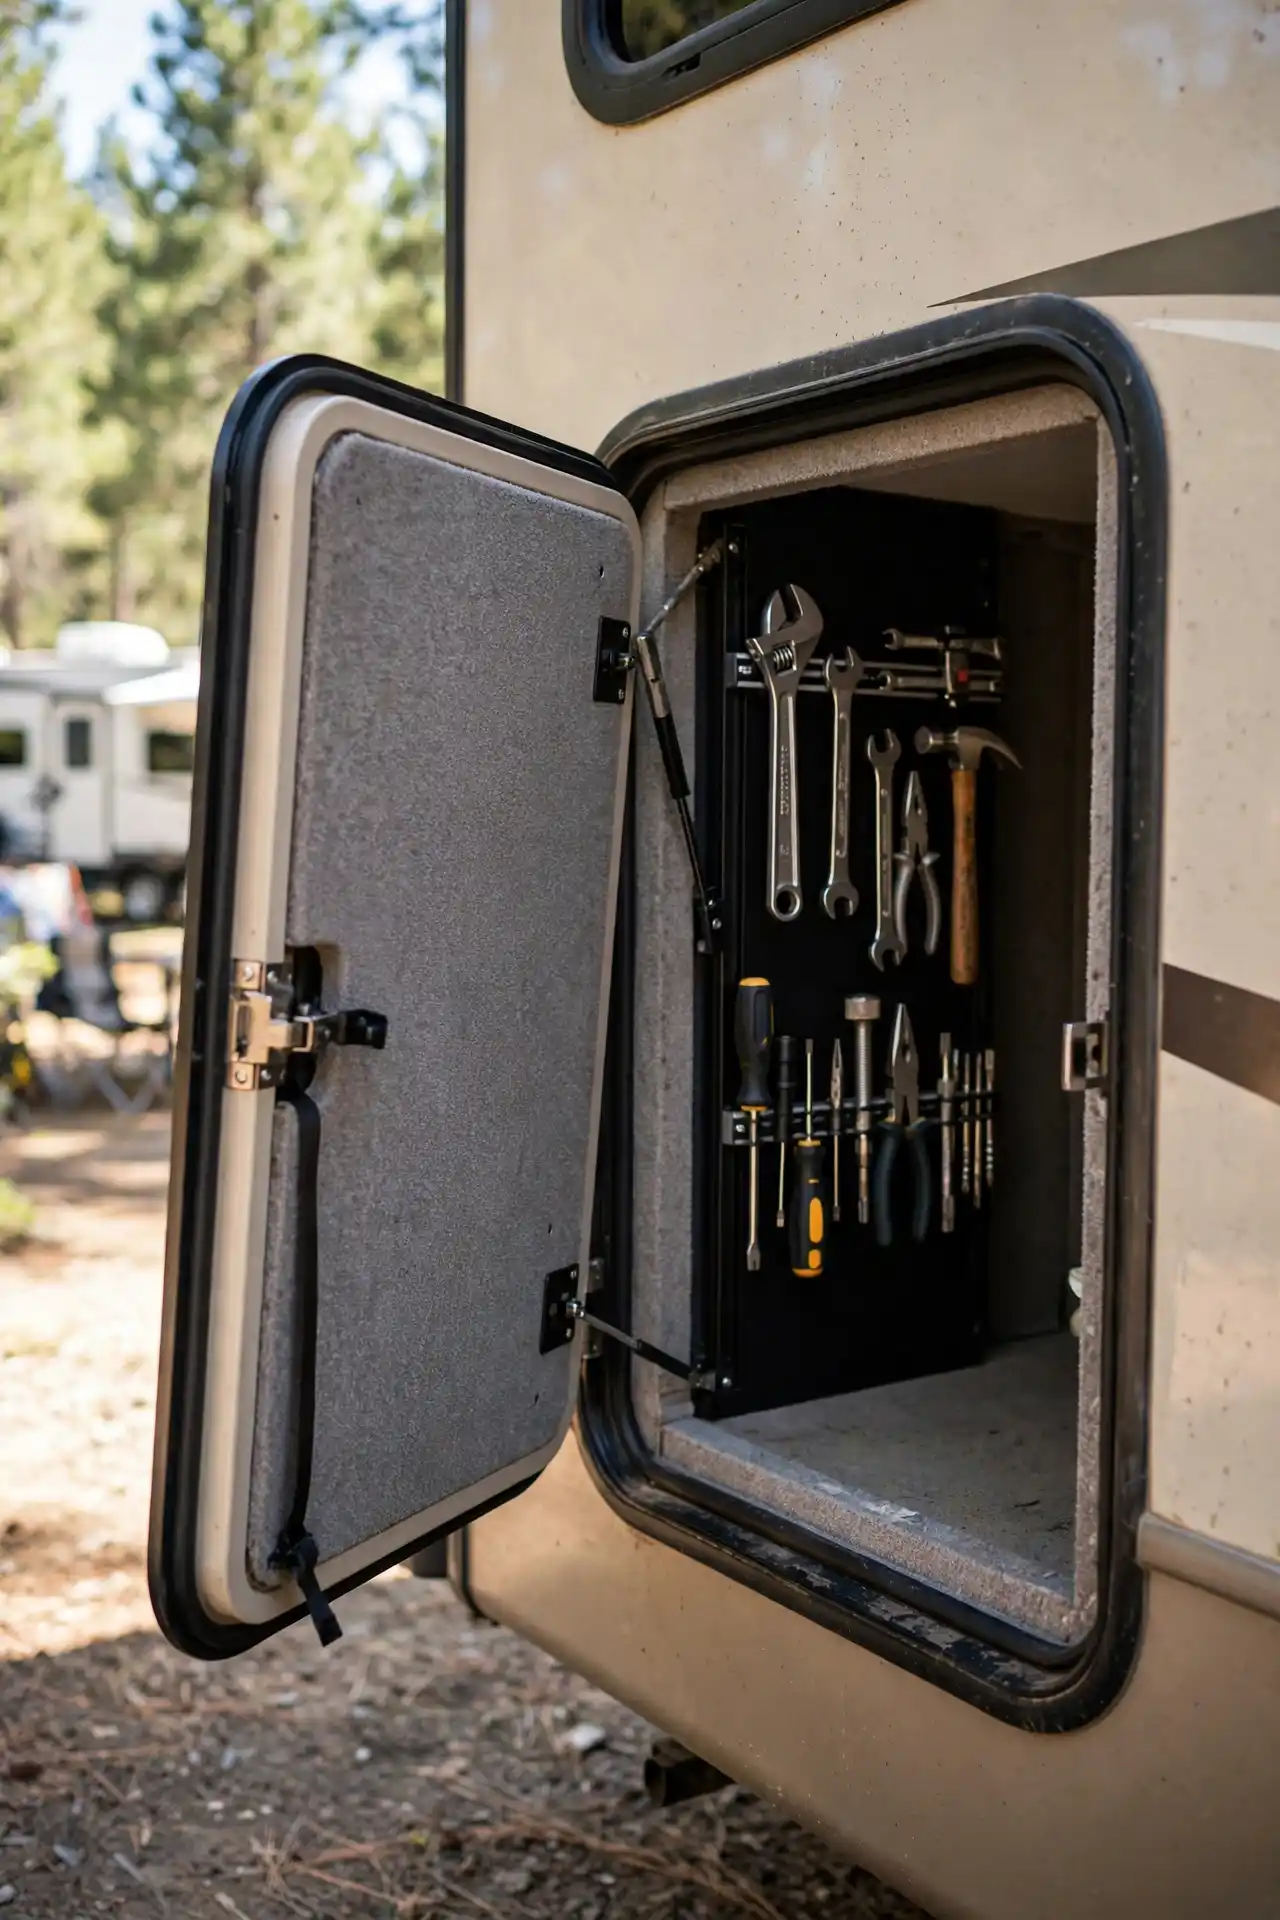
Wrenches, pliers, a hammer, and screwdrivers hang on magnetic strips inside this exterior compartment, keeping the whole kit upright and visible instead of loose in a bin.
A gas strut props the door open on its own, and the felt lined interior keeps tools from rattling against bare metal every time the rig hits a bump.
Magnetic tool strips cost a few dollars and mount with two screws, no custom foam cutouts required to keep everything in place.
Every kitchen setup eventually needs a wrench or a screwdriver, whether it is tightening a wobbly table leg or fixing a stuck cabinet latch.
Keeping that kit outside and separate from your food storage means greasy tools never end up next to your dishes.
14. Hide a Narrow Cubby Behind the Seat Divider
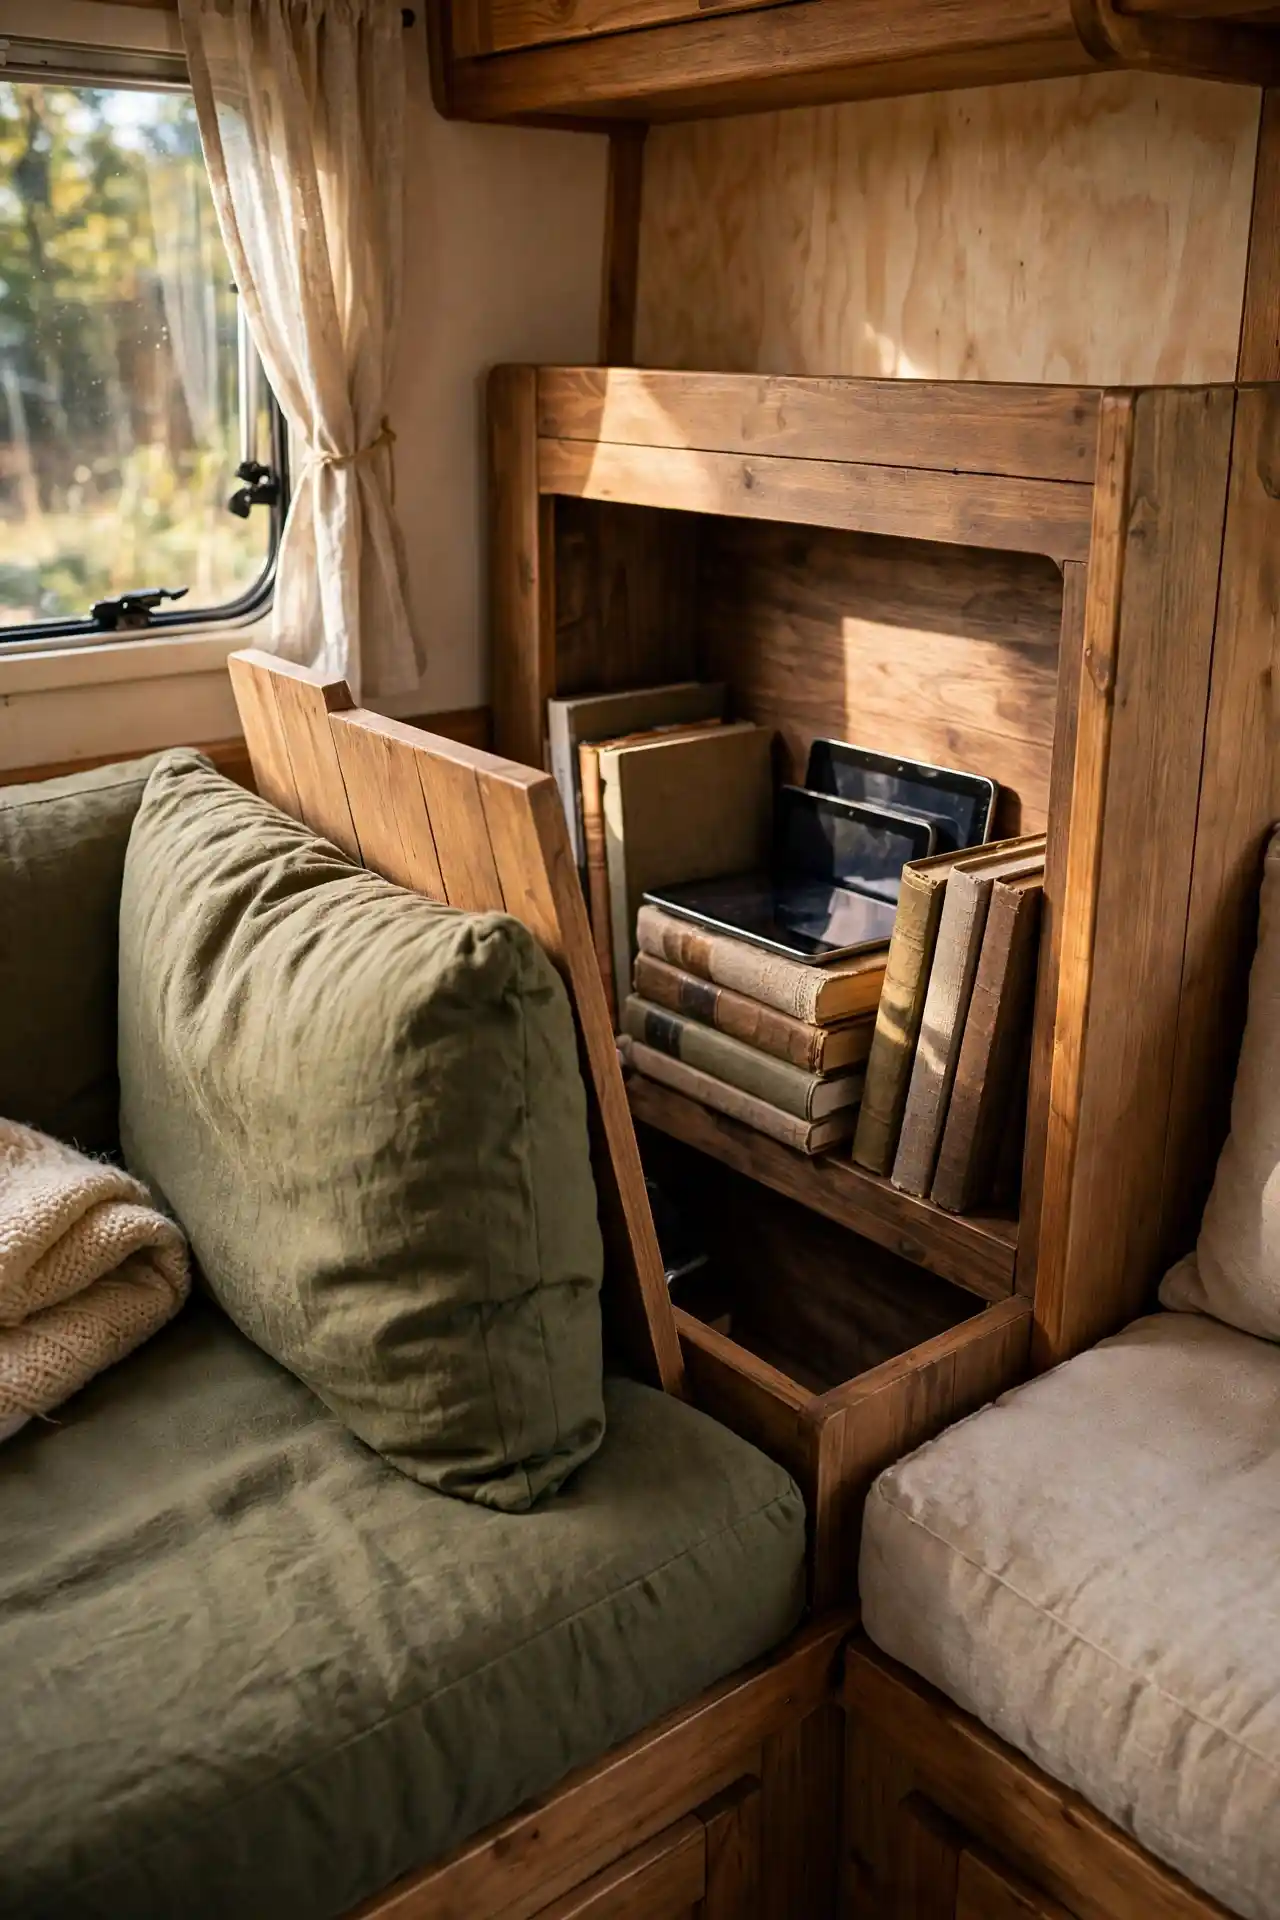
The wood panel between these two bench seats hinges open to reveal a slim vertical cubby holding books and a tablet, with a deeper bin tucked below it for things used less often. It is a smart use of a space most builds treat as dead wood between two cushions.
Bringing this into a kitchen dinette setup:
- Frame a narrow cubby into the seat divider, sized for a recipe binder or tablet on top
- Hinge the front panel so it swings open flush, no visible latch needed
- Add a deeper bin below for placemats, extra napkins, or seasonal items
- Finish the panel to match the surrounding wood so it reads as part of the frame, not a hidden door
If a panel looks solid but sounds hollow when you knock it, there is probably storage behind it.
15. Install a Three Tier Pull-Out Rack for Spices and Canned Goods
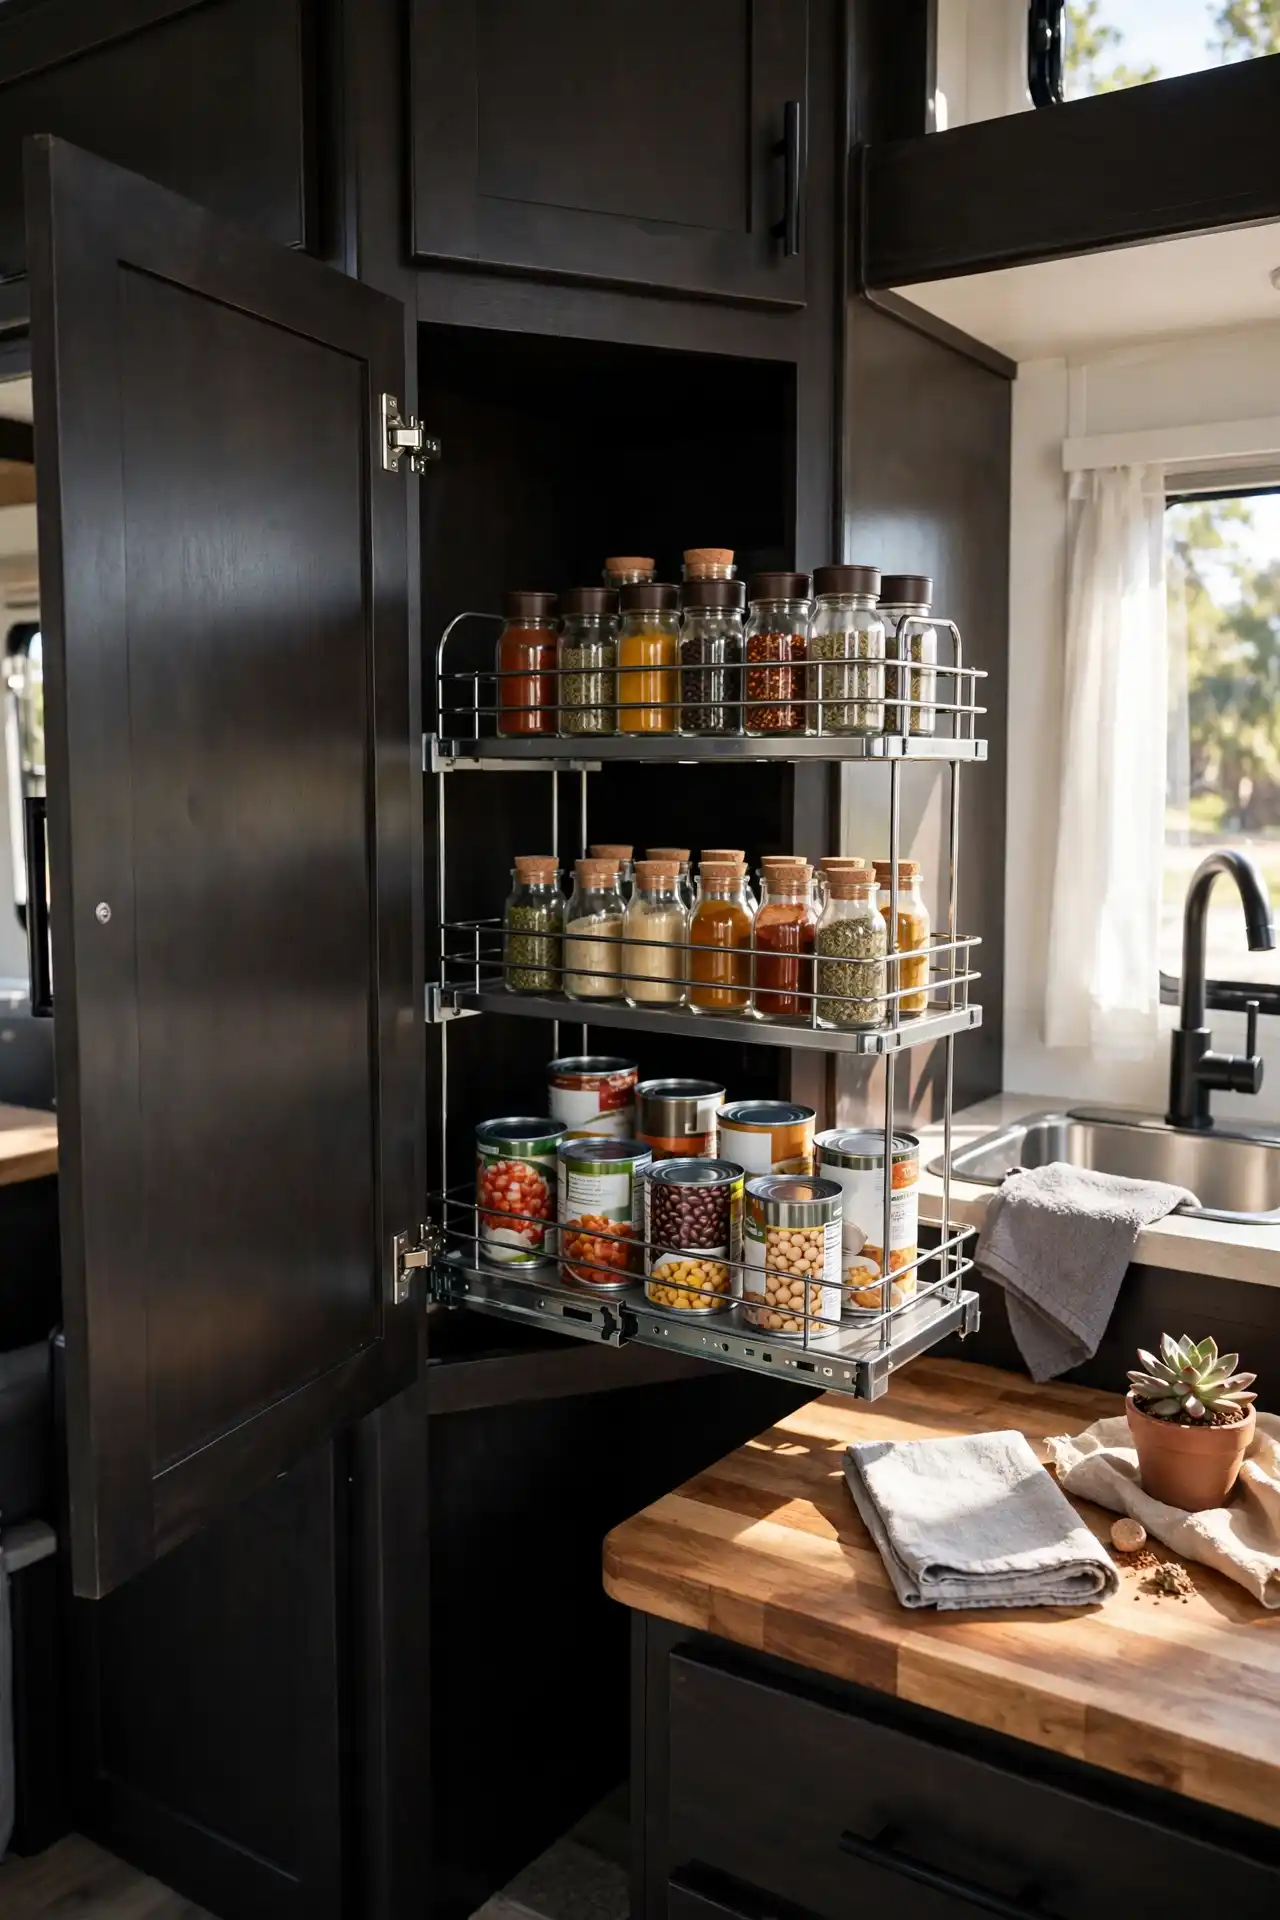
A single narrow cabinet holds an entire pull-out spice and pantry rack here, three wire tiers stacked on one set of rails that swing the whole thing out toward the counter.
Everything from spice jars to canned beans gets its own tier instead of piling into one deep, dark shelf where the back row never gets touched.
This kind of rack works especially well in a narrow galley cabinet where a normal shelf would waste depth trying to fit one deep static shelf instead.
The wire construction also means less weight added to the door hinges compared to solid wood shelving, so it holds up better over years of pulling it in and out.
Look for rails rated for a fully loaded weight, since three tiers of glass jars and canned goods adds up fast.
16. Corral Loose Bathroom and Kitchen Items in Woven Baskets
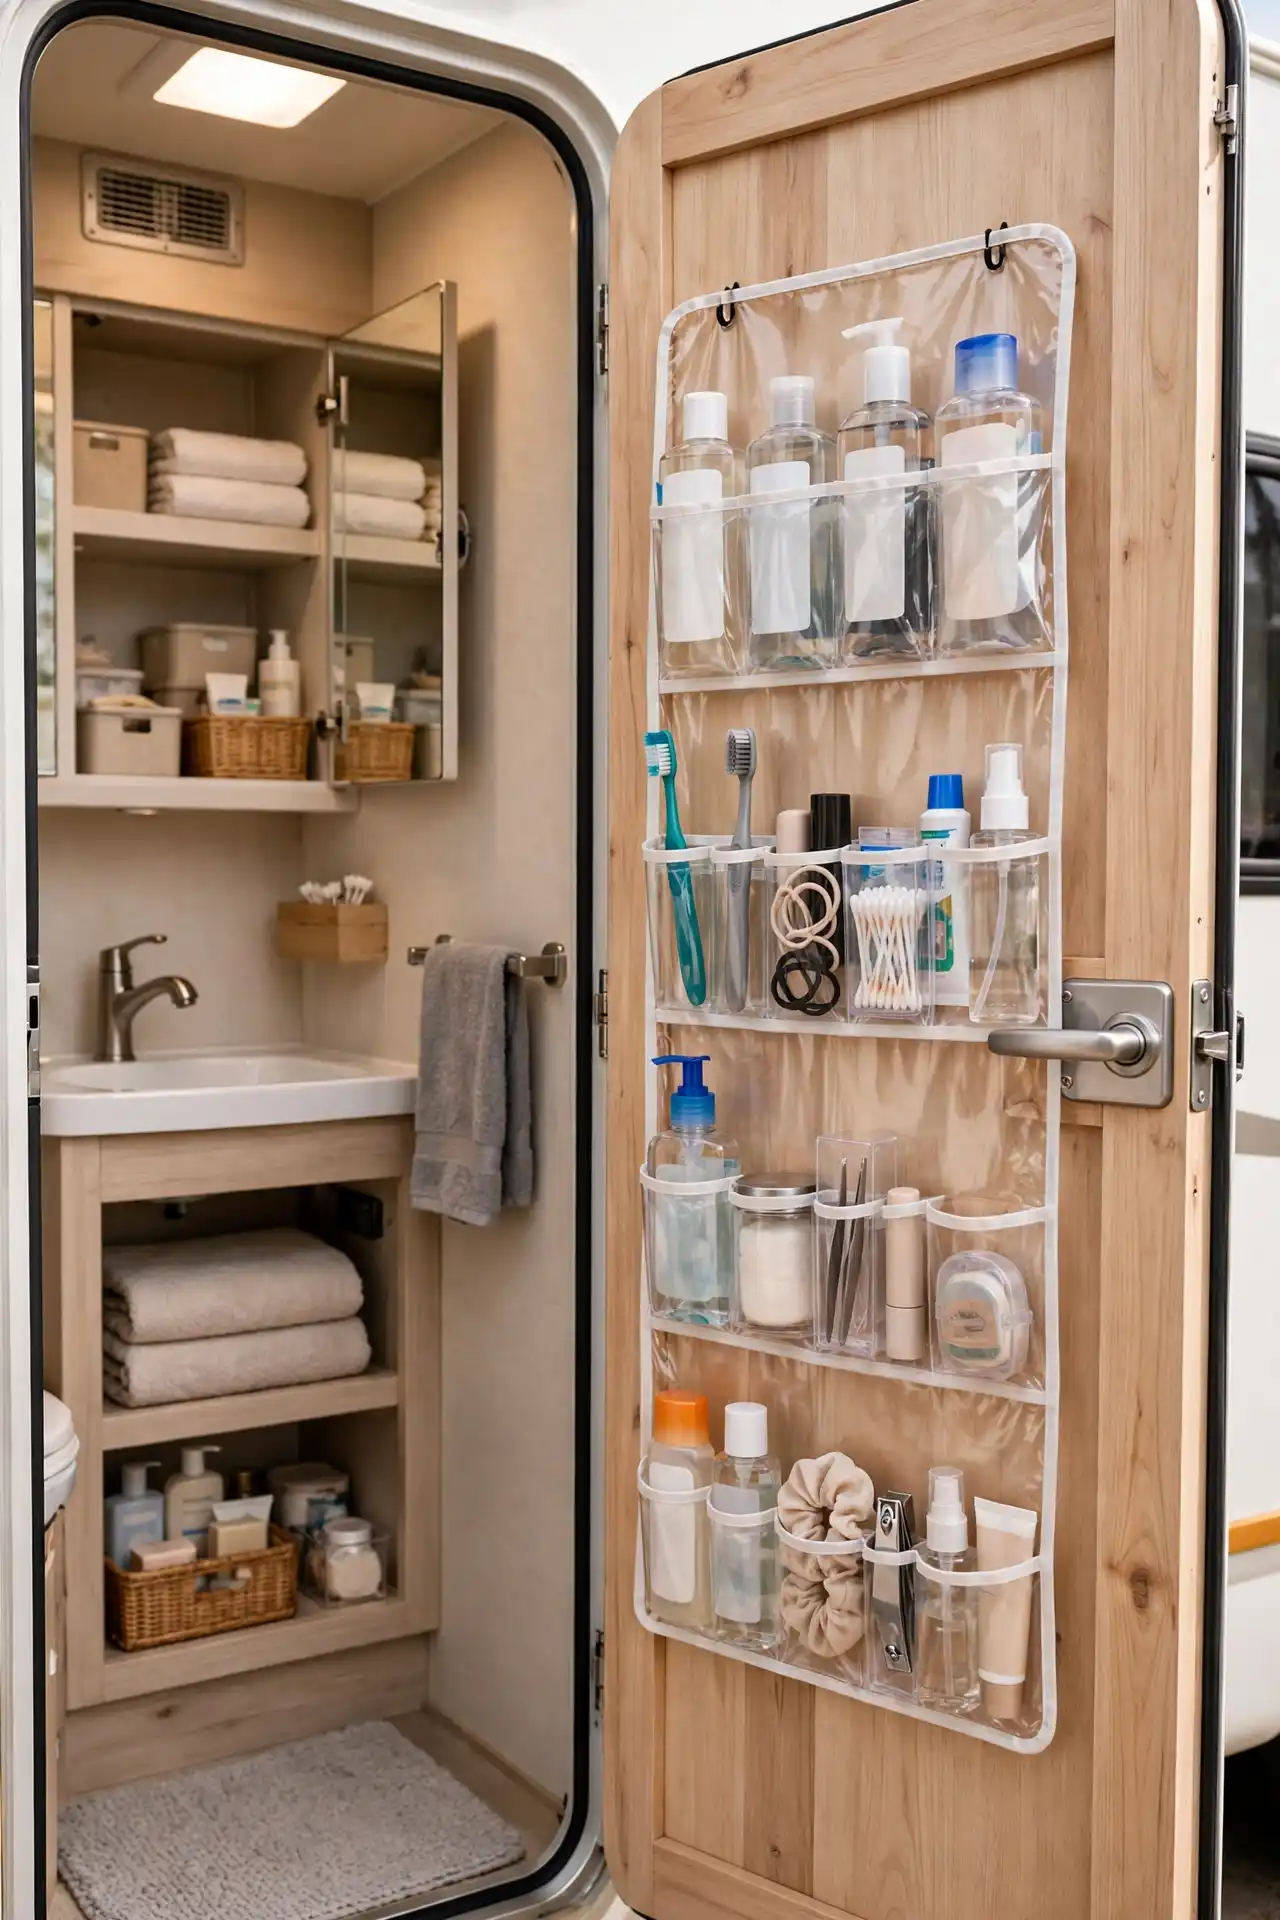
Open shelving looks great until it turns into a jumble of boxes and bottles nobody wants to dig through.
This cabinet solves it by grouping small loose items into a couple of wicker baskets instead of setting everything directly on the shelf, so pulling out one basket gets you everything in that category at once.
The same fix works in a camper kitchen for anything that tends to roll around loose, tea bags, sauce packets, spare batteries.
A basket with a handle beats a bin without one, since you can lift the whole thing out to the counter instead of reaching deep into a cabinet.
Loose bottles and small items set directly on an open shelf, tipping over with every turn.
One woven basket per category, lifted out in a single grab, contents contained the whole drive.
17. Disguise a Spice Pantry Behind a Hinged Backsplash Panel
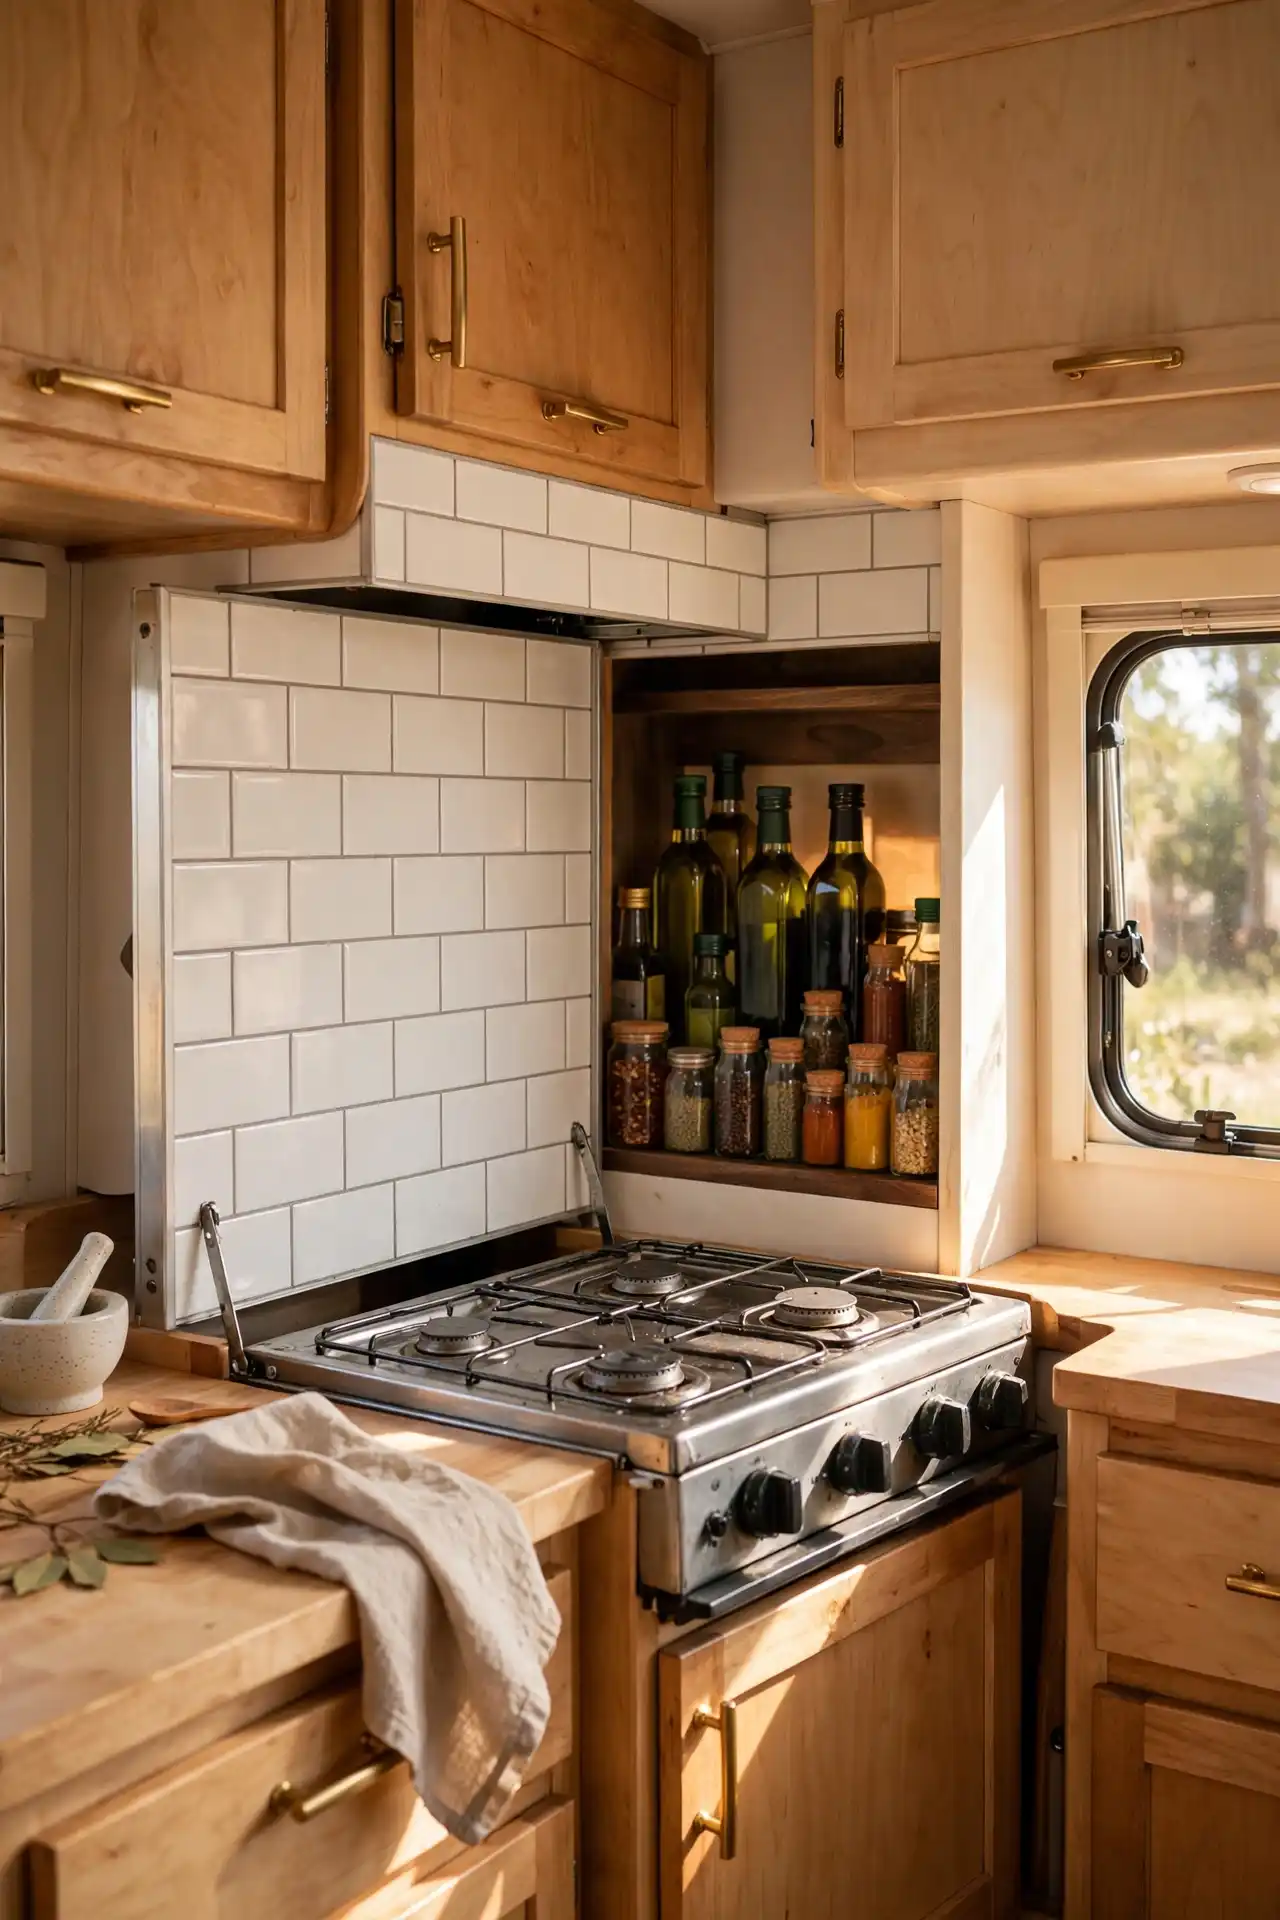
That subway tile backsplash above the stove is not fully fixed to the wall. It swings open on hinges to reveal a deep shelf built right into the wall cavity, holding oil bottles, sauces, and spice jars exactly where you cook, with zero counter space lost to a rack or shelf.
Bottles right next to the stove means no reaching across the galley mid recipe, and closed, the panel looks like a normal backsplash with no clue there is anything behind it.
This is one of the more involved builds on this list since it means cutting into the wall structure, so it makes the most sense if you are already gutting the kitchen wall for other upgrades rather than retrofitting a finished space.
The payoff is a pantry that costs zero counter or cabinet space anywhere else in the galley.