17 Studio Apartment Kitchen Storage Ideas

Open one cabinet and you find plates. Try the other, and a frying pan slides out onto your foot. If that sounds familiar, you’re cooking in a studio kitchen with only two cabinets, and the counter is already losing the fight.
Here’s what most tiny kitchens forget: storage doesn’t have to live behind a door. Walls can hold pans. The sink door can hold foil. A narrow gap beside the fridge can hold every spoon you own.
These 17 setups found room where nobody thought to look. Steal one idea, or stack five of them until your counter is clear again.
How to Find More Storage When You Only Have Two Cabinets
Two cabinets hold less than you think, so stop asking them to do everything. Give them only the things that truly need a door, and send the rest up the wall, onto open shelves, or onto wheels.
- Reserve the doors: keep dishes, dry food, and anything that gathers dust behind the cabinets you have.
- Go vertical: rails, hooks, and floating shelves turn bare wall into storage that costs no floor space.
- Use the forgotten gaps: the fridge side, cabinet tops, and the strip beside an appliance all fit slim storage.
- Add one freestanding piece: a hutch, cart, or shelf tower works like a third cabinet you can take when you move.
- Protect the counter: lift the microwave and small appliances off your work surface whenever you can.
1. Mug Rail and Tiered Canister Rack on the Backsplash
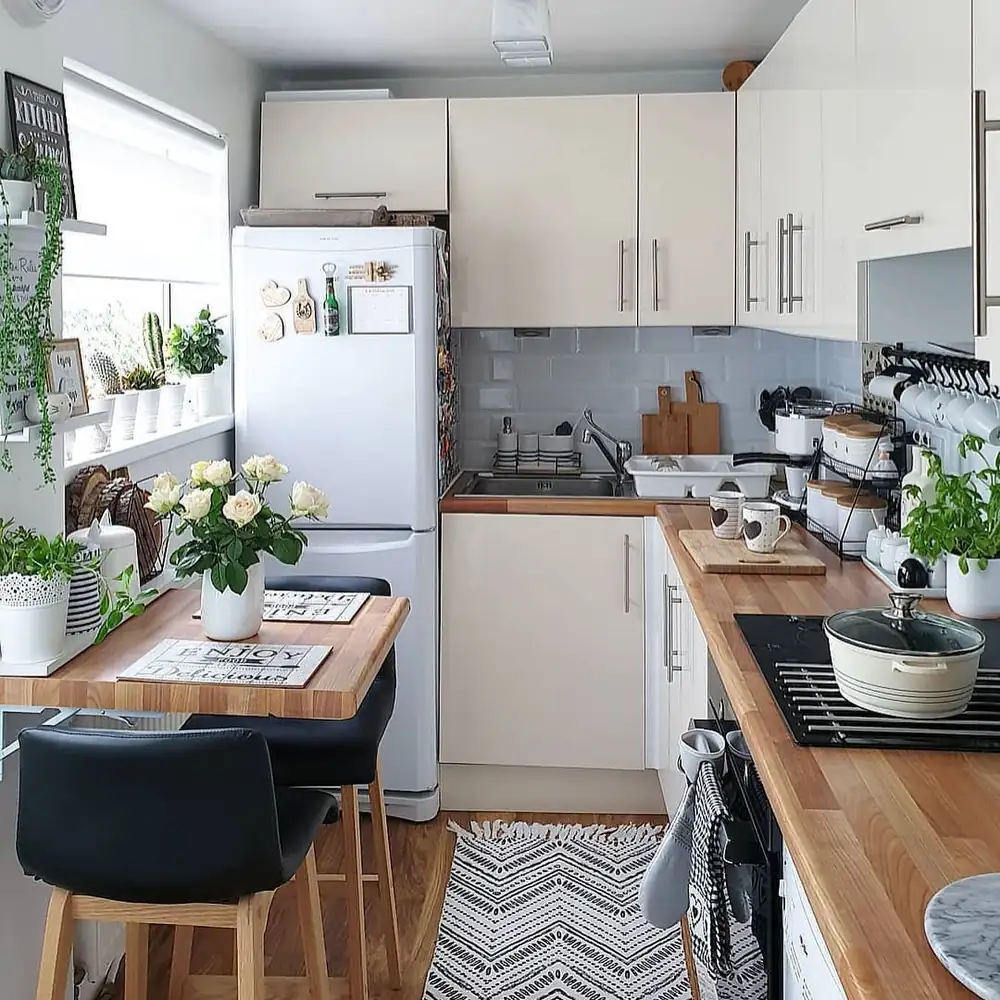
Look past the cream gloss cabinets in this galley kitchen and notice where the daily items live. A black hook rail carries a row of white mugs above the butcher block counter. Right beside it, a black wire rack stacks white canisters with wooden lids in neat tiers. For a studio kitchen with only two cabinets, that pairing frees more shelf space than any organizer you could put inside them.
Why it works:
- Mugs leave the cabinet: hanging cups free a full shelf for plates and bowls.
- Tiers double the surface: the wire rack stacks canisters instead of spreading them out.
- Open wire stays light: thin black wire never hides the gray blue subway tile.
Small kitchen tip: Hang the rail high enough that the mugs clear the canisters below. Keep both near the kettle so tea and coffee get made without opening a single door.
2. Pallet Wood Shelf in the Gap Beside the Fridge
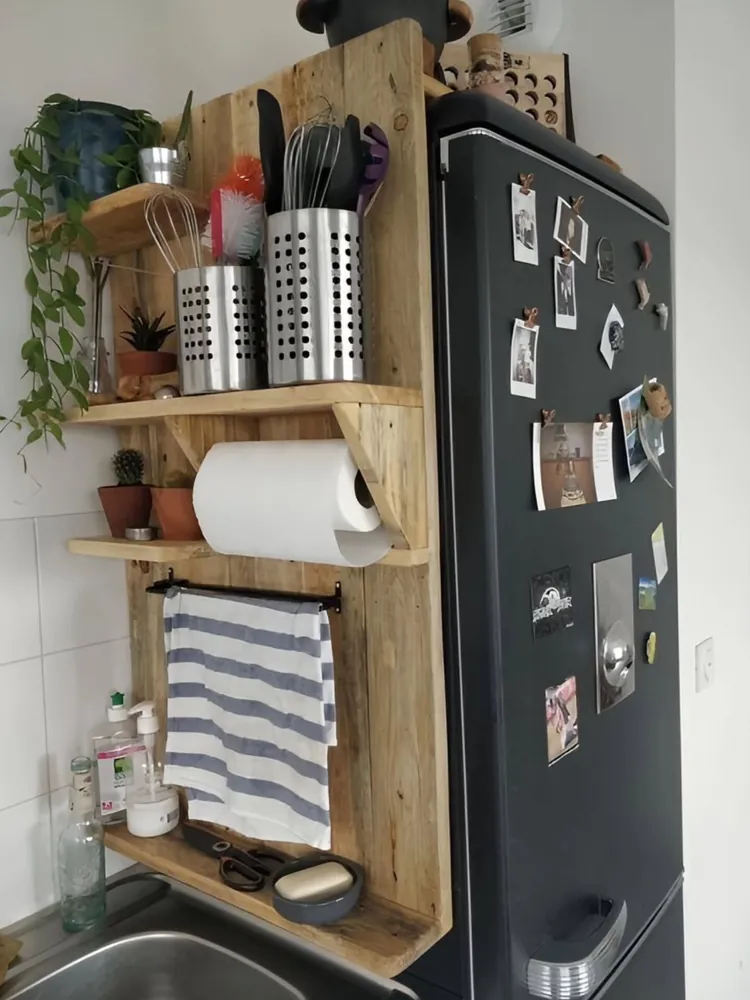
- Materials: what looks like reclaimed pallet boards, a paper towel dowel, and a slim black towel bar.
- Make: a tall wooden backboard with short shelves resting on simple angled braces.
- Finish: the wood appears raw or lightly oiled, so its knots and grain still show.
- Display: perforated steel caddies for whisks and spatulas, plus cacti in terracotta pots.
Narrow gaps like this usually collect clutter, yet this one carries almost a cabinet’s load. Utensils stand in two steel caddies at eye level, and a striped blue tea towel dries on the bar below. Soap, scissors, and a soap dish line the bottom ledge right beside the sink. Build details aren’t fully visible, so treat the list above as a suggested approach.
Food safe note: Spoons and whisks touch food, so seal any homemade wood shelf with a food safe oil or finish. Sand rough pallet edges well before you mount anything.
3. Glass Front Pantry Hutch With an Appliance Nook
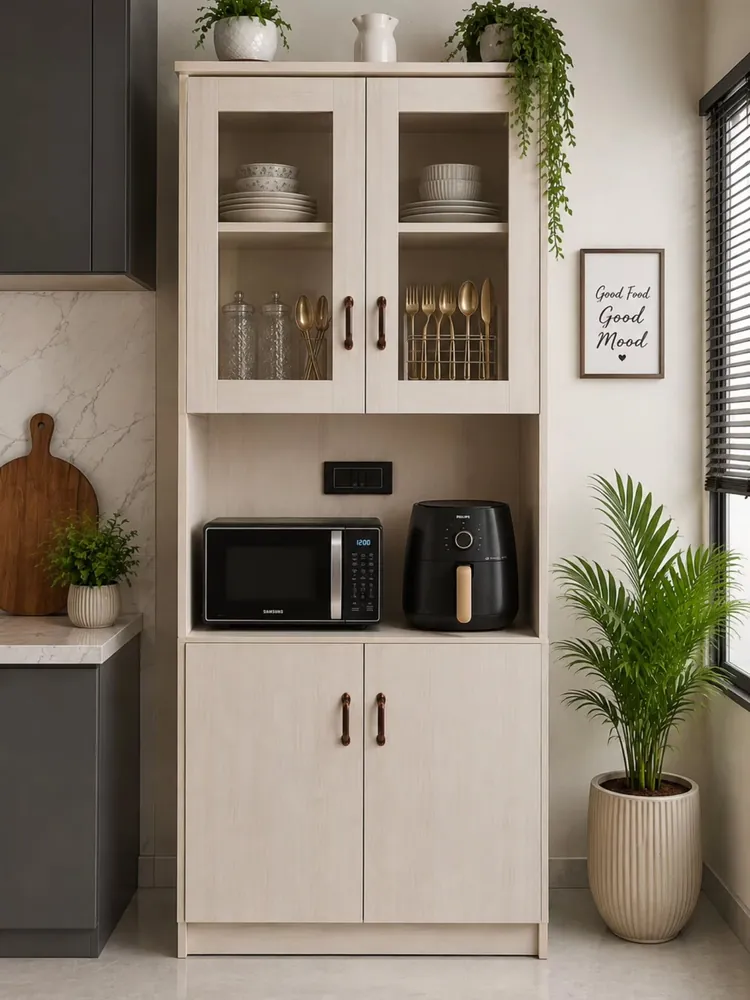
Best for: studio kitchens with one free wall and no room for a third built in cabinet.
Freestanding pieces like this pale wood hutch act as the cabinet your kitchen never got. Glass doors up top show stacked white bowls and plates, two glass jars, and gold flatware standing in wire caddies. Behind the lower doors, there’s room for pots or bulk food you’d rather hide.
Its middle opening holds a microwave and a black air fryer beside a wall outlet. Putting both appliances here keeps the main counter open for chopping and plating. Bronze toned pulls and a trailing plant on top keep the tall unit from feeling heavy.
Budget swap: A plain bookcase with doors on the bottom half can copy this layout for less. Measure the open nook against your tallest appliance before you buy.
4. Gray Pantry Tower With Pull Out Drawers
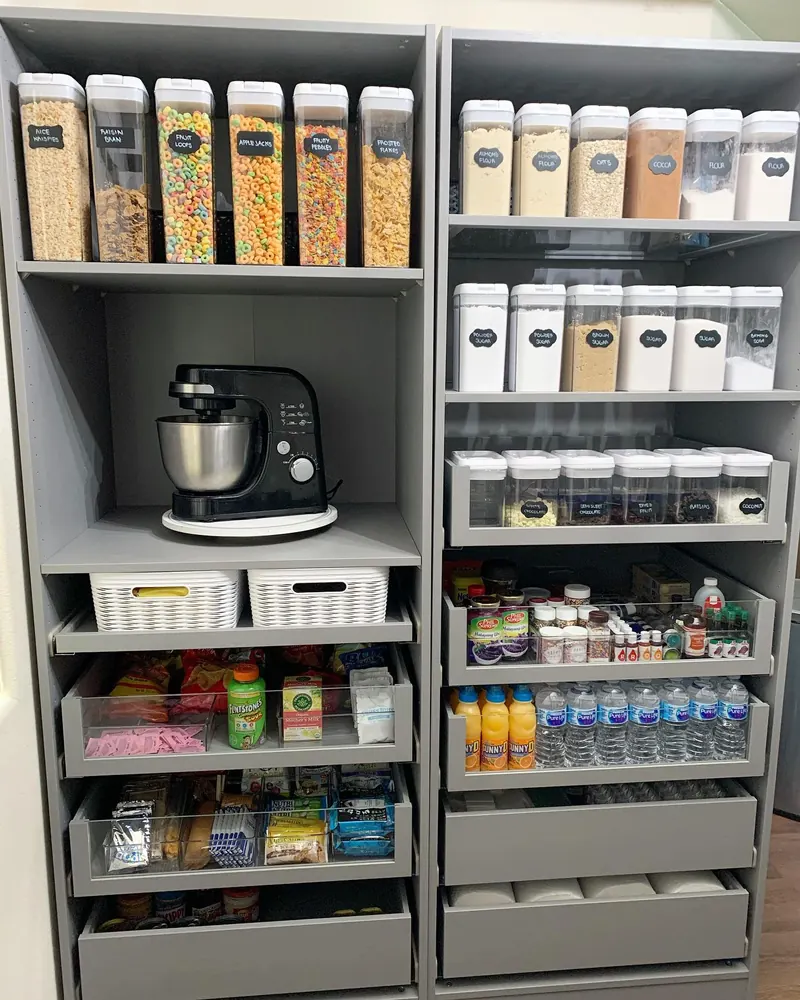
- Zone: cereal on top, baking staples on the right, snacks and drinks in the low drawers.
- Containers: clear canisters with white flip lids, plus two white woven baskets.
- Labels: black chalkboard tags name each item, from oats and cocoa to sugar and flour.
- Upkeep: shallow drawers with clear fronts show what’s running low at a glance.
Two tall gray units here do the job of a walk in pantry. A black stand mixer sits on a white turntable in an open cubby, so it spins forward for use and back for storage. Pull out drawers below hold bottled water, orange drinks, spices, and snack packs where nothing gets lost in the back.
Kid friendly: Keep snacks in the lowest drawers, like this setup does, so kids can help themselves. Heavier flour and sugar stay higher, out of small hands’ reach.
5. Open Cubby Shelves Between the Upper Cabinets
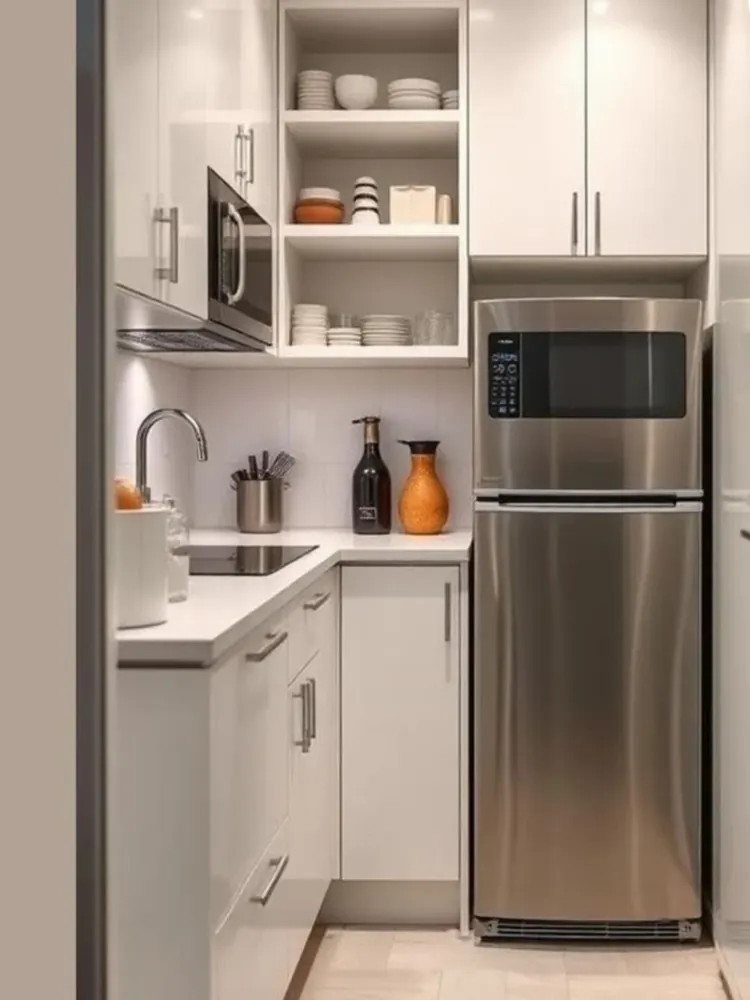
Breaking up a wall of white gloss doors with one open column makes this narrow kitchen feel wider. Stacked plates, white bowls, and a terracotta colored bowl fill three open cubbies. Glasses sit on the lowest shelf, right above the counter where they get filled.
Over the glass cooktop, a microwave mounts under the left cabinet instead of eating counter space. That single move leaves room for a steel utensil crock, a dark glass bottle, and an amber vase near the sink.
Open cubbies only stay calm when everything on them matches, so keep dishes to one or two colors. Wipe the shelves weekly, since open storage near a stove gathers grease faster than closed doors. Anything mismatched can live in the cabinet beside it.
6. All in One Kitchenette Unit With Two Wall Cabinets
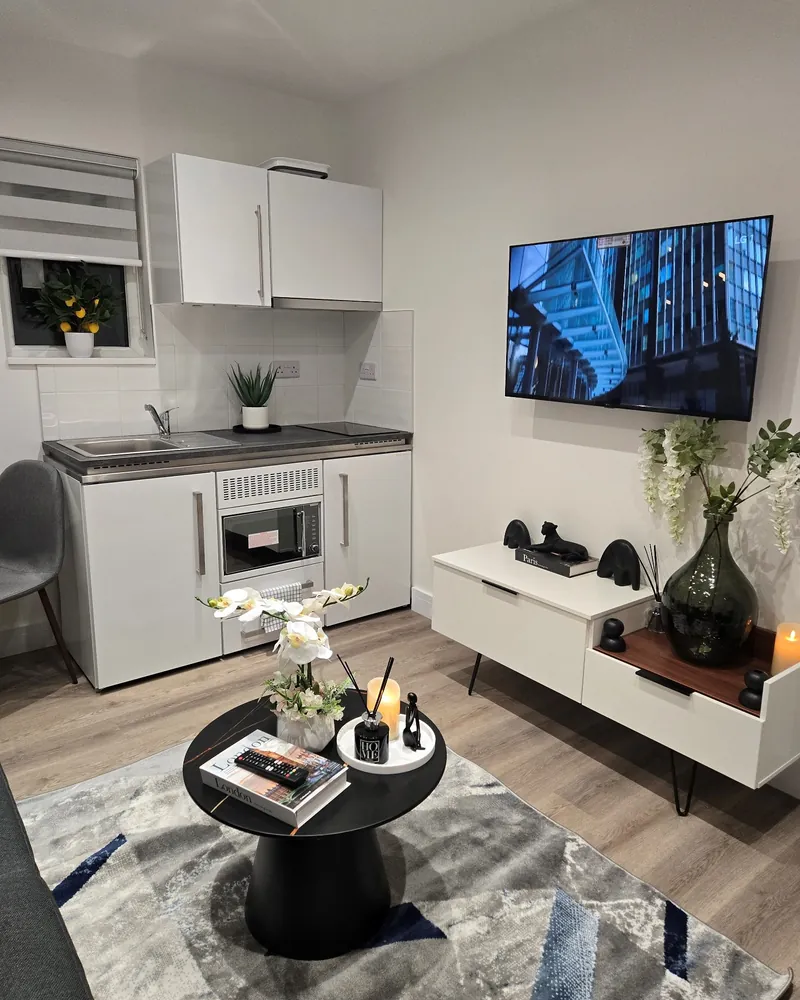
Best for: open plan studios where the kitchen shares a wall with the living room.
Here’s a true kitchen with only two cabinets above the counter, and it still reads calm. White wall units hang over a compact run with a steel sink, a small ceramic cooktop, and a built in microwave above what looks like a small oven. Lower doors on each side hold the rest.
Matching the kitchenette to the white media console across the room makes both read as one set of furniture. A flat white box sits on top of a wall cabinet, a smart spot for spare paper goods. The counter holds only a small potted plant, so prep space stays clear.
One small change: Add a lidded box to the top of the second cabinet too. Both tops together give you a hidden shelf nobody notices from the sofa.
7. White Kitchen Hutch With Hooks and a Lit Work Nook
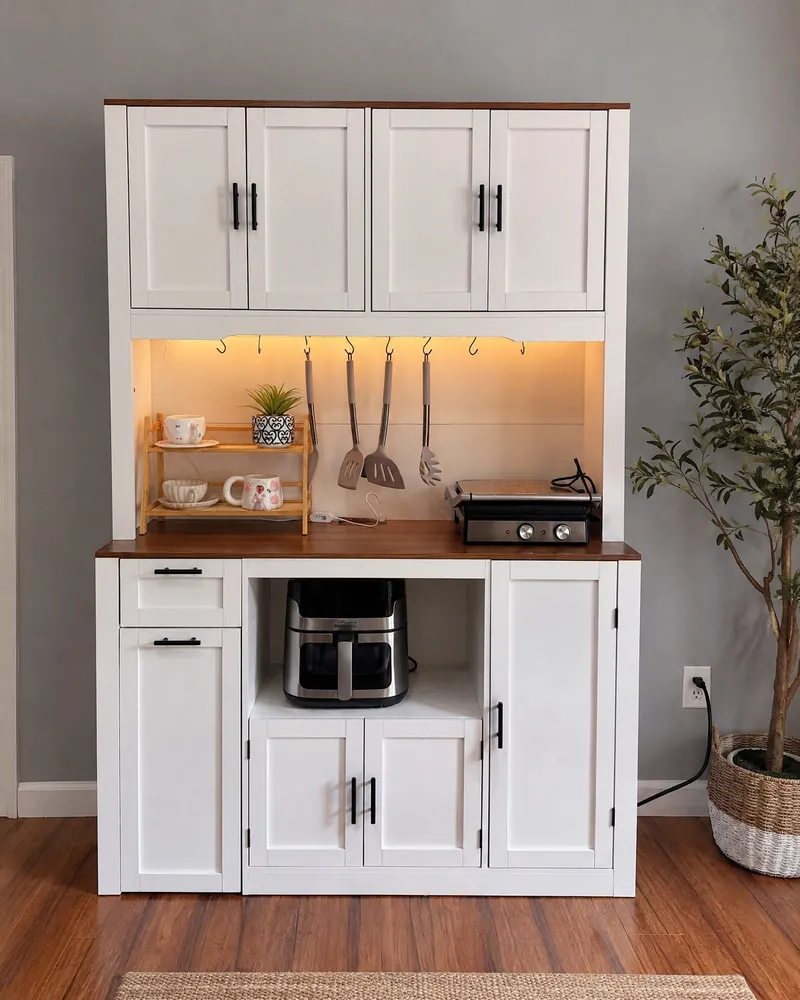
Shaker doors, a walnut toned top, and black bar pulls make this white hutch look built in, yet it stands free against a gray wall. Four upper doors and several lower ones add real closed storage. Between them, a warm lit nook holds a contact grill, a bamboo rack of teacups, and gray utensils hanging from hooks. The open cubby below parks an air fryer off the counter.
Lighting note: What looks like an LED strip under the upper cabinets turns the nook into a bright prep zone. Plug in strips work for renters who can’t hardwire anything.
Grouping tip: Keep hanging tools in one color, the way these gray spatulas and servers match. Mixed colors in a single row look messy fast.
Safety note: Unplug the grill after cooking and let it cool before stacking anything near it. Route cords behind the hutch rather than across the counter.
8. Hutch Beside the Range With a Low Microwave Cubby
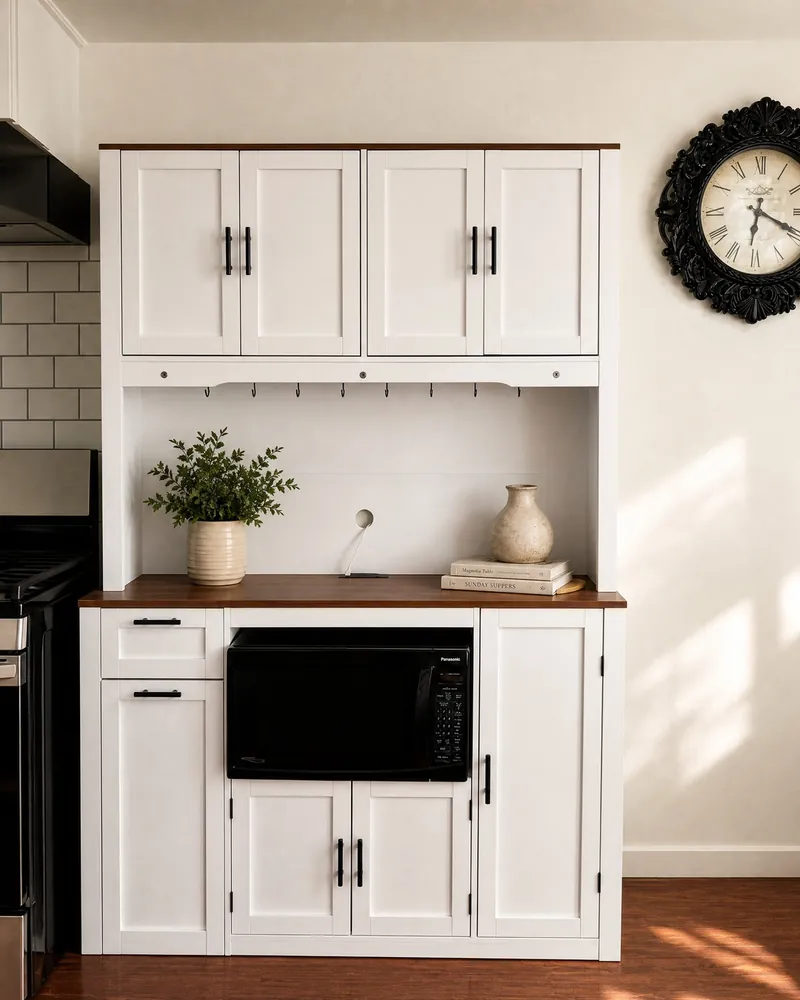
You’ll need: a freestanding hutch with an open base cubby, a microwave, and a few cookbooks.
Setting this hutch right next to a black range gives the stove the side counter it was missing. Plates come off the burner and get filled on the walnut toned top. Four shaker doors above swallow the dinnerware a two cabinet kitchen usually can’t fit.
Down low, a black microwave fills the open base cubby. Keeping it at that height frees the work surface for a potted plant, a cream vase, and two cookbooks. Small doors beneath the microwave suit baking sheets and lids stored on their sides.
Placement tip: Leave a little breathing room between the hutch and the stove so heat and grease don’t build up on its side panel. Check your microwave’s manual for the vent clearance it needs inside a cubby.
9. Wooden Kitchen Cart Under Floating Shelves
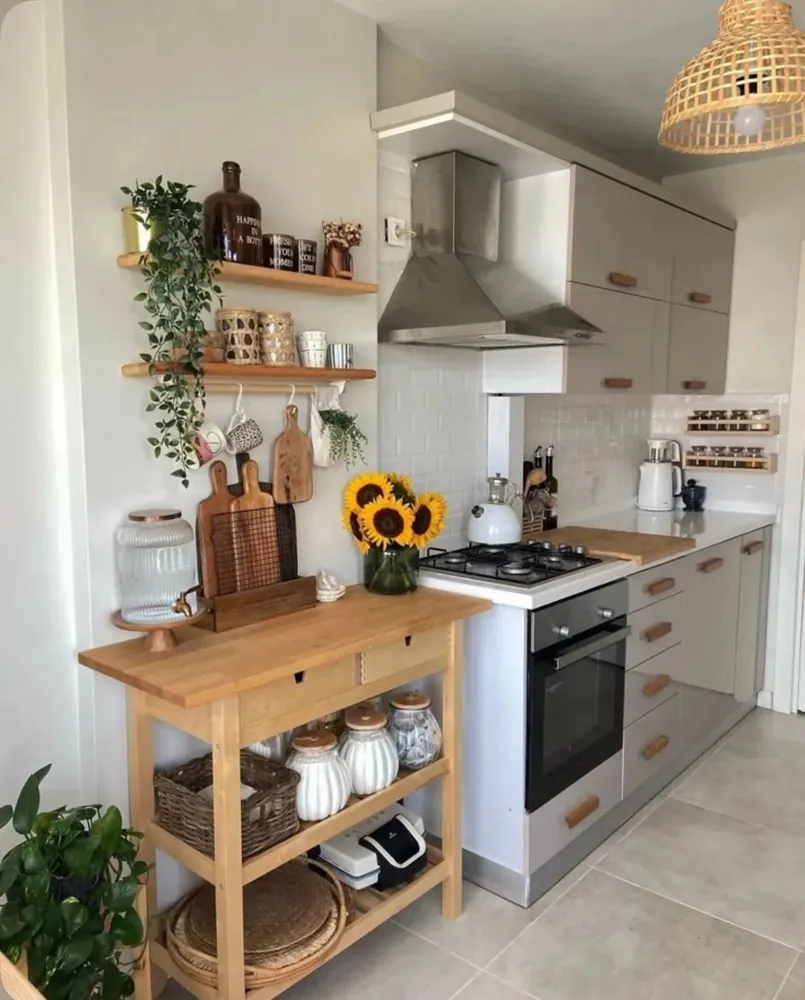
Instead of squeezing more into the gray cabinets, this kitchen adds a natural wood cart along the side wall. Its top holds a glass drink dispenser, cutting boards in a wooden stand, and a vase of sunflowers. Underneath, ribbed white jars with wood lids, a wicker basket, and round rattan placemats fill two open shelves.
Above the cart, two floating shelves carry a brown glass bottle, canisters, and mugs. Cups and wooden boards hang from small hooks under the lower shelf, keeping them in reach without crowding the cart.
Tiny wall ledges by the hood hold rows of spice jars, which frees a cabinet shelf for bigger things. Copy that idea even if you skip the cart. Wood tones repeated from shelves to cart to door handles make the whole corner feel planned.
10. Under Sink Door Rods for Wraps and Rolls
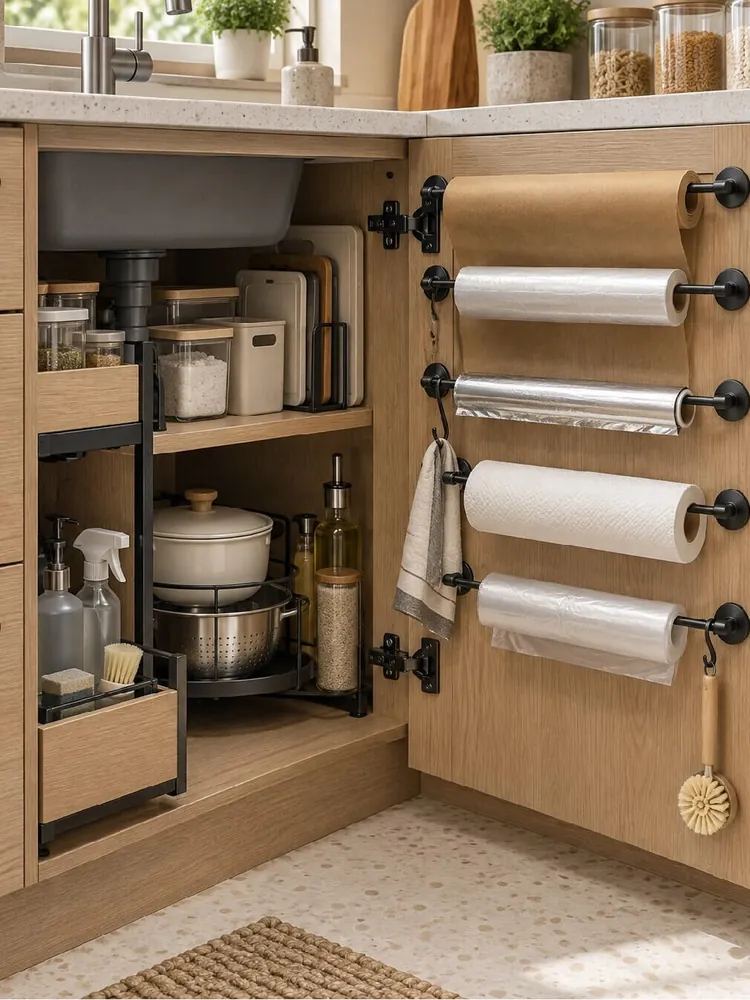
Most people never use the inside of the sink cabinet door. Here it holds five black rods carrying brown paper, plastic wrap, foil, paper towels, and bags, with hooks for a towel and a dish brush. Inside the cabinet, a two tier pull out rack keeps cleaners handy, and a round wire rack lifts a white pot over a steel colander.
Why it works:
- Rolls pull straight off: no more digging through boxes for the foil or the wrap.
- Tiers slide forward: soap, spray, and brushes come out instead of hiding behind pipes.
- Boards stand upright: grabbing one cutting board disturbs nothing else on the shelf.
Cleaning tip: Line the cabinet floor with a washable mat before loading it, since sink pipes can drip. Check under there whenever you refill the soap or spray.
11. Lidded Bins on Top of the Cabinets and a Metal Shelf Wall
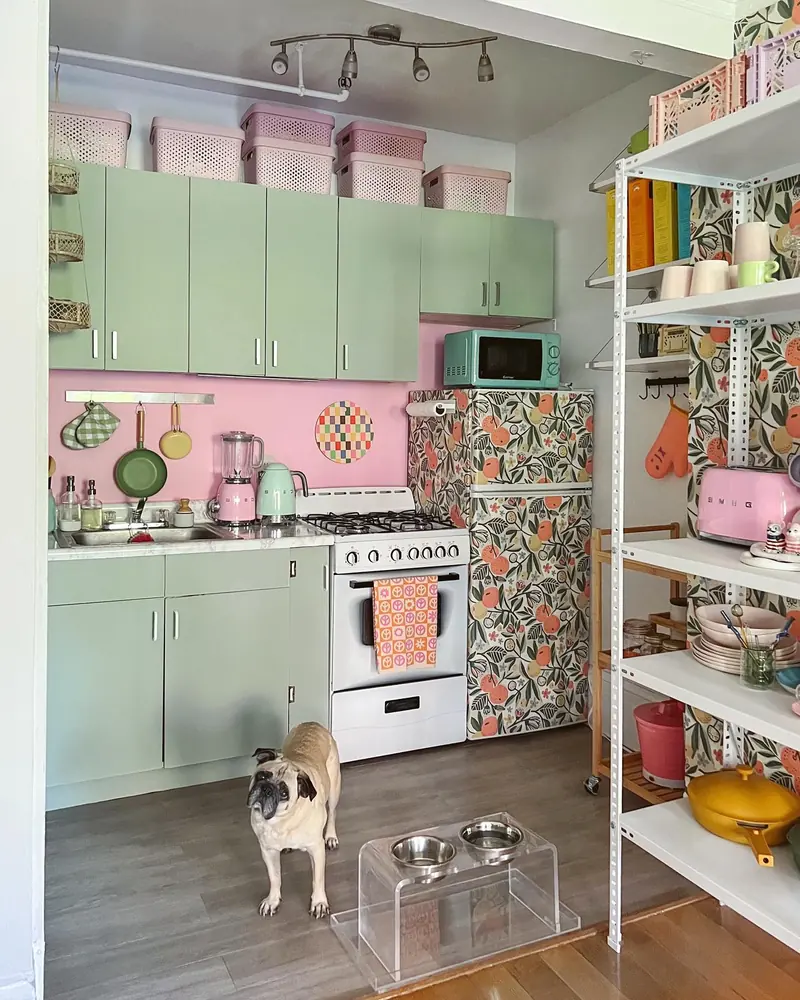
Color does a lot of the work in this cheerful studio kitchen. Pink lidded bins line the tops of the mint green cabinets, filling space most people leave empty. A white metal shelving unit across from the stove carries mugs, plates, a pink toaster, and a yellow lidded pot. Even the fridge pulls its weight, with a mint microwave on top and a paper towel roll on its side.
Color note: Matching the bins to the pink wall makes the top row look like decor instead of overflow. Pick one color for every bin up there.
Storage tip: Save high bins for things you use a few times a year, like holiday dishes or backup sponges. Daily items belong on the open shelves.
Scale note: Under the cabinets, a rail holds a green pan, a small yellow pan, and an oven mitt. Hanging only a few pieces keeps the pink backsplash visible.
12. Corner Shelf Wall With Hanging Pans by a Bistro Table
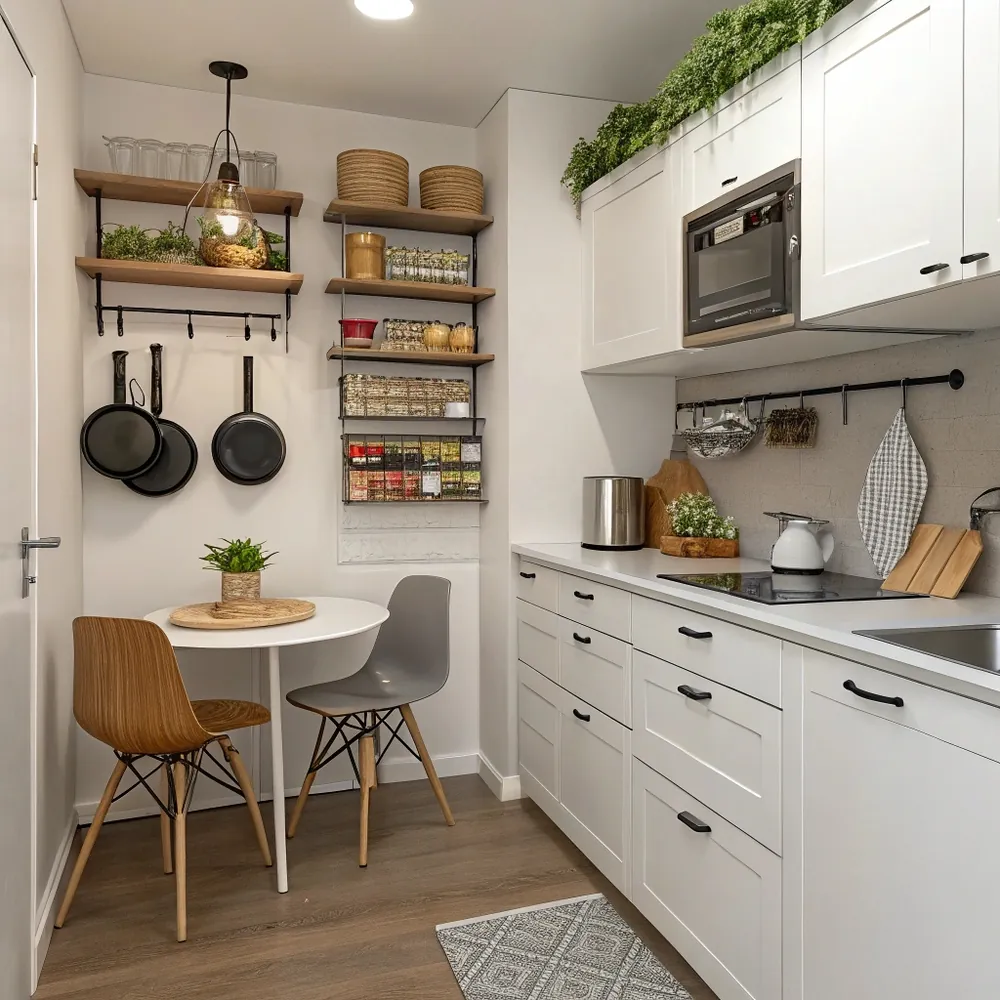
You’ll need: wood shelves on black brackets, a hook bar, wall hooks for pans, and a few woven baskets.
Skillets usually hog a whole cabinet. In this corner, three black pans hang flat on the wall below a pair of wood shelves with a hook bar. A separate column of shelves stacks woven baskets, glass jars, and wire racks of packets beside the bistro table.
Across the room, white shaker cabinets with black pulls hold a built in microwave up high. Over the backsplash, a black rail carries hanging wire baskets and a checked towel. Greenery along the cabinet tops softens all that white.
Make it easier: Hang pans by size, largest in the center, so each one lifts off without knocking the others. Leave enough wall below them for chair backs to clear.
13. Slim Rolling Cart and Open Cubbies Around the Washer
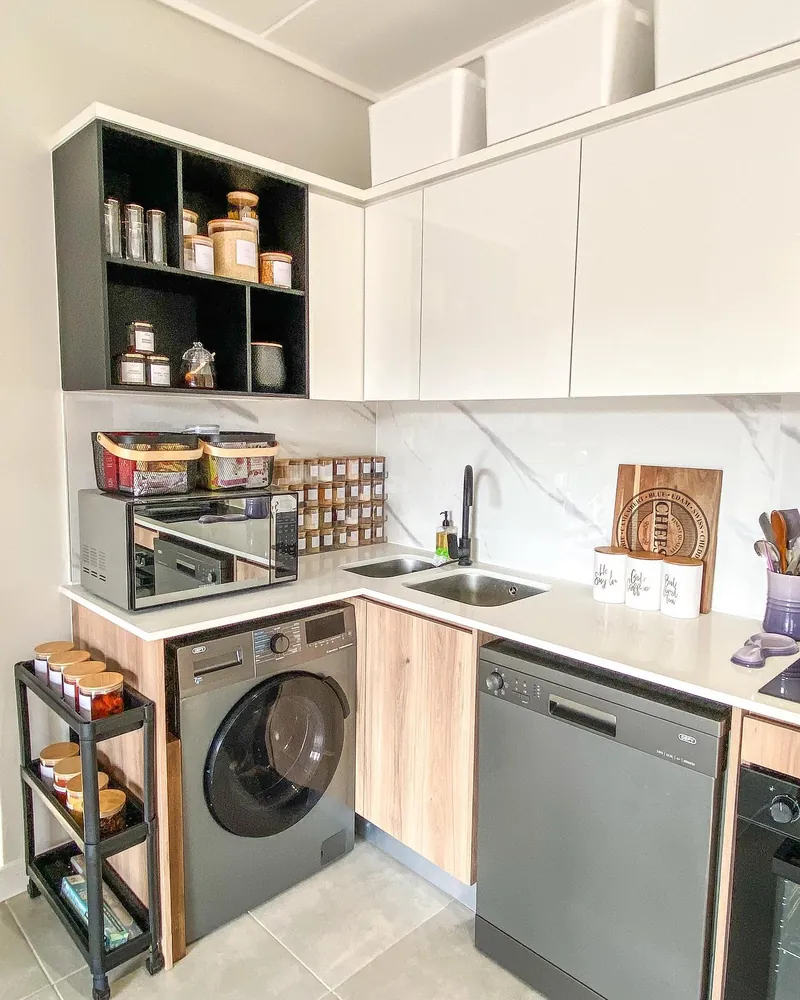
Best for: compact kitchens where the laundry machine lives under the counter.
Every inch counts in this corner. A slim black cart on wheels slides into the gap beside the washer, holding wood lidded jars on its upper tiers. Above the counter, a black open cubby unit carries glass jars with wooden lids next to the flat white upper doors.
Two wire baskets ride on top of the microwave, and a grid of small spice jars stacks beside them. White lidded boxes sit up on the wall cabinets as well. Together, those spots add up to roughly another cabinet’s worth of space.
Try instead: No washer gap? Park a cart like this at the end of the counter or beside the fridge. Keep the heaviest jars on the bottom tier so it rolls steady.
14. Banquette Seating With Drawers Built Underneath
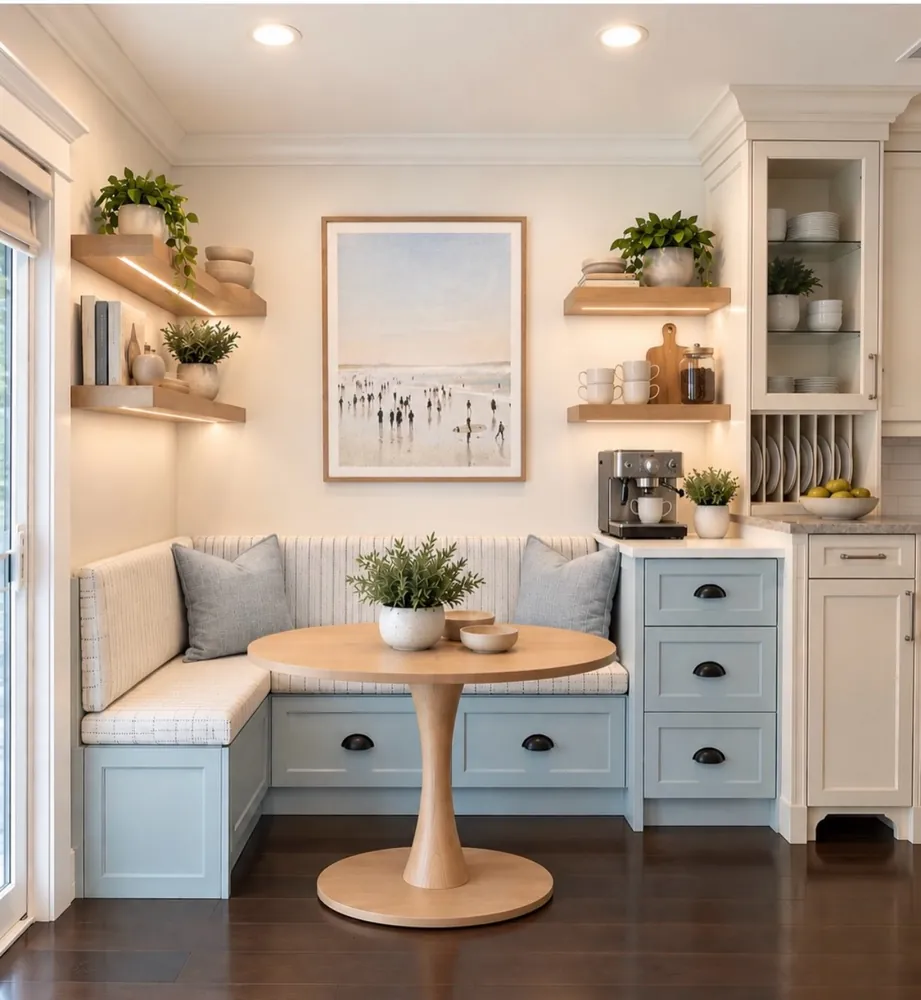
Seating can hide storage too, and this pale blue banquette proves it. Deep drawers with black cup pulls run under the bench, while a matching drawer stack sits beside it under the espresso machine. Linens, placemats, and the bulky gear that crowds a tiny kitchen with just two cabinets fit easily down there.
Floating wood shelves on both walls glow from small lights underneath. They hold plants, bowls, books, white mugs, a cutting board, and a jar. Nearby, a glass front cabinet shows stacked plates over a slotted plate rack.
Round pedestal tables like this light wood one let people slide in from any side of the bench. Choose a wipeable cushion fabric, since a nook this close to the coffee station sees spills. Pillows in soft gray tie the bench to the shelf decor.
15. White Bakers Rack Coffee and Appliance Tower
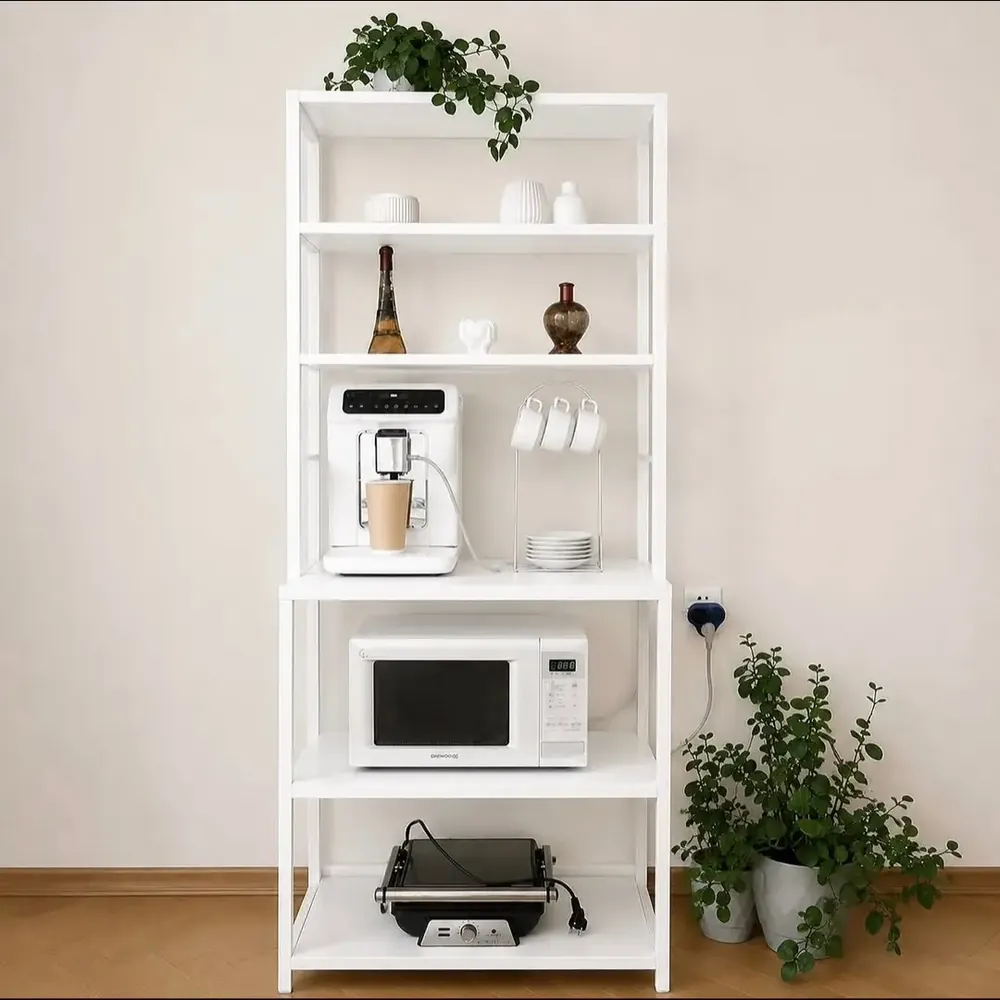
- Base: white metal rack with open shelves, standing right beside a wall outlet.
- Layer: microwave at waist height and a contact grill on the lowest shelf.
- Accent: a coffee machine on the shelf above, next to a stand of white cups and saucers.
- Finishing touch: small vases, a ceramic heart, and a trailing plant up top.
Stacking appliances up instead of out saves this kitchen a whole stretch of counter. Everything plugs into the one outlet beside the rack, so cords stay short and tidy. White on white keeps the tower calm against the pale wall, even with three machines on it.
Counter space tip: Put the appliance you use daily at the easiest height to reach. Occasional items like the grill can sit lower, where bending now and then is fine.
16. Rustic Wood and Black Metal Shelf Tower
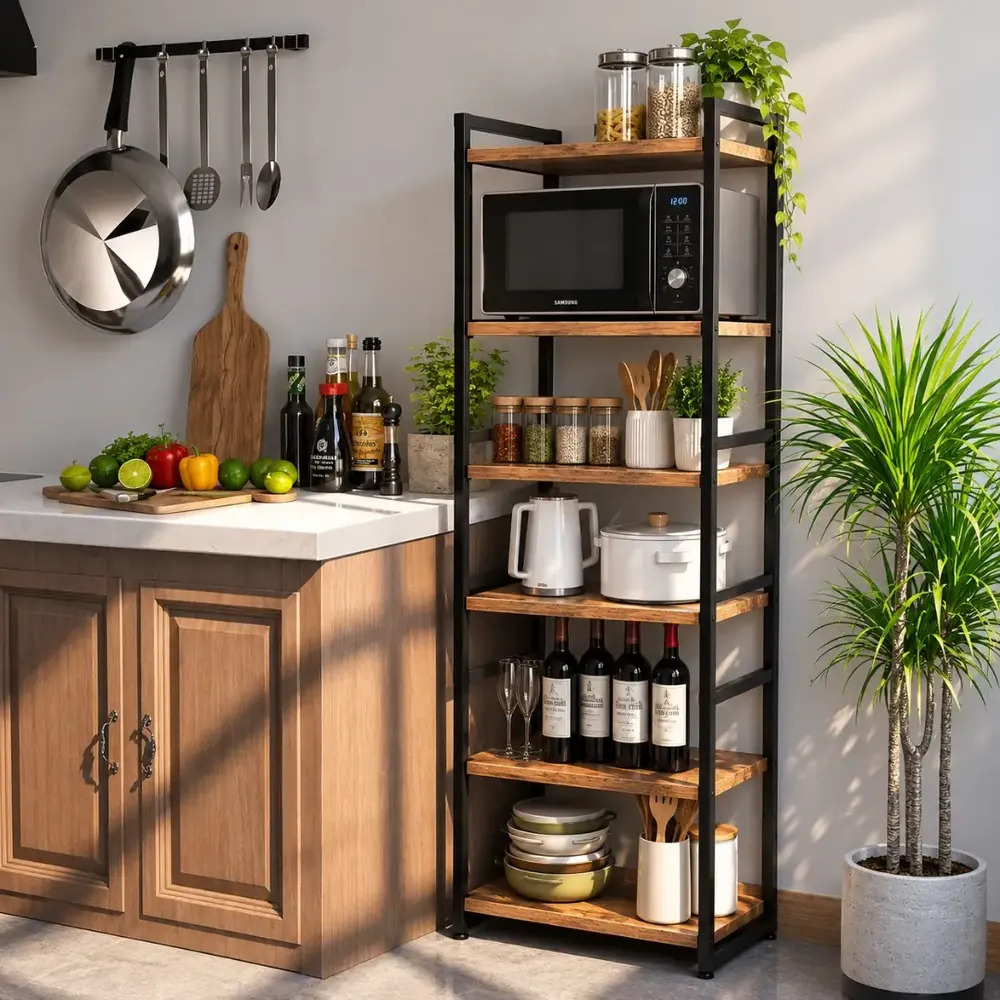
Warm wood shelves on a black metal frame give this tall tower a rustic look that suits a cozy studio. Glass canisters of pasta and what looks like dried beans sit on top, a black microwave fills the shelf below, and spice jars line up beside a crock of wooden spoons. Further down are a white kettle, a white lidded pot, wine bottles with two glasses, and stacked mixing bowls.
Weight tip: Stack the heaviest bowls and pots on the bottom shelf, like this tower does, so it stays steady. Anchor any tall unit to the wall if it wobbles.
Steam note: Leave headroom above the kettle so steam doesn’t hit the wood shelf right over it. Wipe off moisture quickly to protect the finish.
Skip this: Avoid filling every shelf edge to edge. A little open space on each level, like the gaps here, keeps a tall tower from looking crowded.
17. Microwave Niche Under Two Tall Wall Cabinets
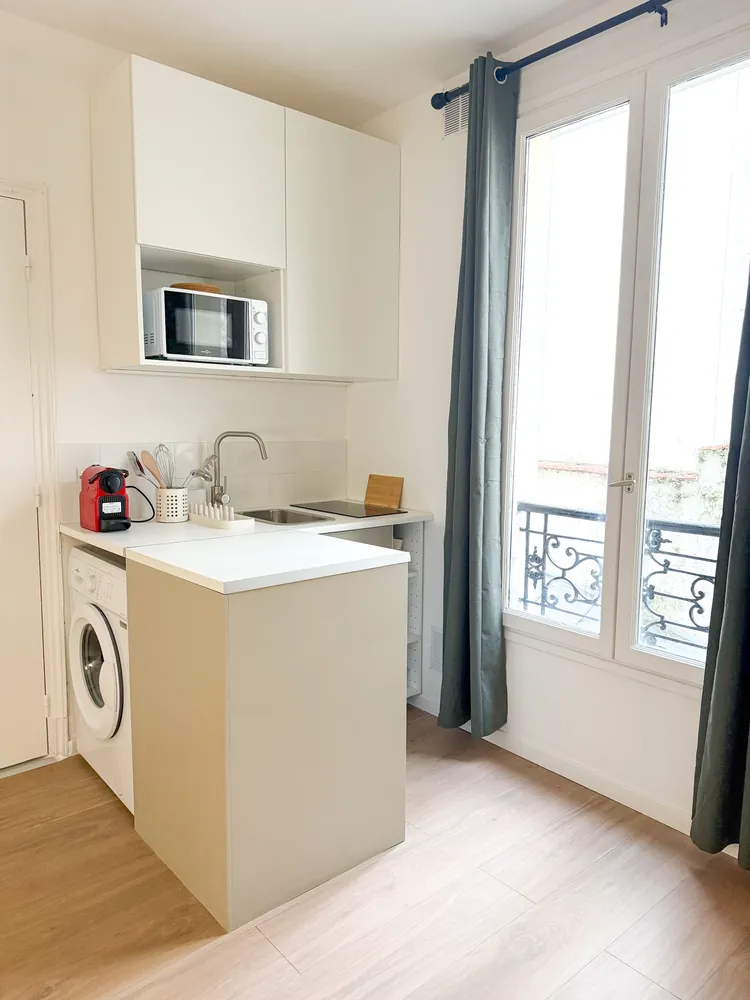
You’ll need: a pair of tall wall cabinets with an open bay below, a narrow side shelf, and a slim utensil cup.
Proof that two cabinets can be enough sits in this bright studio with tall windows. White upper doors stretch close to the ceiling, and an open niche at their base holds a microwave off the counter. Below, a washer tucks under the worktop beside a small sink and cooktop.
Short counters mean every tool earns its spot. A red capsule coffee machine, a white cup of whisks and wooden spoons, and a small dish rack are all that live on top. Tucked behind the beige end panel, a slim open shelf faces the window for extra odds and ends.
The detail to steal: Ask for upper cabinets that run tall, close to the ceiling. Two tall doors hold far more than two standard ones, and the top shelves suit things you rarely reach for.